

Introduction
Welcome back! Today we are tackling another Windows binary from crackmes.one. Unlike the previous binaries, this was compiled with C/C++ so we will not be able to use dnSpy or a similar tool to reverse this binary. There aren't any surprises in this binary just some tricky disassembly that I'll do my best to walk you through! If you want you can feel free to watch the YouTube video below or continue reading!
Optional Materials to Follow Along
I normally use my Windows VM to analyze Windows binaries but my Windows VM was acting a little funky so I used my Kali VM. Luckily we did not need to do any debugging to solve this challenge. If you're using a Kali VM you'll need to install wine to run the binary on Kali. If you're using my VM, you'll find this binary in the /home/kali/reverse_engineering/crackmes/find_the_pass directory. If not you can download the binary here. It comes in a password protected zip file. The password is "crackmes.one" without the quotes. With all of that out of the way let's get reversing!
Initial Triage
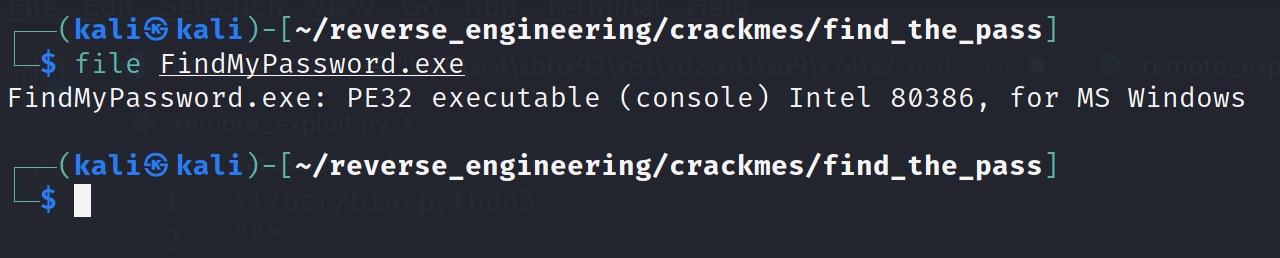
Just like in the previous challenges we start by running file. However, you'll notice that on a Windows binary file doesn't provide much information. Also we can't look at the symbols either with the nm command. Again fortunately, this is a simple challenge so we do not need to worry too much about.
So, not much information there but let's go ahead and run strings and see if there is anything of interest in there.
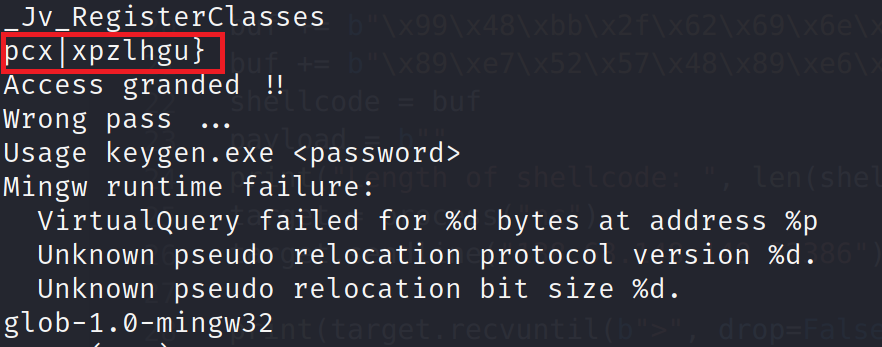
We see what looks like a possible password (highlighted in red). There's no way it's this easy right? Well you know me, I am a try everything kind of guy so let's try to supply this password to the binary! We also see, we are to supply the password as an argument to the binary.
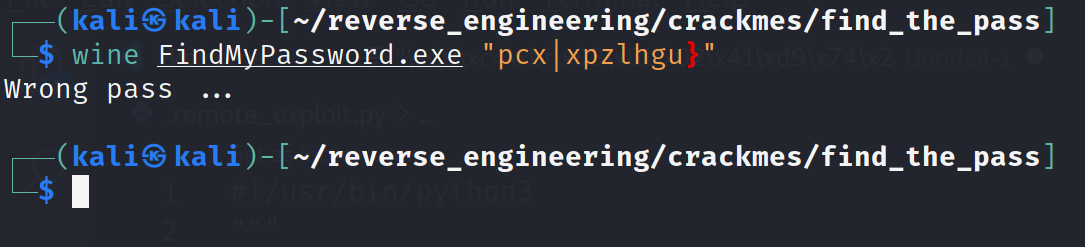
And just as we expected. Well this string could have some significance later (spoiler it does), so let's just jot this down in our notes for now. Now, before we move on, not that this binary has reference to mingw32. If you didn't know, mingw is a cross compiler. This little detail will be important later on.
Static Analysis with Ghidra
Alright let's go ahead and open this up in Ghidra!
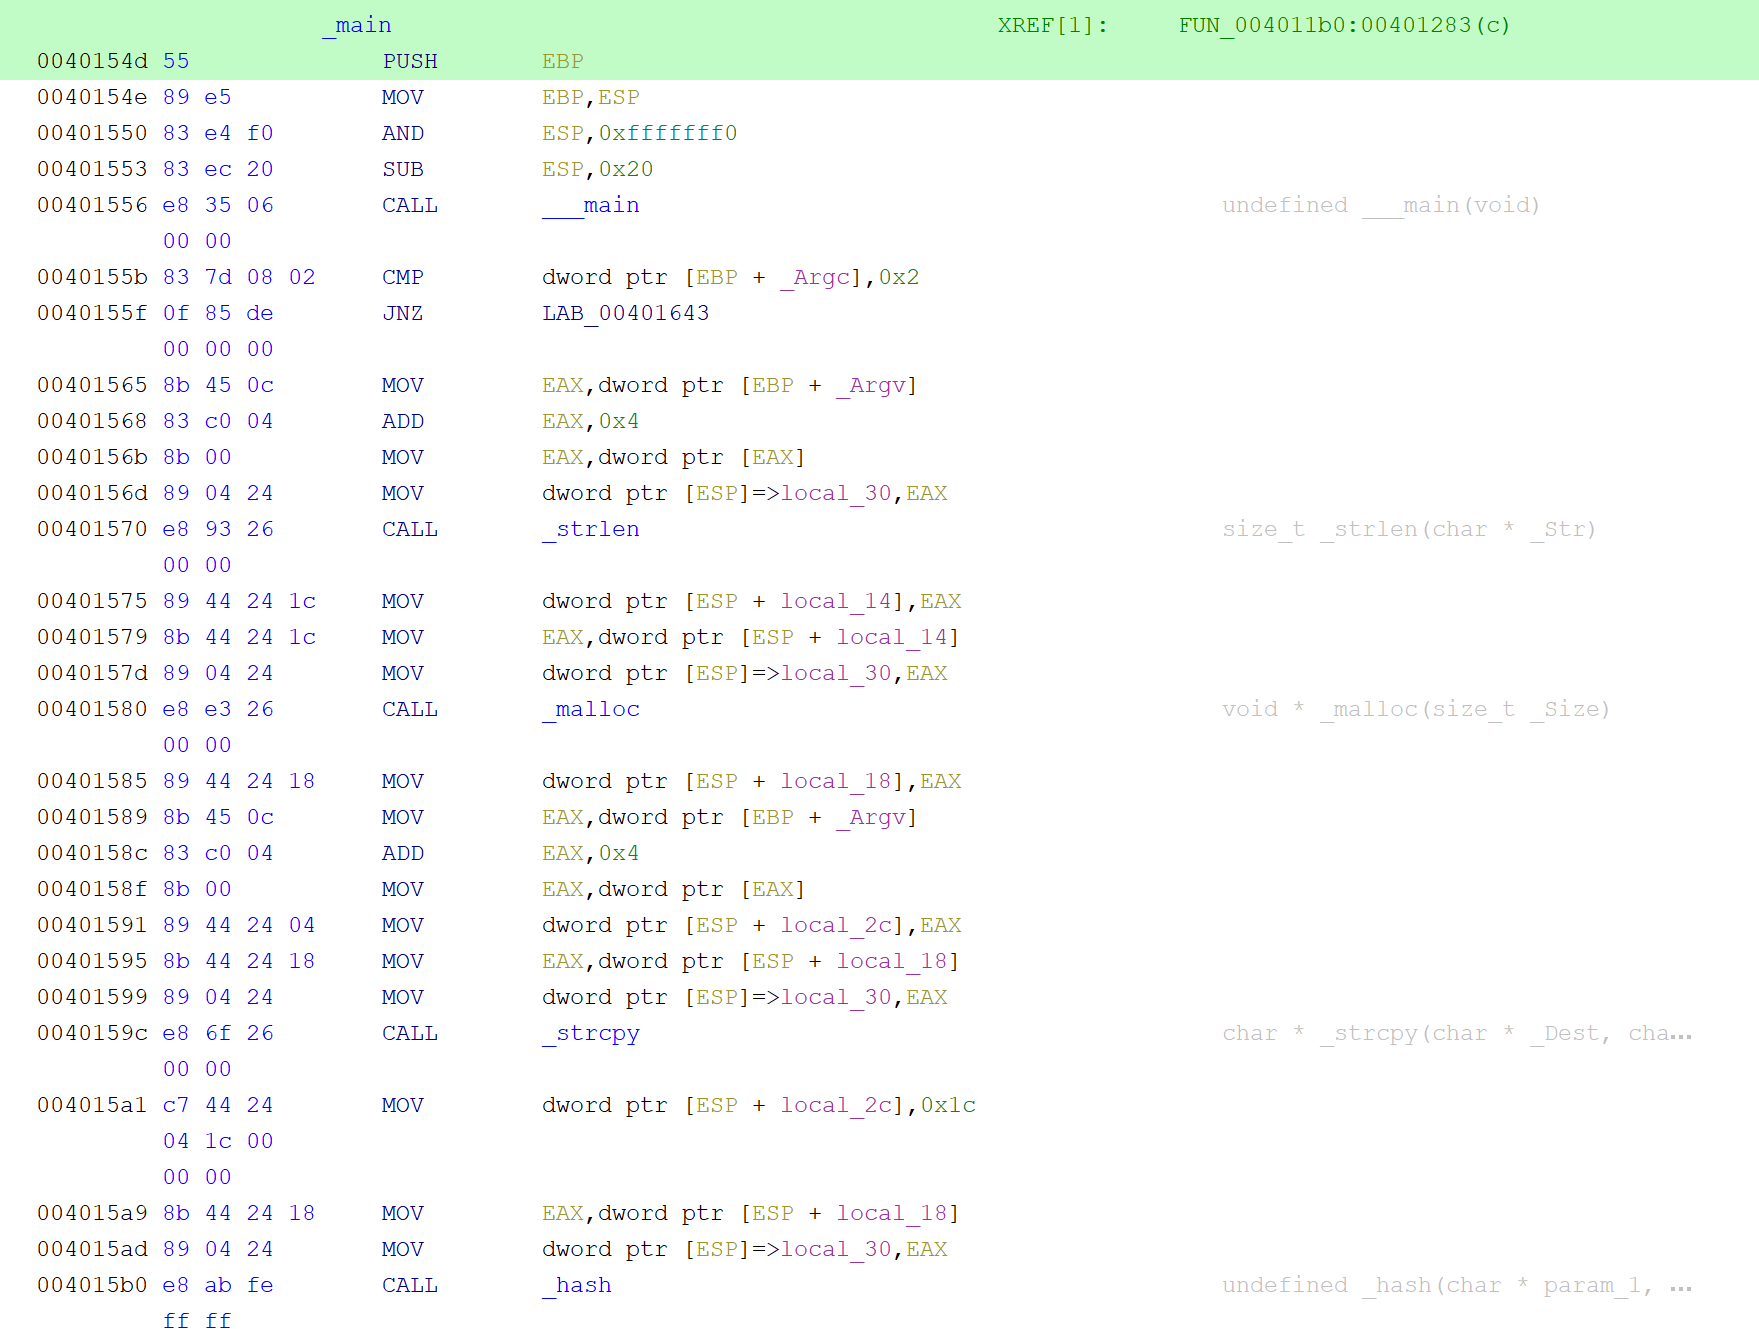
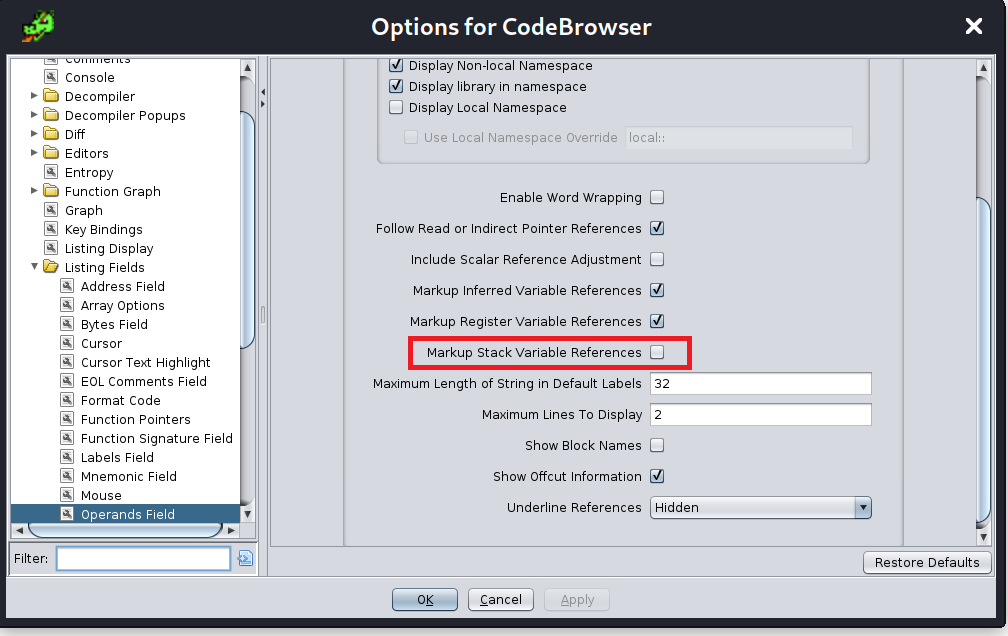
We see something that's a little strange at address 0x401556. We see a call to ____main. We don't have to worry about this. From what I can tell this is a mingw artifact that does some extra setup. After that we see it compares the argument count with two, ensuring we passed in a parameter. Assuming we pass in a parameter we can move to address 0x401565. We see the code grabs argv[1] which would be the password. Since this is a 32-bit binary, arguments are passed on the stack. At address 0x40156d, we see our user input being placed at the top of the stack followed by a call to strlen. The result of this is stored in a variable local_14. Recall that return values are placed in the EAX register. So, we can rename local_14 to password_len. We then see the password_len is placed at the top of the stack which sets up the malloc function call. The return is then placed in a variable local_10. Let's rename this to buffer. Ghidra is doing something that makes it a little difficult to figure out what's going on. You see at address 0x401591 that EAX gets stored to ESP+local_2c. This is a little bit misleading. What's actually happening is the value stored in the EAX register which happens to be argv[1] is being placed on the stack, specifically, ESP+4. We can tell prevent Ghidra from doing this by making the following changes: Edit -> Tool options -> Listing Fields -> Operands Fields and then uncheck the box Markup Stack Variable References.
This will clean up the disassembly display as you can see below. I've also renamed the variables.
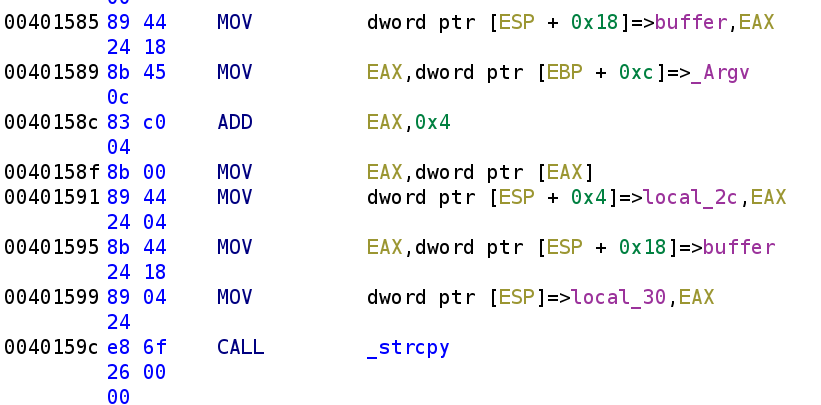
With this notation we can see clearly that our user supplied password and the newly created buffer are placed on the stack ESP+4 and ESP respectively. This makes it easier to determine that the arguments for the strcpy function. So far, our decompiled output will look something like this:
if (argc != 2)
{
	printf("Usage:...\n");
    return 0;
}

password_len = strlen(argv[1]);
buffer = malloc(len_user_input);
strcpy(buffer, argv[1]);
We then see we call a function called _hash.
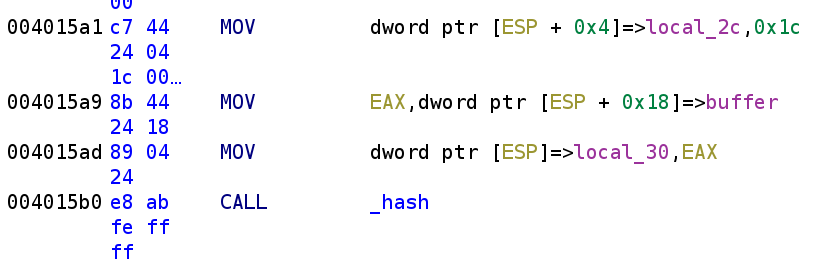
Similar to the previous function, we see the arguments to _hash are buffer and 0x1c. The first argument is buffer and the second is 0x1c. This will be important in just a moment! Let's take a deeper dive into the hash function.
Analyzing a Simple Hash Function
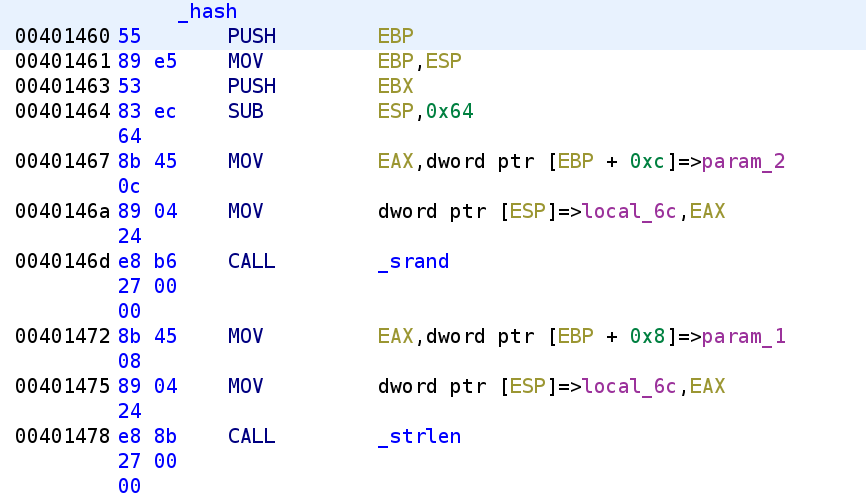
Right off the bat we see param_2 which is 0x1c gets passed to the srand function. This means the author is using a static seed (giggity). This is good for us because it means every time rand() is called, the same number will be generated every time we run the program. Next we see param_1 which holds our user_input is passed to the strlen function. Let's go ahead and rename these variables so it's a little easier to follow.
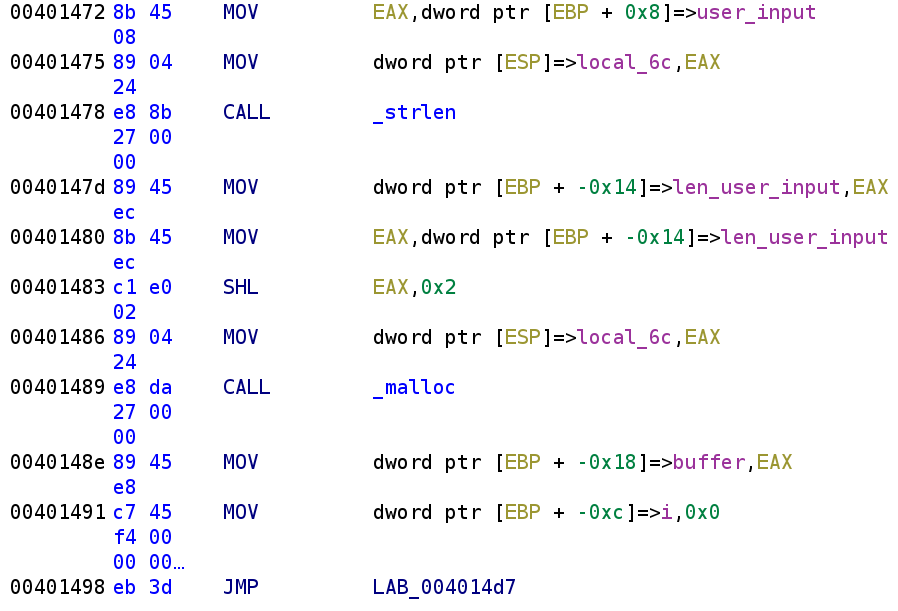
We see that we are grabbing the creating another buffer with the malloc function. Notice the len_user_input goes through an SHL instruction before being passed to the malloc function. This will multiply len_user_input by 2 raised to the 2 power or simply 4. Finally, we see a variable being set to 0 followed by an unconditional jump which we know by experience is normally how a loop begins so I renamed this variable to i. Let's go ahead and take a look at what's going on in this loop.
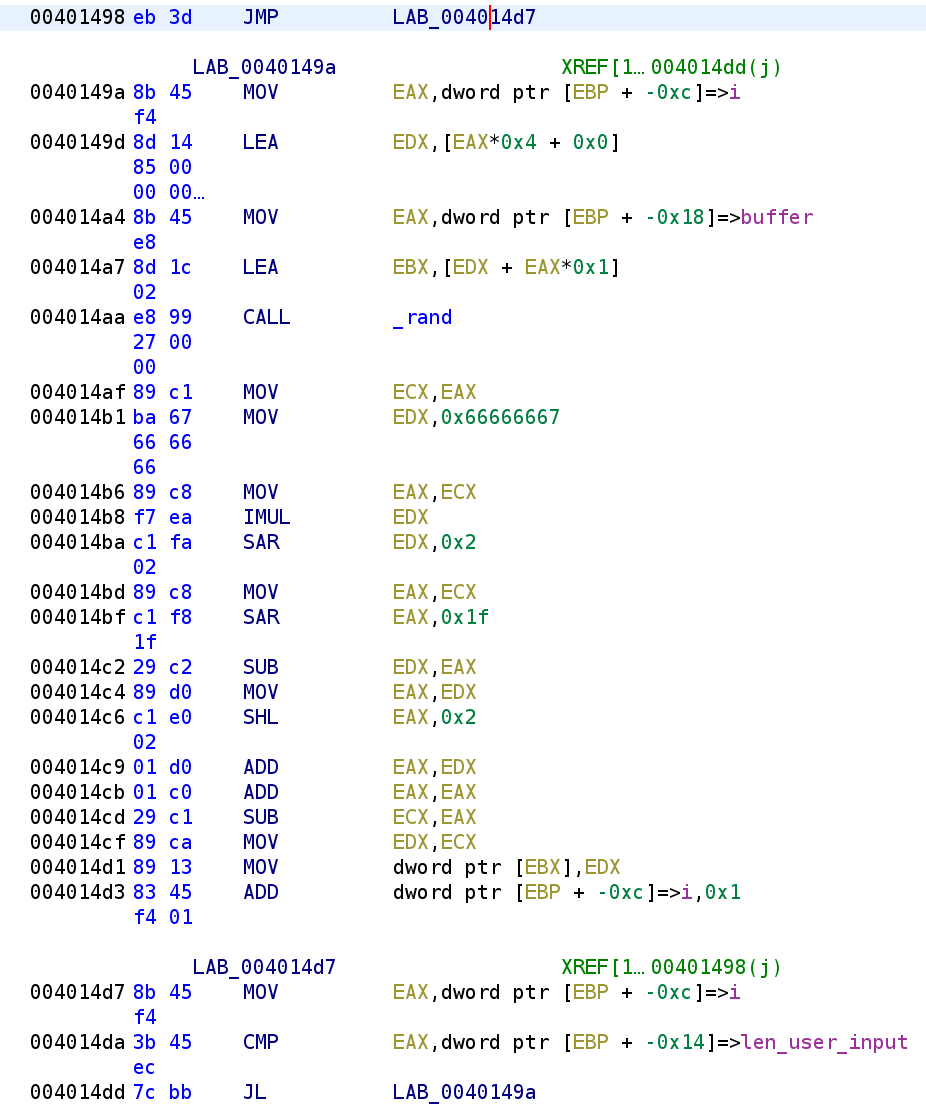
We see the loop continues as long as i is less than len_user_input. The first few instructions in LAB_0040149A look a little confusing but let's go through it step by step. First, i is placed in the EAX register. The next instruction, we see EAX*4 get stored in the EDX register. We can ignore the + 0x0 since that does not affect anything. So EDX holds EAX*4 or we can i*4. Next, buffer gets placed in the EAX register. Lastly, before the rand() function call, we see EDX+EAX*1 get stored in EBX. We can substitute the registers for our variables to make it easier to understand. So, EBX holds (i*4 + buffer*1). We can actually ignore the *1 since that will not affect anything in this case. If this notation looks weird you're not alone. This was a little confusing to me as well. What's happening here is buffer is being indexed and stored in the EBX register. By the name, we expected buffer to hold characters but it appears that buffer will hold integer values. Integers are 4 bytes which explains why i gets multiplied by 4. This will ensure that we get to the next element in the array. We can simplify the indexing by simply translating the craziness to buffer[i]. Alright so buffer[i] is placed in the EBX register. Let's keep that in mind. Next, we see rand() is called. Recall, since the seed was static, this will not be a truly random number. This means if we were to create a function, initialize it with 0x1c and call random as many times as this hash function does we will get the exact same "random" numbers. After rand() is called, we can see a lot of craziness that I cannot decompile myself. The instructions from 0x4014AF to 0x4014CF take the result of rand() and mod it by 10. That is EDX will hold rand() % 10. Then we see EDX gets stored in EBX and lastly we see i is incremented. We can translate this loop to the following C code:
while(i < len_user_input)
{
	buffer[i] = rand() % 10;
    i++
}
Now, buffer does not seem to be a proper name for this variable. Let's rename it to key. This will become apparent later. Now, after this loop finishes, we go into yet another loop lol.
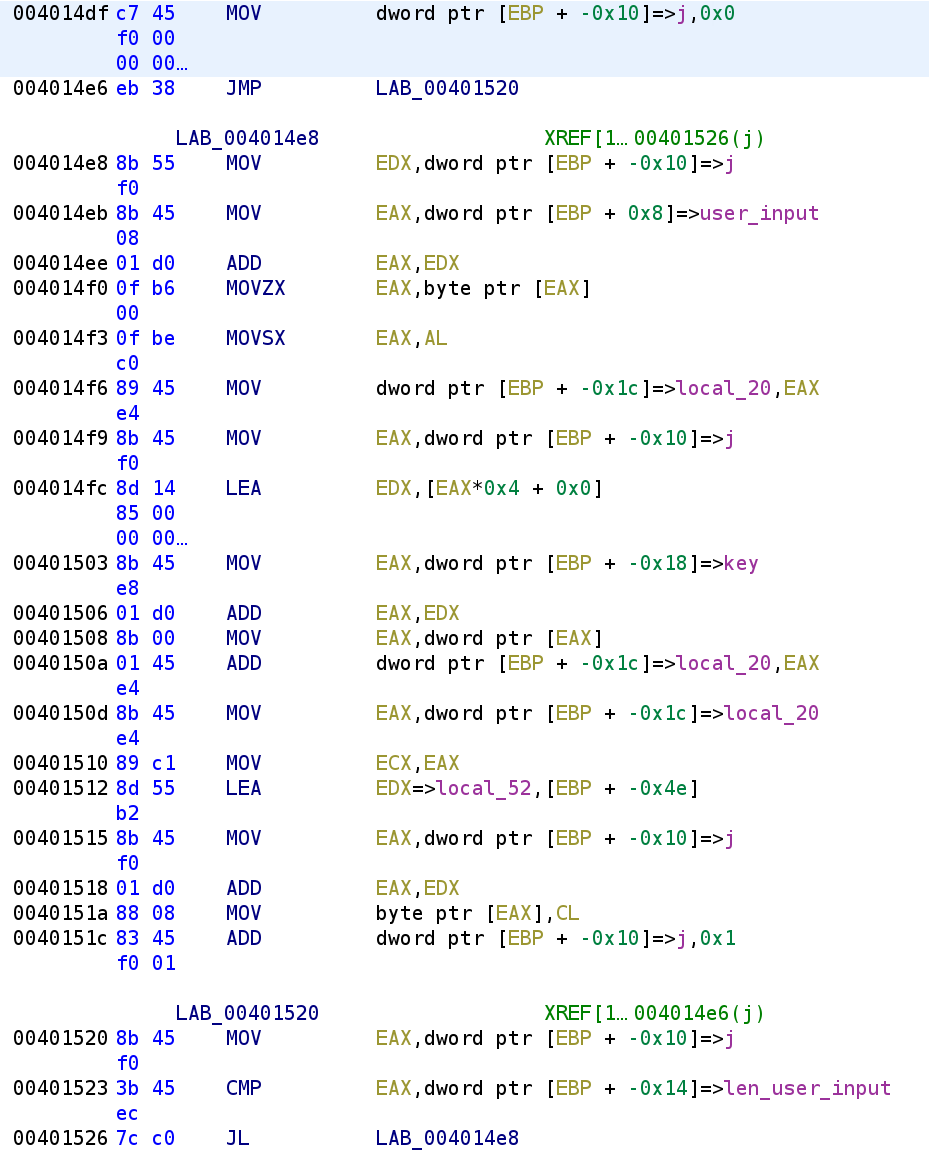
Luckily, we don't have any crazy modulus to worry about in this loop but we it is still a little confusing. Just like the previous loop we will go through this step-by-step. First, we see user_input[j] gets stored in the EAX register. This in turn gets stored in a local variable local_20. We then see our key get indexed by j as well. Next we see key[j] is added to local_20 which holds user_input[j]. So local_20 holds user_input[j] + key[j]. This is beginning to look similar to a shift cipher. The result of this is stored in the ECX register at address 0x401510. We then see another new stack variable local_52. This new variable gets indexed by j and then user_input[j] + key[j] is stored. So, let's rename this to modified_user_input. We then see j is incremented by 1. The above loop can be roughly translated to the following C code:
while(j < len_user_input)
{
	letter = user_input[j];
    letter += key[j];
    modified_user_input[j] = letter;
    j++
}
I went ahead and changed renamed local_20 to letter. Now, let's analyze the rest of this function.
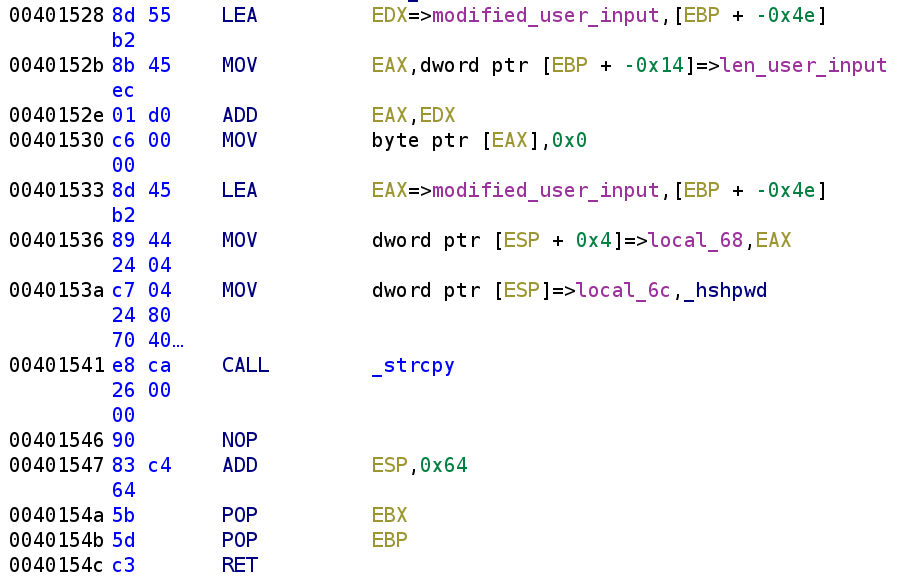
The end of the hash function looks fairly straight forward. First, we see modified_user_input is indexed by len_user_input and then we see 0 is placed at this location. This is essentially, NULL terminating the modified_user_input. This looks like modified_user_input[len_user_input] = '\0'. Finally, we see hshpwd and modified_user_input are placed on the stack and strcpy is called. hshpwd is a global variable the author created. You'll see this variable is used in the main function shortly. Let's take a look!
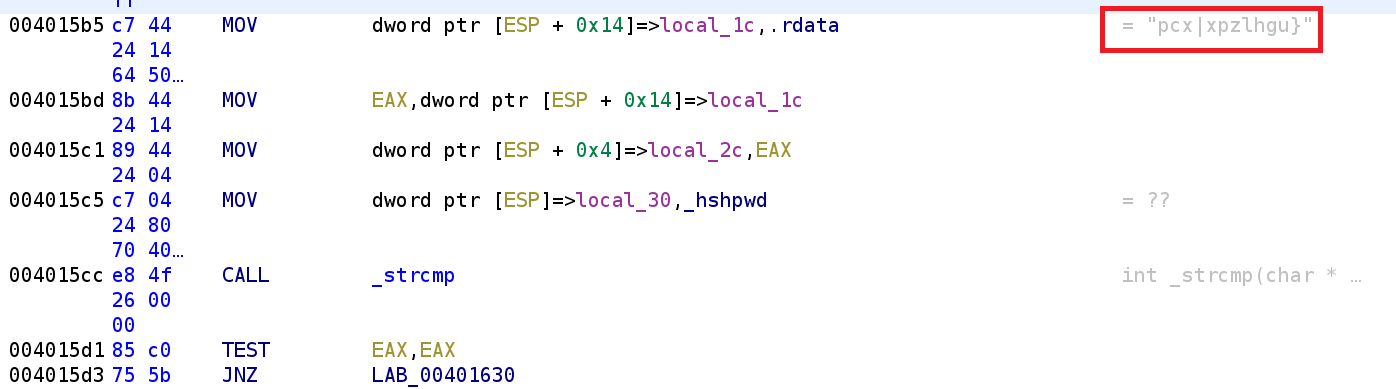
Recall, that hshpwd contains our modified user_input. We also see a string that we saw earlier. This is the value that hshpwd will get compared against. What's strange is this comparison occurs a few times in succession. I'm not sure why the author did that but if we look at the rest of the main function we can see the same comparison occurs multiple times before printing out the "Success" message.
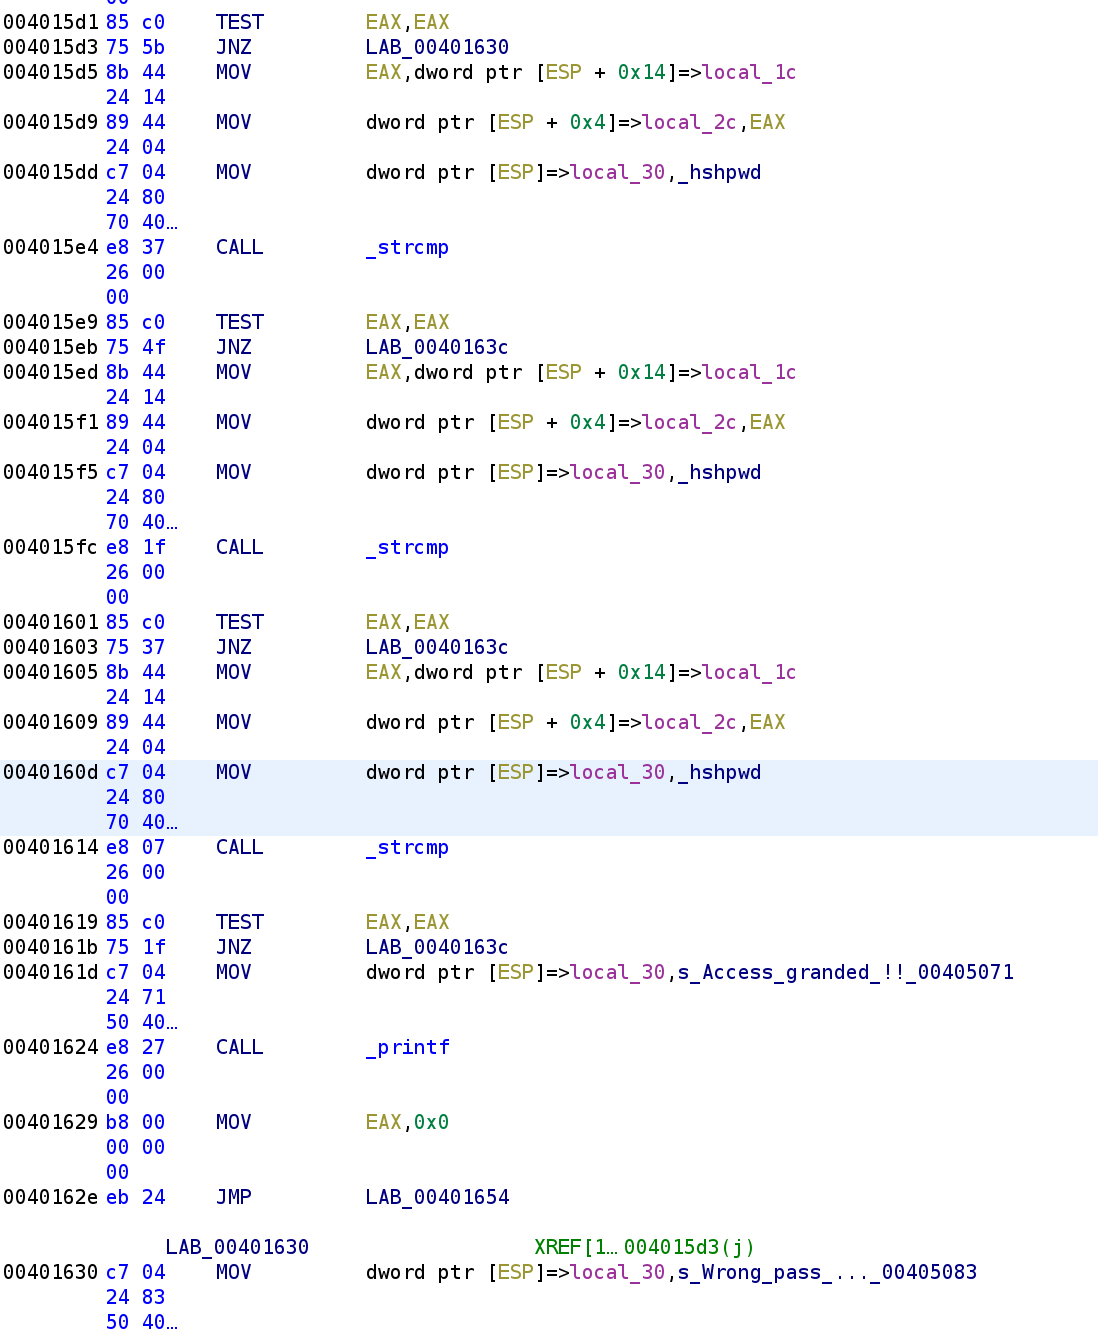
So, now we have a greater idea of what this binary is doing. We can solve it. It simply takes our user input and modifies it using the hash function and then it compares it against the string pcx|xpzlhgu}. So all we have to do is implement the hash function and pass pcx|xpzlhgu} as a parameter. Of course, we would change it slightly such that instead of adding key[i] we would substract key[i] from pcx|xpzlhgu}. Now, remember when I said that this was compiled with mingw and that would be important later on? Well this is the time. In order to replicate the values produced by rand() we have to write our solution in C and compile it with mingw. Here is the code I used to solve this challenge. You can also find this code on my Github.
#include <stdio.h>
#include <string.h>
#include <stdlib.h>

int main()
{
    char *hash = "pcx|xpzlhgu}";
    int random_number;
    int i = 0;
    char password[12];
    srand(0x1c);
    while(i < strlen(hash))
    {
        random_number = rand() % 10;
        printf("random_number: %d\n", random_number);
        password[i] = (int)hash[i] - random_number;
        i++;
    }
    printf("%s\n", password);

    return 0;
}
The above code must be compiled like so:
i686-w64-mingw32-gcc-win32 keygen.c -o keygen
This will create a keygen.exe file. Now run it with wine keygen.exe.
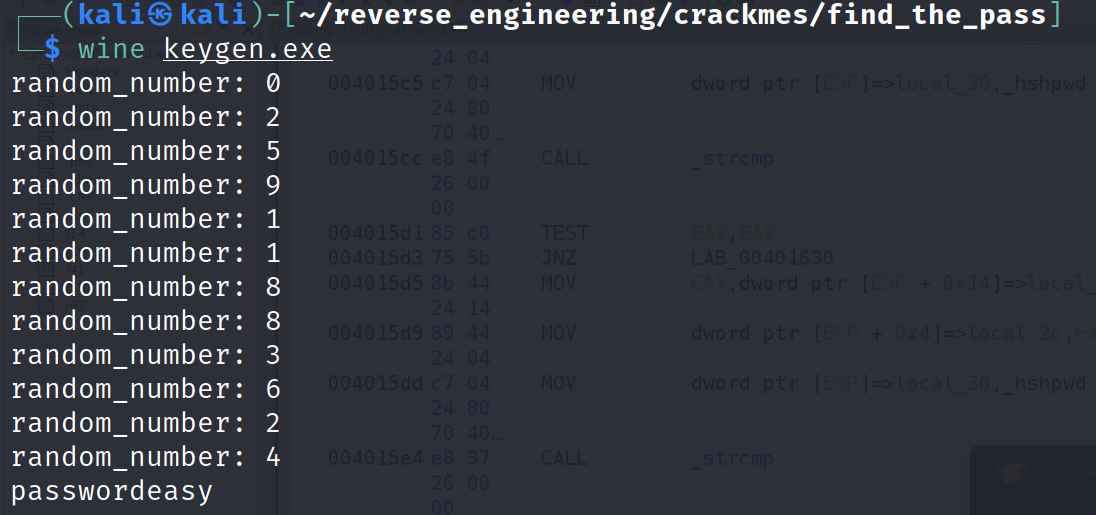
I printed out the random values produced by rand(). This of course is extremely unnecessary lol. Now, we test our input with the binary we are interested in.
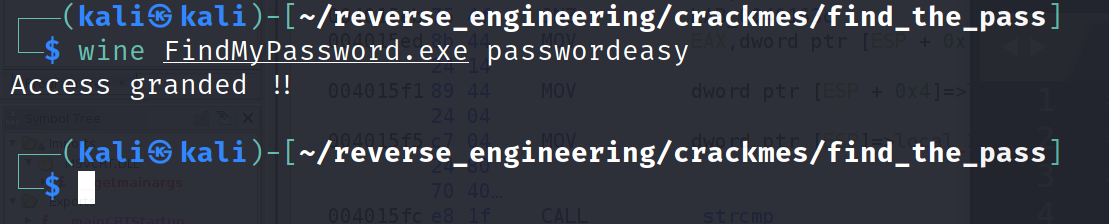
And we solved it!
A Buffer Overflow?
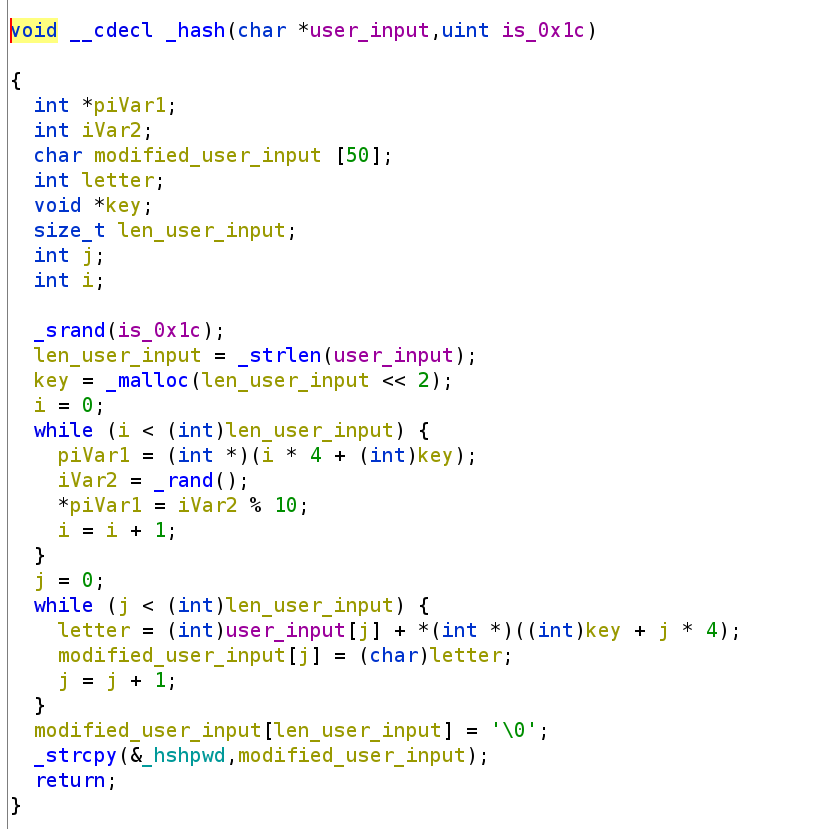
Before I conclude I want to point something out which will be a little easier if I write out all of my decompiled output for this challenge. A friend of mine pointed this issue out to me. Let's take another look at the hash function.
hash(user_input, is_0x1c)
{
        srand(0x1c)
        len_user_input = strlen(user_input)
        key = malloc(len_user_input (2*2))
        i = 0
        while(i < len_user_input)
        {
                key[i] = rand() % 10
                i++
        }
        j = 0
        while(j < len_user_input)
        {
                letter = user_input[j]
                letter += key[j]
                new_user_input[j] = letter
                j++
        }

        modified_user_input[len_user_input] = '\0';
        strcpy(_hshpwd, new_user_input);

}
Now, I didn't include it in my decompiled output but the size of new_user_input is static. In fact, according to Ghidra it is 50 bytes long.
Why is this an issue? Well, the size of key is determined by the size of our user_input. This presents a potential buffer overflow vulnerability. If we provide input that is greater than 50 bytes, we will overflow the buffer and possible spill into the return address. Let's verify this by supplying a bunch of A's to the program and see if we can get a crash.
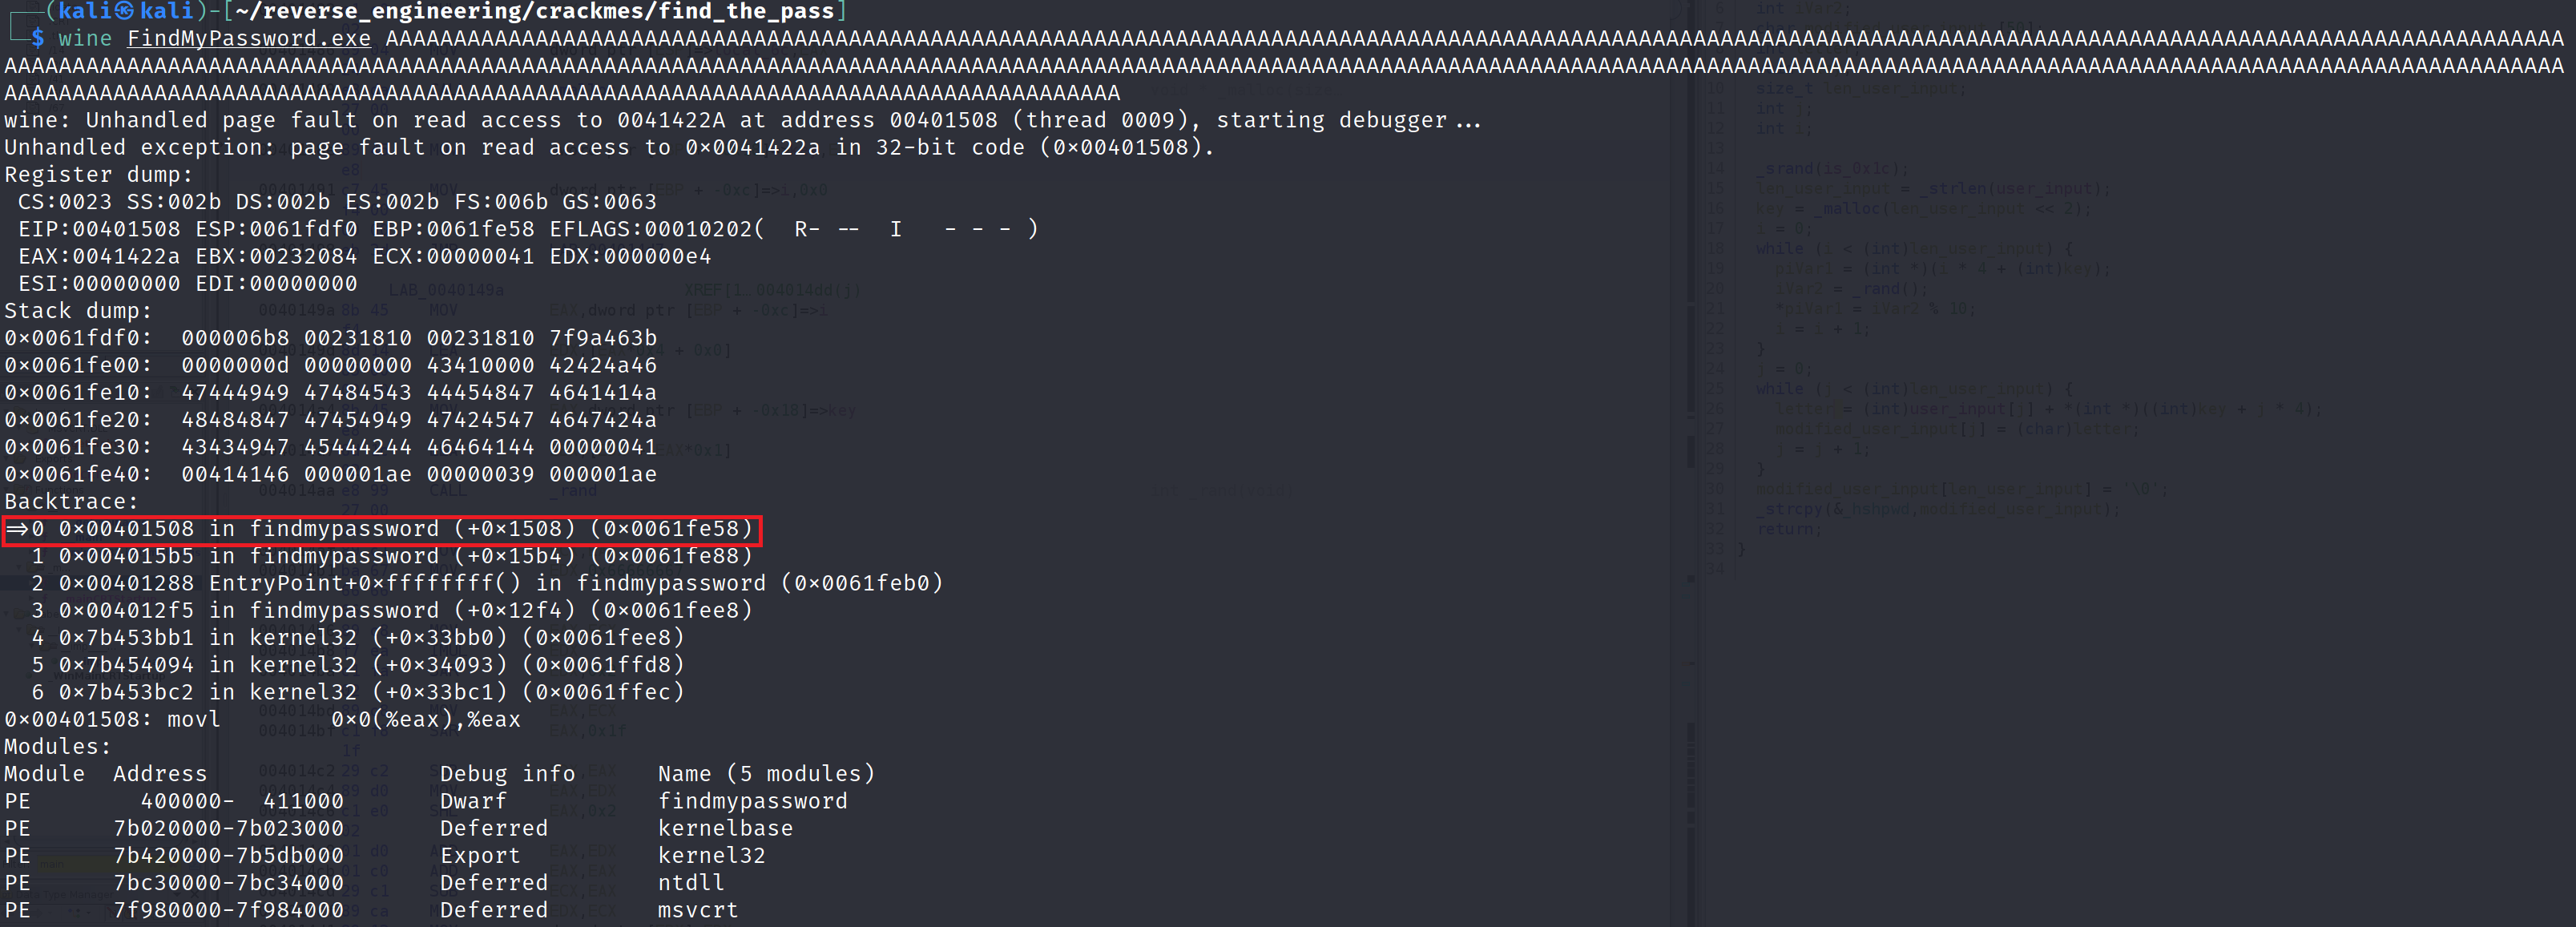
Alright we crashed the program. We see we got an unhandled read access. Wine was nice enough to start a debugger and print a stack trace. The stack dump doesn't have a bunch of A's that we expected but remember, the user_input is modified so it is possible that the values in the stack are indeed part of our buffer. Furthermore, take a look at the address where the crash happened (highlighted in red). This occurs in the second while loop where the bytes are being copied to the modified_user_input. I didn't have time to play around with this very much but there is a potential for a buffer overflow here. If I make any progress and exploit this vulnerability I'll post an update. Similarly, if you figure out how to exploit the vulnerability please share the details!
Conclusion
Alright that's all there is to it for this challenge. It was a little on the easier side but I did enjoy solving this challenge and I hope you enjoyed reading about it. Furthermore, I hope you learned something from this blog post or at least increased your understanding about the topics presented here. If you have any questions feel free to hit me up on Twitter, Instagram, or Discord: jaybailey216#6540. If you have a challenge you want me to try next, let me know and I'll give it a shot! I'll see you all next time!
Peace out! ✌🏾