

Introduction
Hello and welcome back! Today we are going to solve the sh4ll1 challenge from crackmes.one. The name should sound pretty familiar! I solved sh4ll0 a while back. This is by the same author but this time the challenge is a little tricky. The description for this challenge gives us a tip saying there's noise in the stack. Let's keep this in mind as we analyze the binary. You're always welcome to take a look at my YouTube video!
Optional Materials to Follow Along
If you want to follow along you can use my VM or you can use your own. No pressure! At the very least you'll need the binary. The binary comes in a password protected zip file. The password is: crackmes.one. I would also recommend a disassembler like Ghidra or IDA. With all of that out of the way, let's get reversing.
Initial Triage
Let's start by running file on the binary.

Great it looks like we have symbols. Let's take a look at the symbols.
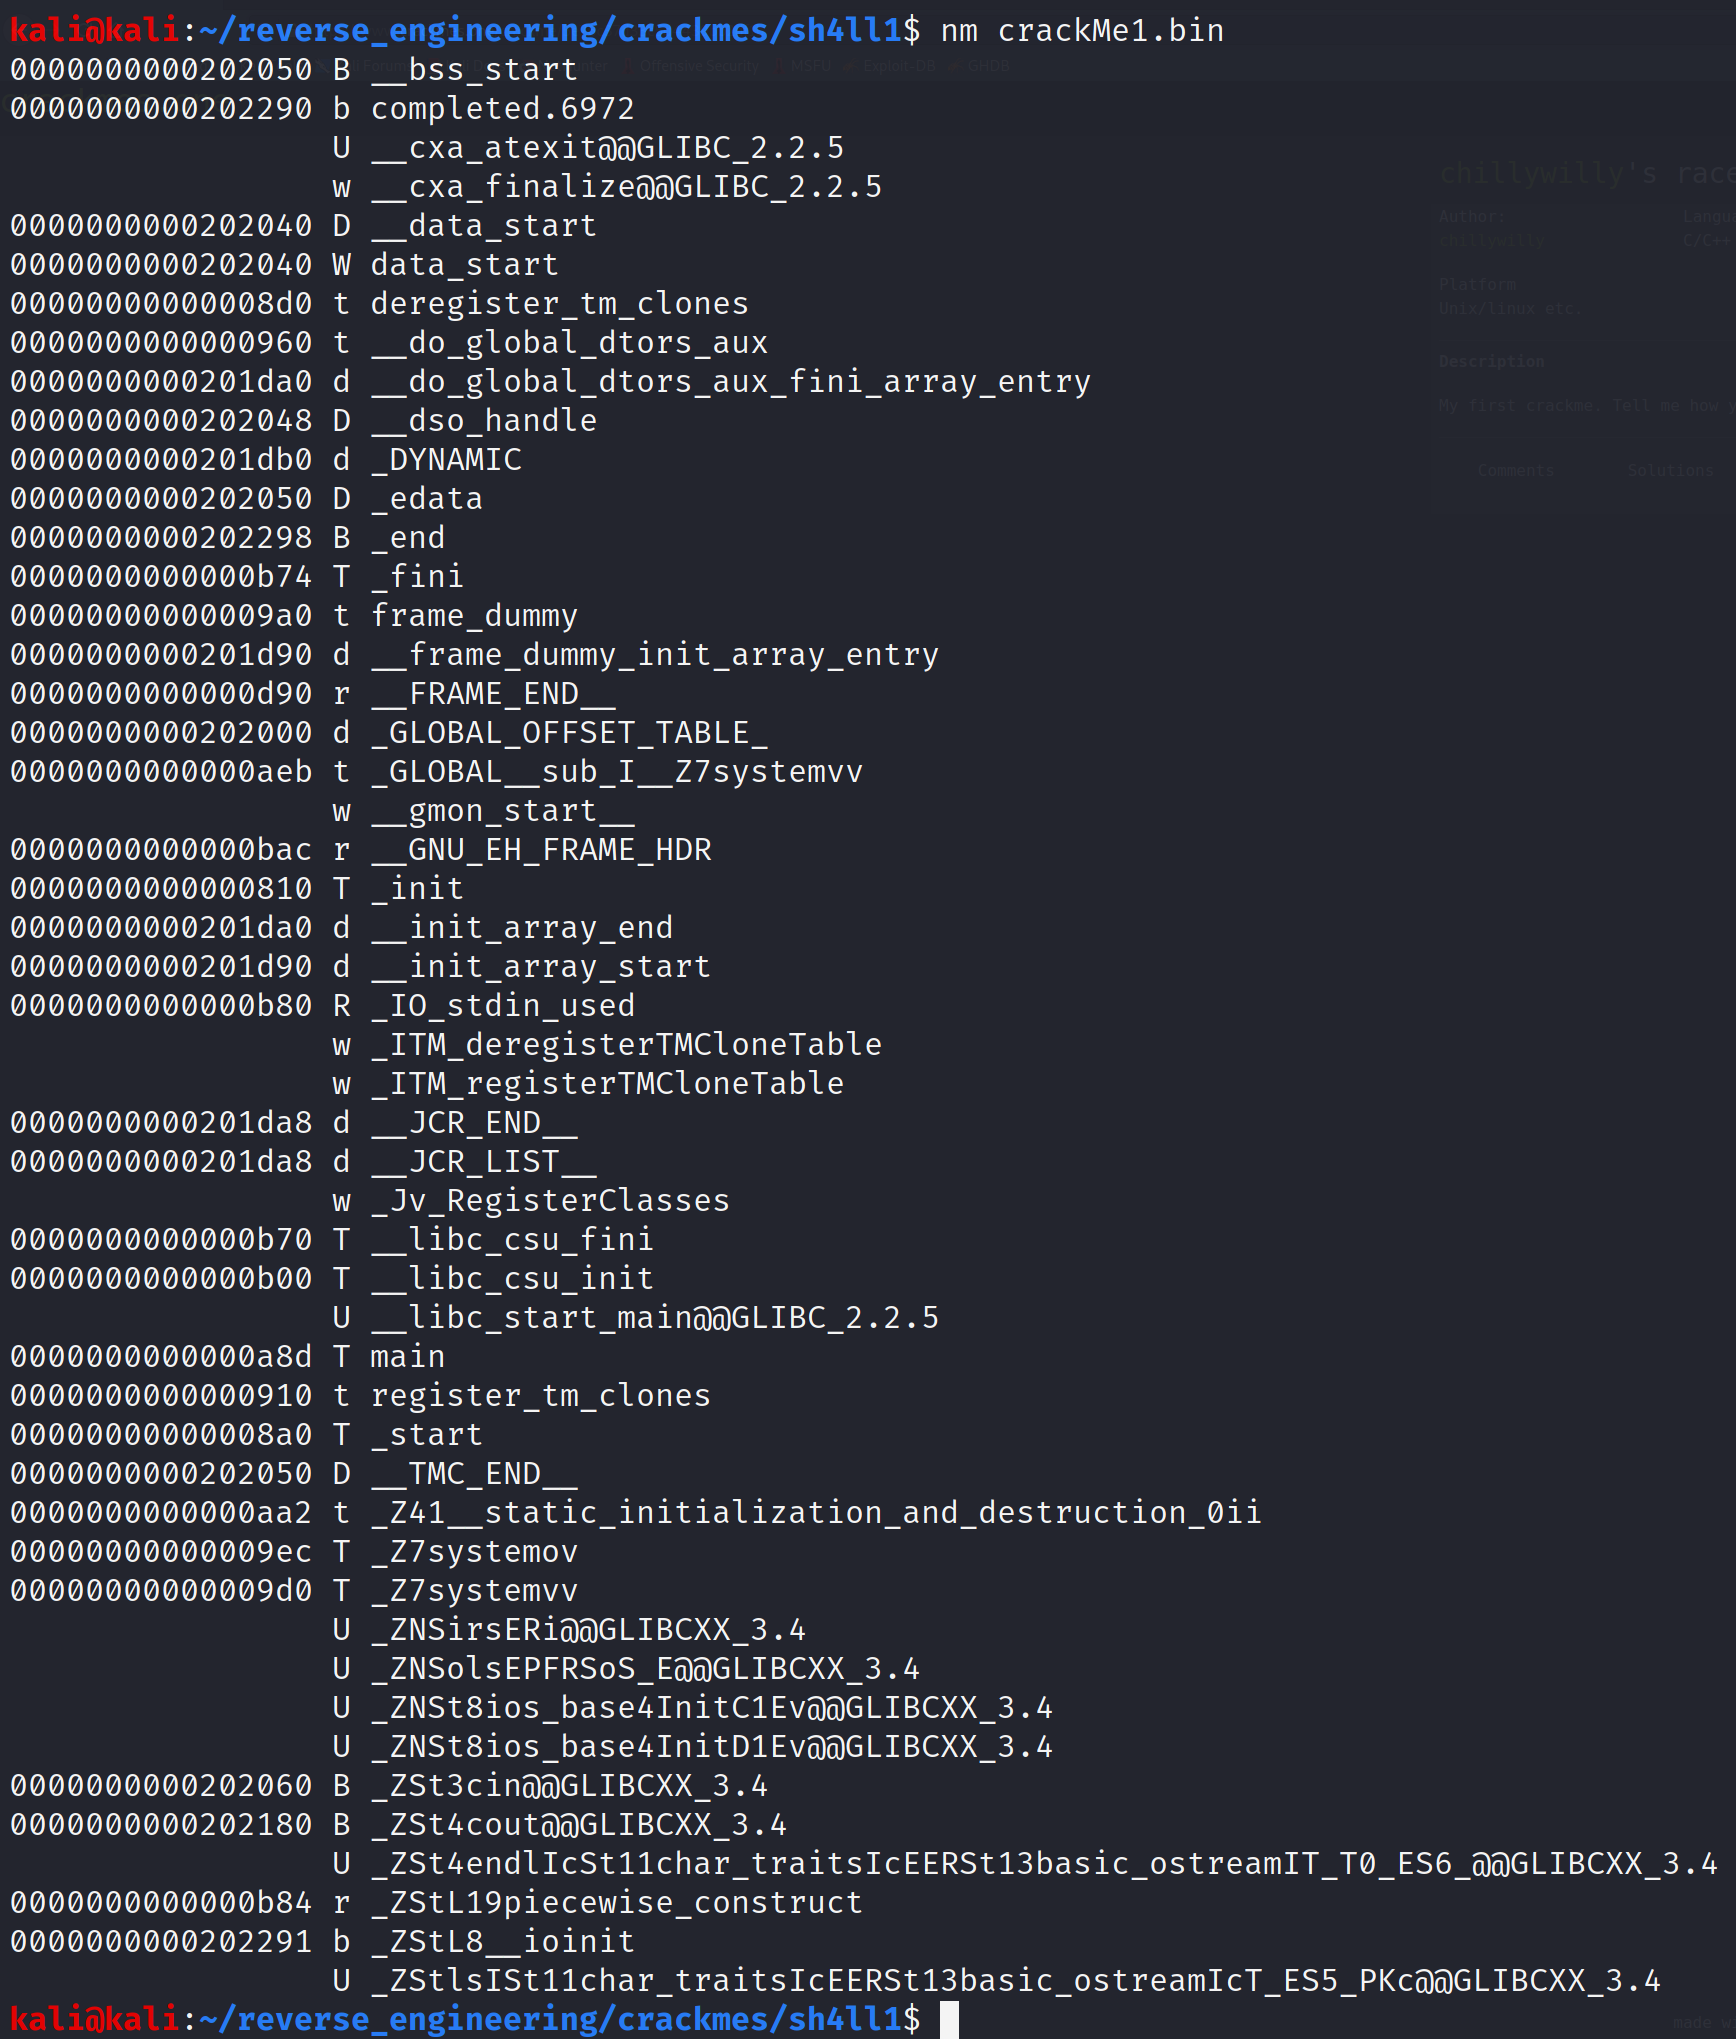
There are two functions that are interesting: systemo and systemv. These are interesting only because it appears they are user defined functions. Also notice the GLIBCXX_3.4 suffix on a few of the symbols. This indicates that the source for this binary was C++ and not C as we are used to seeing. Be prepared to see some disgusting disassembly. Well it's not that bad but C++ code is usually gross. Before we get to the disassembly let's go ahead and run strings.
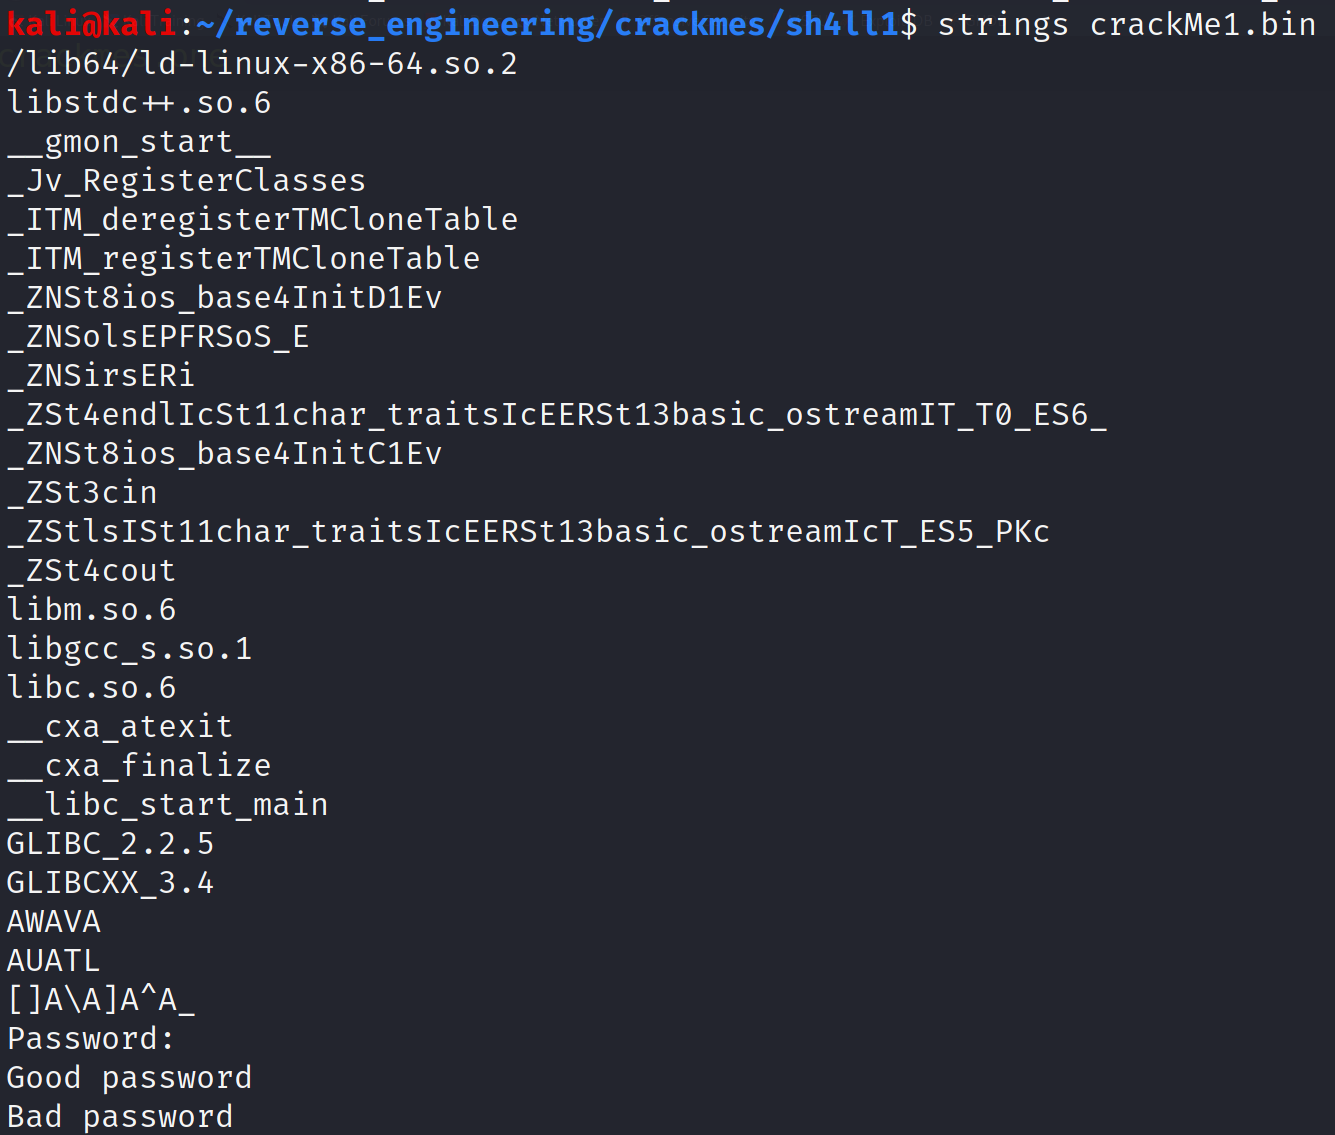
Just like in the author's previous challenge, we have a three messages; a prompt (Password:), a success message (Good Password), and an error message (Bad password). That's about all we can gather from the binary at the moment. Let's go ahead open this up in IDA.
Static Analysis with IDA
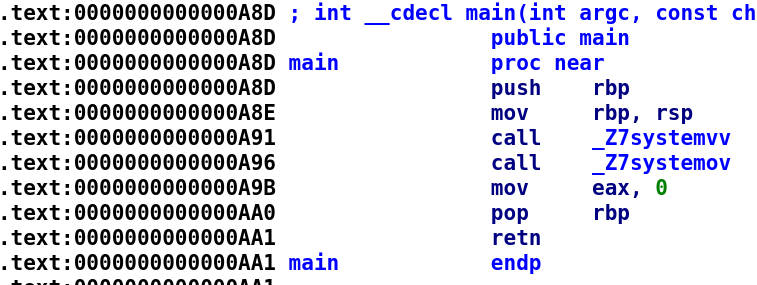
This is pretty interesting. The main function calls two functions: systemv and systemo. Let's take a look at the systemv function.
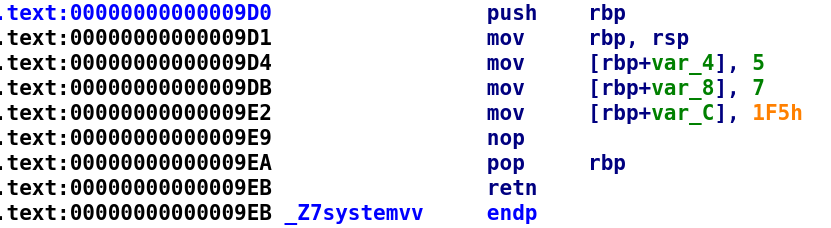
This function looks a little strange. It is storing values in the stack variables. Interestingly, we don't see space being allocated for these variables. Since these are integers, we would expect to see the RSP register subtracted by 12. The size of an integer is usually 4 bytes and since there are 3 variables we get 3 * 4 which is 12. This leads me to believe that this function contains inline assembly. I can't think of another way to achieve this in C++ code, however, if the reader is aware I'd love to hear. So, we can assume this function looks something like this:
void systemv()
{
        asm(R"(
                movl $0x5, -0x4(%rbp)
                movl $0x7, -0x8(%rbp)
                movl $0x1f5, -0xC(%rbp)
        )");
}
The beauty of C/C++ is you have this level of control which you don't get in languages like Java or Python. This control can be great if you know what you're doing but C/C++ will allow you to shoot yourself in the foot. In fact, it gives you the gun! You might notice the assembly is a little different than what we are used to seeing. That's because the syntax for inline assembly has to be AT&T syntax whereas IDA and Ghidra use Intel syntax by default. Alright so we know that these values get stored in memory. Let's take a look at the systemo function.
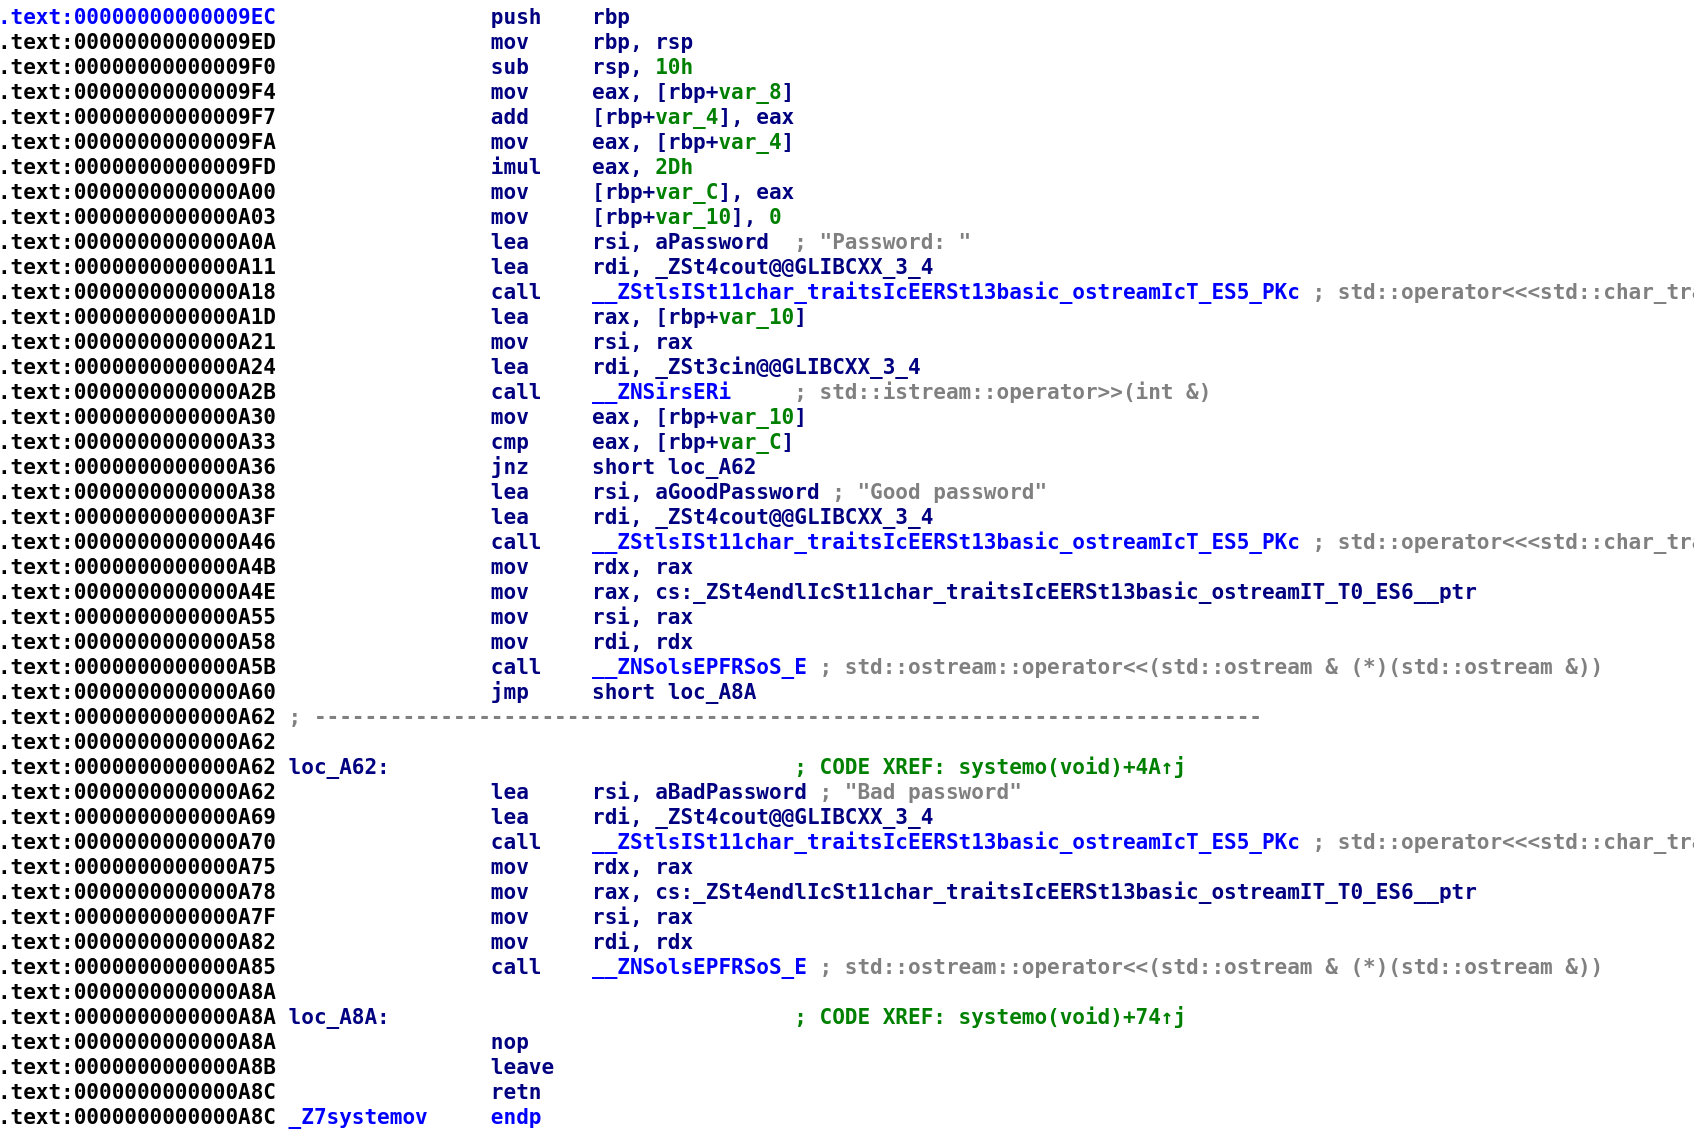
The function prolog looks more like what we expect. We see that the RSP register is subtracted by 16 (0x10). This means that the stack from for systemo is essentially the same as the stack frame for systemv. What does that mean? systemo essentially has access to the stack variables from systemv. Pretty interesting if you ask me. If that isn't clear I'll show you what this looks like in gdb at the end of this blog post. You'll be able see the systemo stack contain variables that the systemv function "created." With this knowledge we have just gained, let's go ahead and rename the variables to reflect the values they hold. These are the same values from the systemv function.
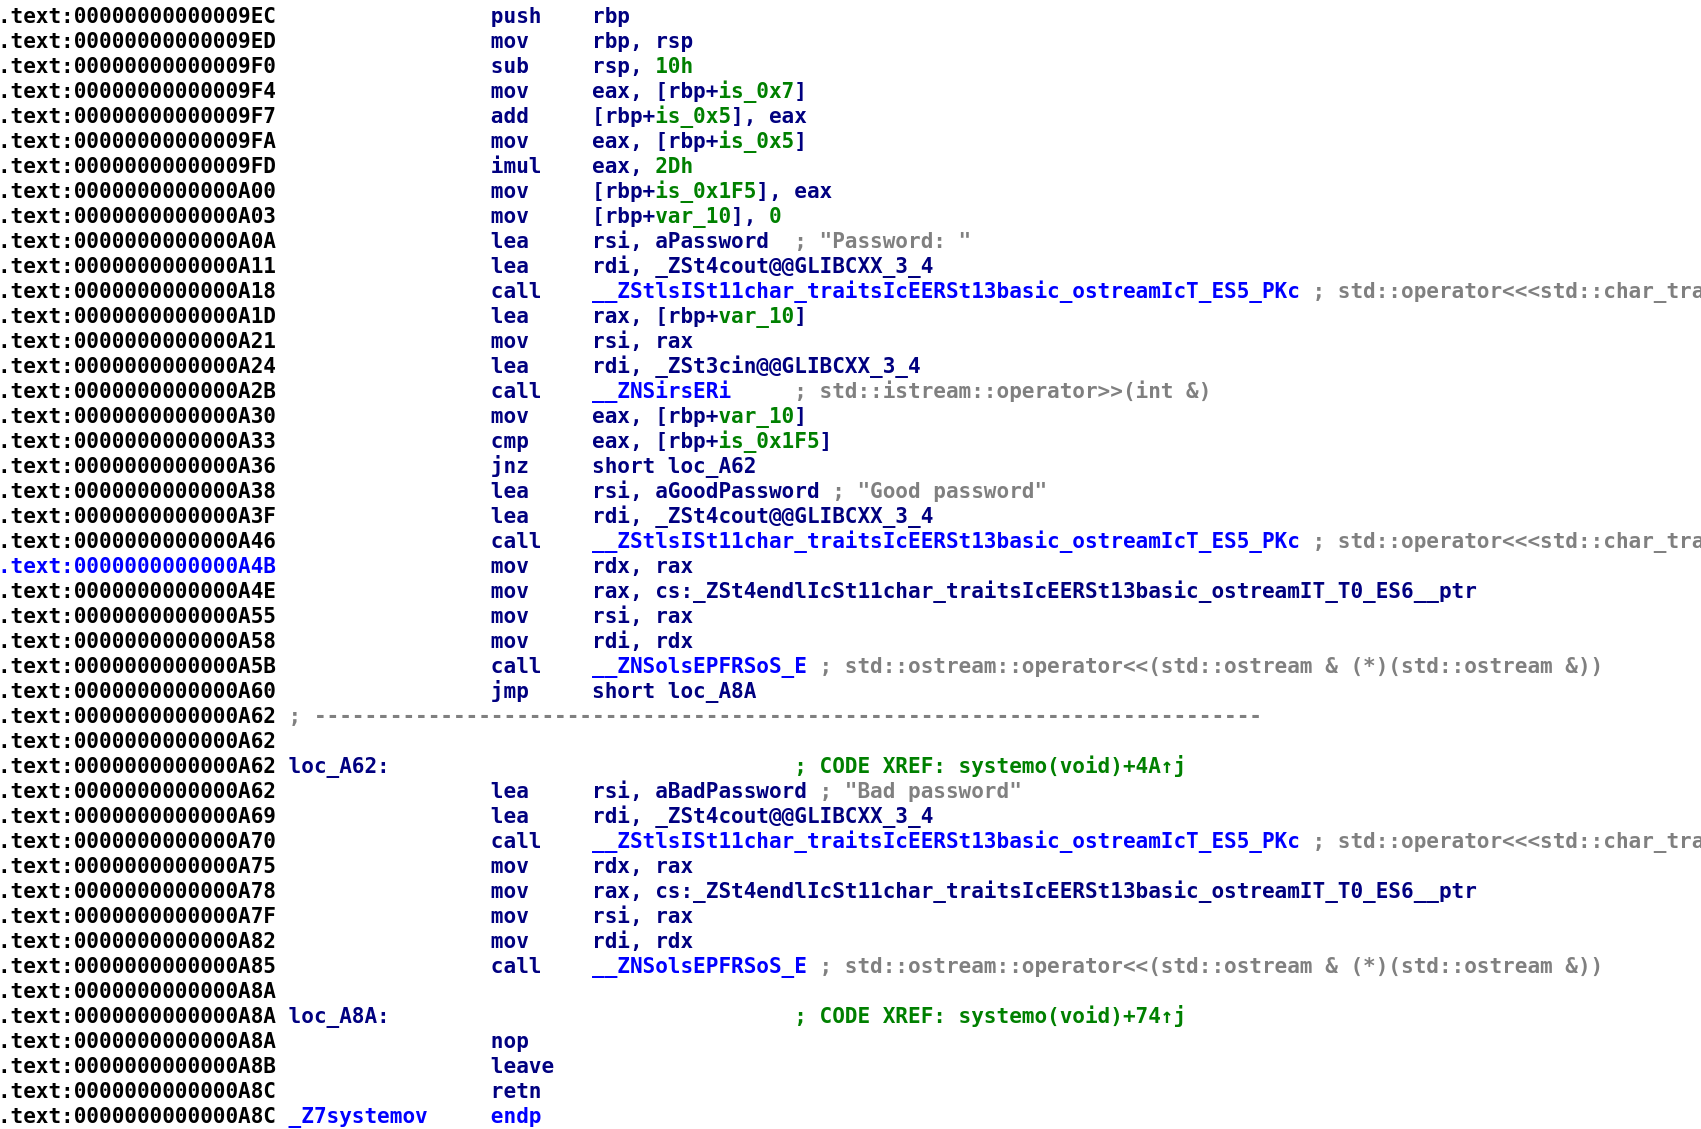
Now, let's go ahead and analyze this function with this new information in mind. We see that is_0x7 is added to is_0x5. The result is stored in is_0x5. We then see the result is multiplied by 0x2D and stored in the is_0x1F5 variable. So, is_1F5 holds ((5 + 7) * 45) which is 540. We see var_10 is initialized to 0. If you're confused by the 3 instructions after that you are not alone. This confused me for a while. We are used to seeing a string get loaded in a register when we see a printf call, however, it is a little different for cout and cin. These are actually objects of the ostream class. This gets passed to the extraction operator (<<)in the case of cout which is why we see cout get loaded into the RDI register. Similarly, a few lines down we'll see cin get passed to the insertion operator (>>). But, for now "Password:" and cout are passed to << which equates to cout << "Password:"; We then see var_10 and cin get passed to >> which means our user_input is var_10. Then, we see a simple comparison between our user input and is_0x1F5 which if you remember gets set to 540 are compared with one another. So, the password for this challenge is 540. I wonder if this is at all related to the skateboard trick? 🤔 Anyway, let's test our theory.

And we were right!
In case you were wondering, the pseudo C++ code for this function is below:
void systemo()
{
	int is_0x5, is_0x7, is_0x1F5, user_input = 0;
	is_0x1F5 = (is_5 + is_7) * 0x2D;
    cout << "Password: ";
    cin >> user_input;
    if(user_input == is_0x1F5)
    {
    	cout << "Good password" << endl;
    }
    else
    	cout << "Bad password" << endl;
    return 0;
}
Notice I explicitly defined local variables in this function. This is required in order to setup the stack frame properly.
An Extremely Brief Primer on Stack Frames
A little bit of background knowledge. When a function runs, a stack frame is created. This stack frame holds all of the local variables, arguments passed from another function, and the return address for the functions caller. Alright let's run the program in gdb. If you're using my VM, you'll notice that gdb has the gef extensions. This will allow us to view the stack. Let's take a look at the main function's stack.
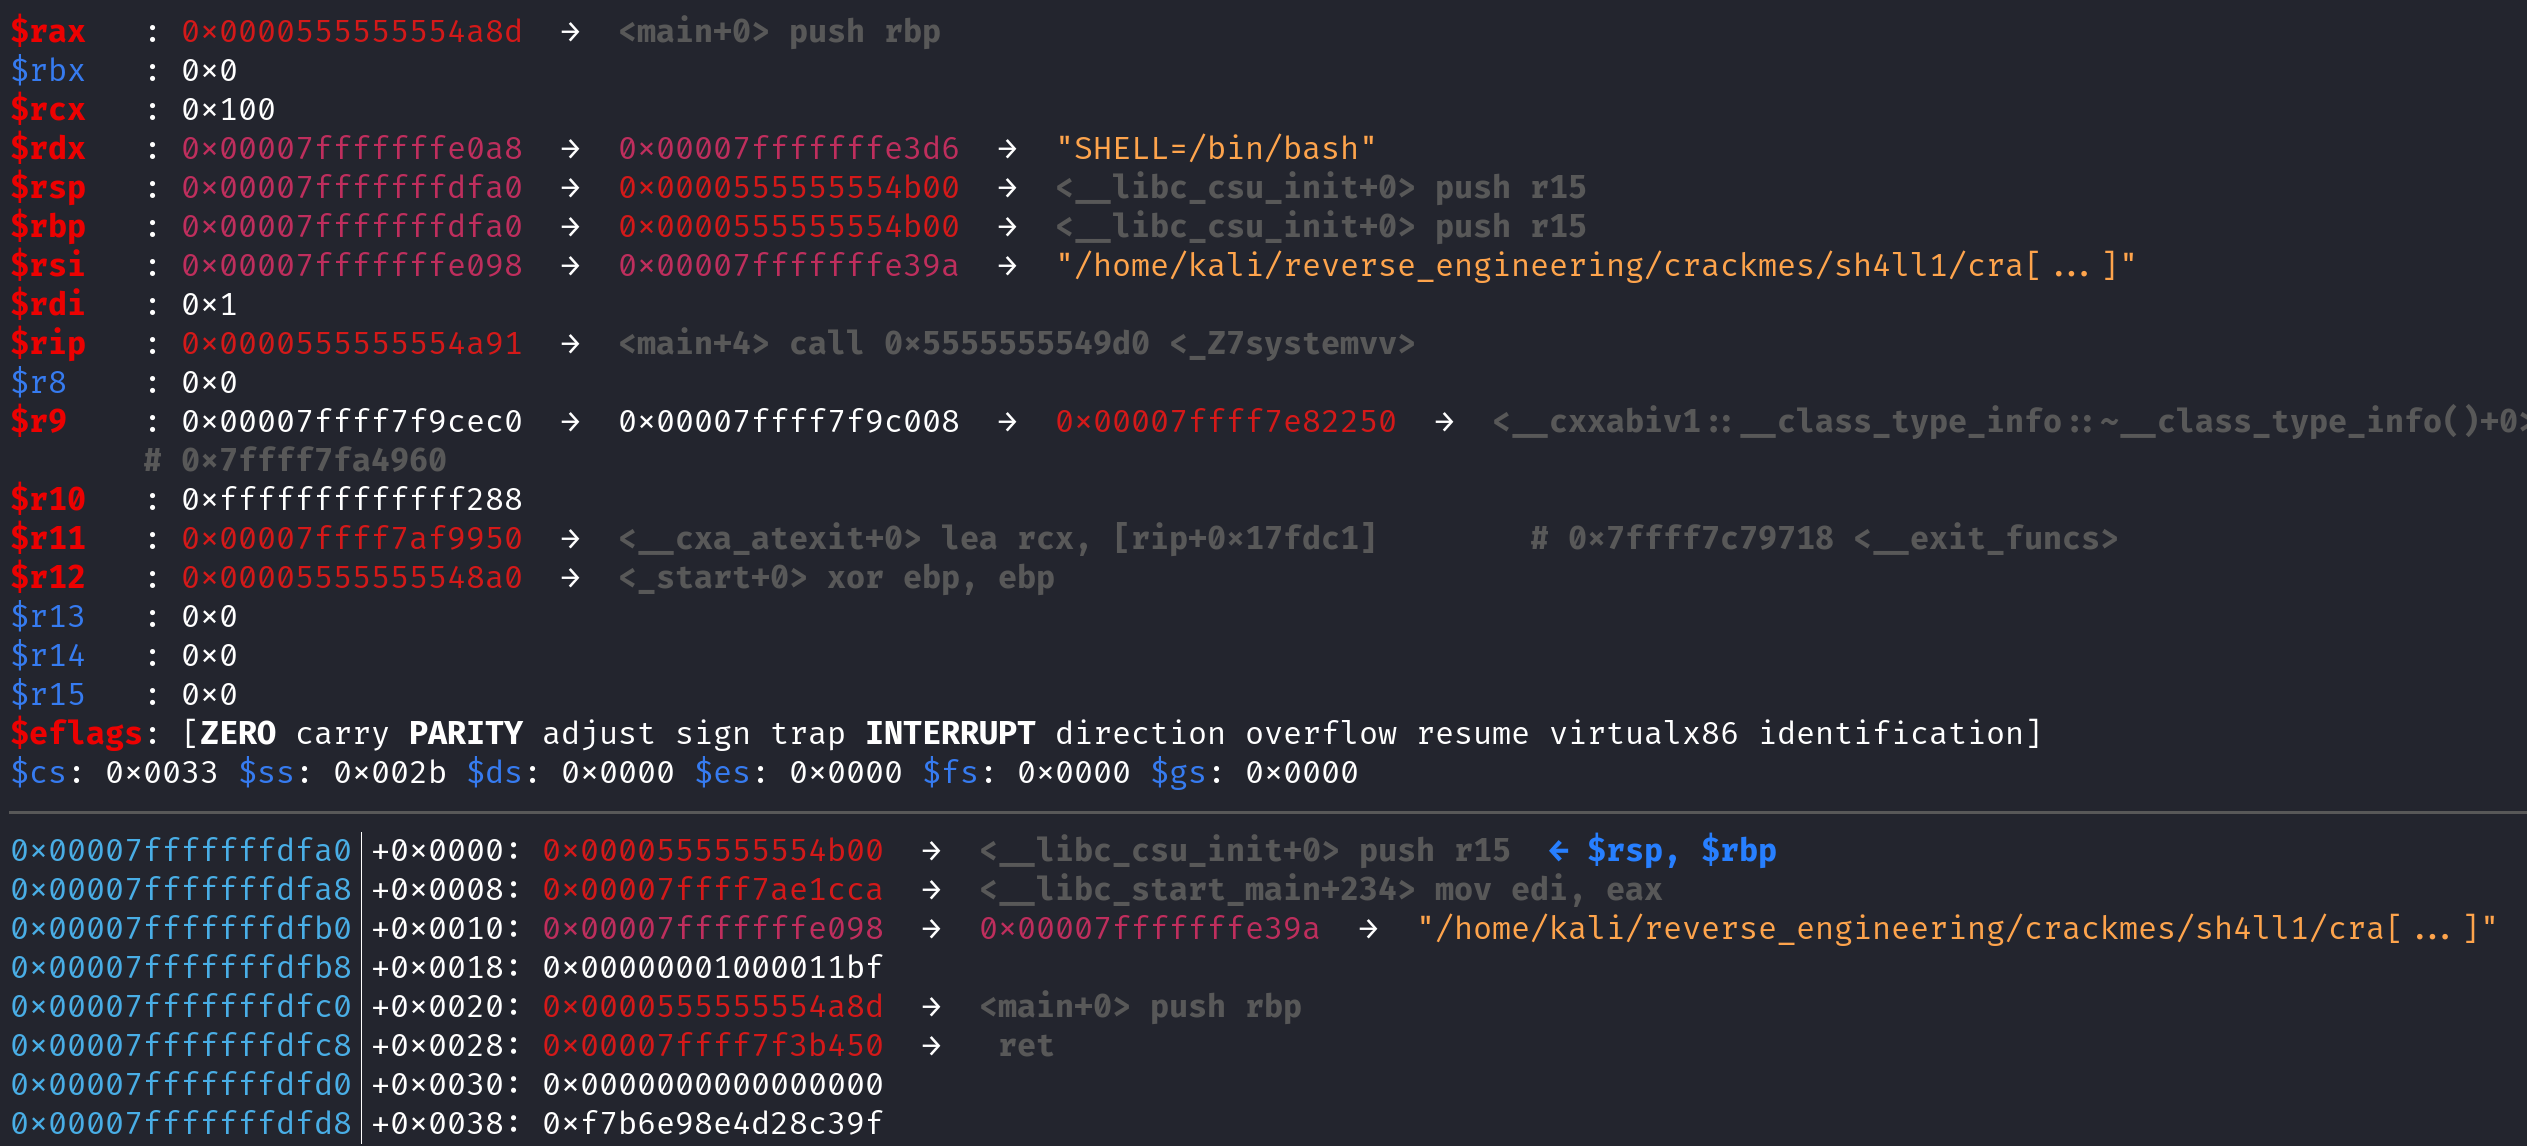
This is the main stack frame. The RSP (0x00007fffffffdfa0) register represents the top of stack while RBP (0x00007fffffffdfa0) represents is the bottom of the stack. The reason both are the same in this case is because the author did not pass argc or argv as arguments to the main function. Had this happened, we would have seen a sub rsp, 0x10 instruction which would make room for the argc and argv variables. However, once we execute the call systemv instruction, the return address for the main function gets push'd on to the stack. The return address is exactly what it sounds like. It's the address that the instruction pointer (RIP) will point to after the systemv function ends. Whenever a value is anything is push'd onto the stack, it causes the stack pointer (RSP)to be decremented by 8. Let's step into the systemv function and take a look at the stack frame when the function is first called and after the function prolog.
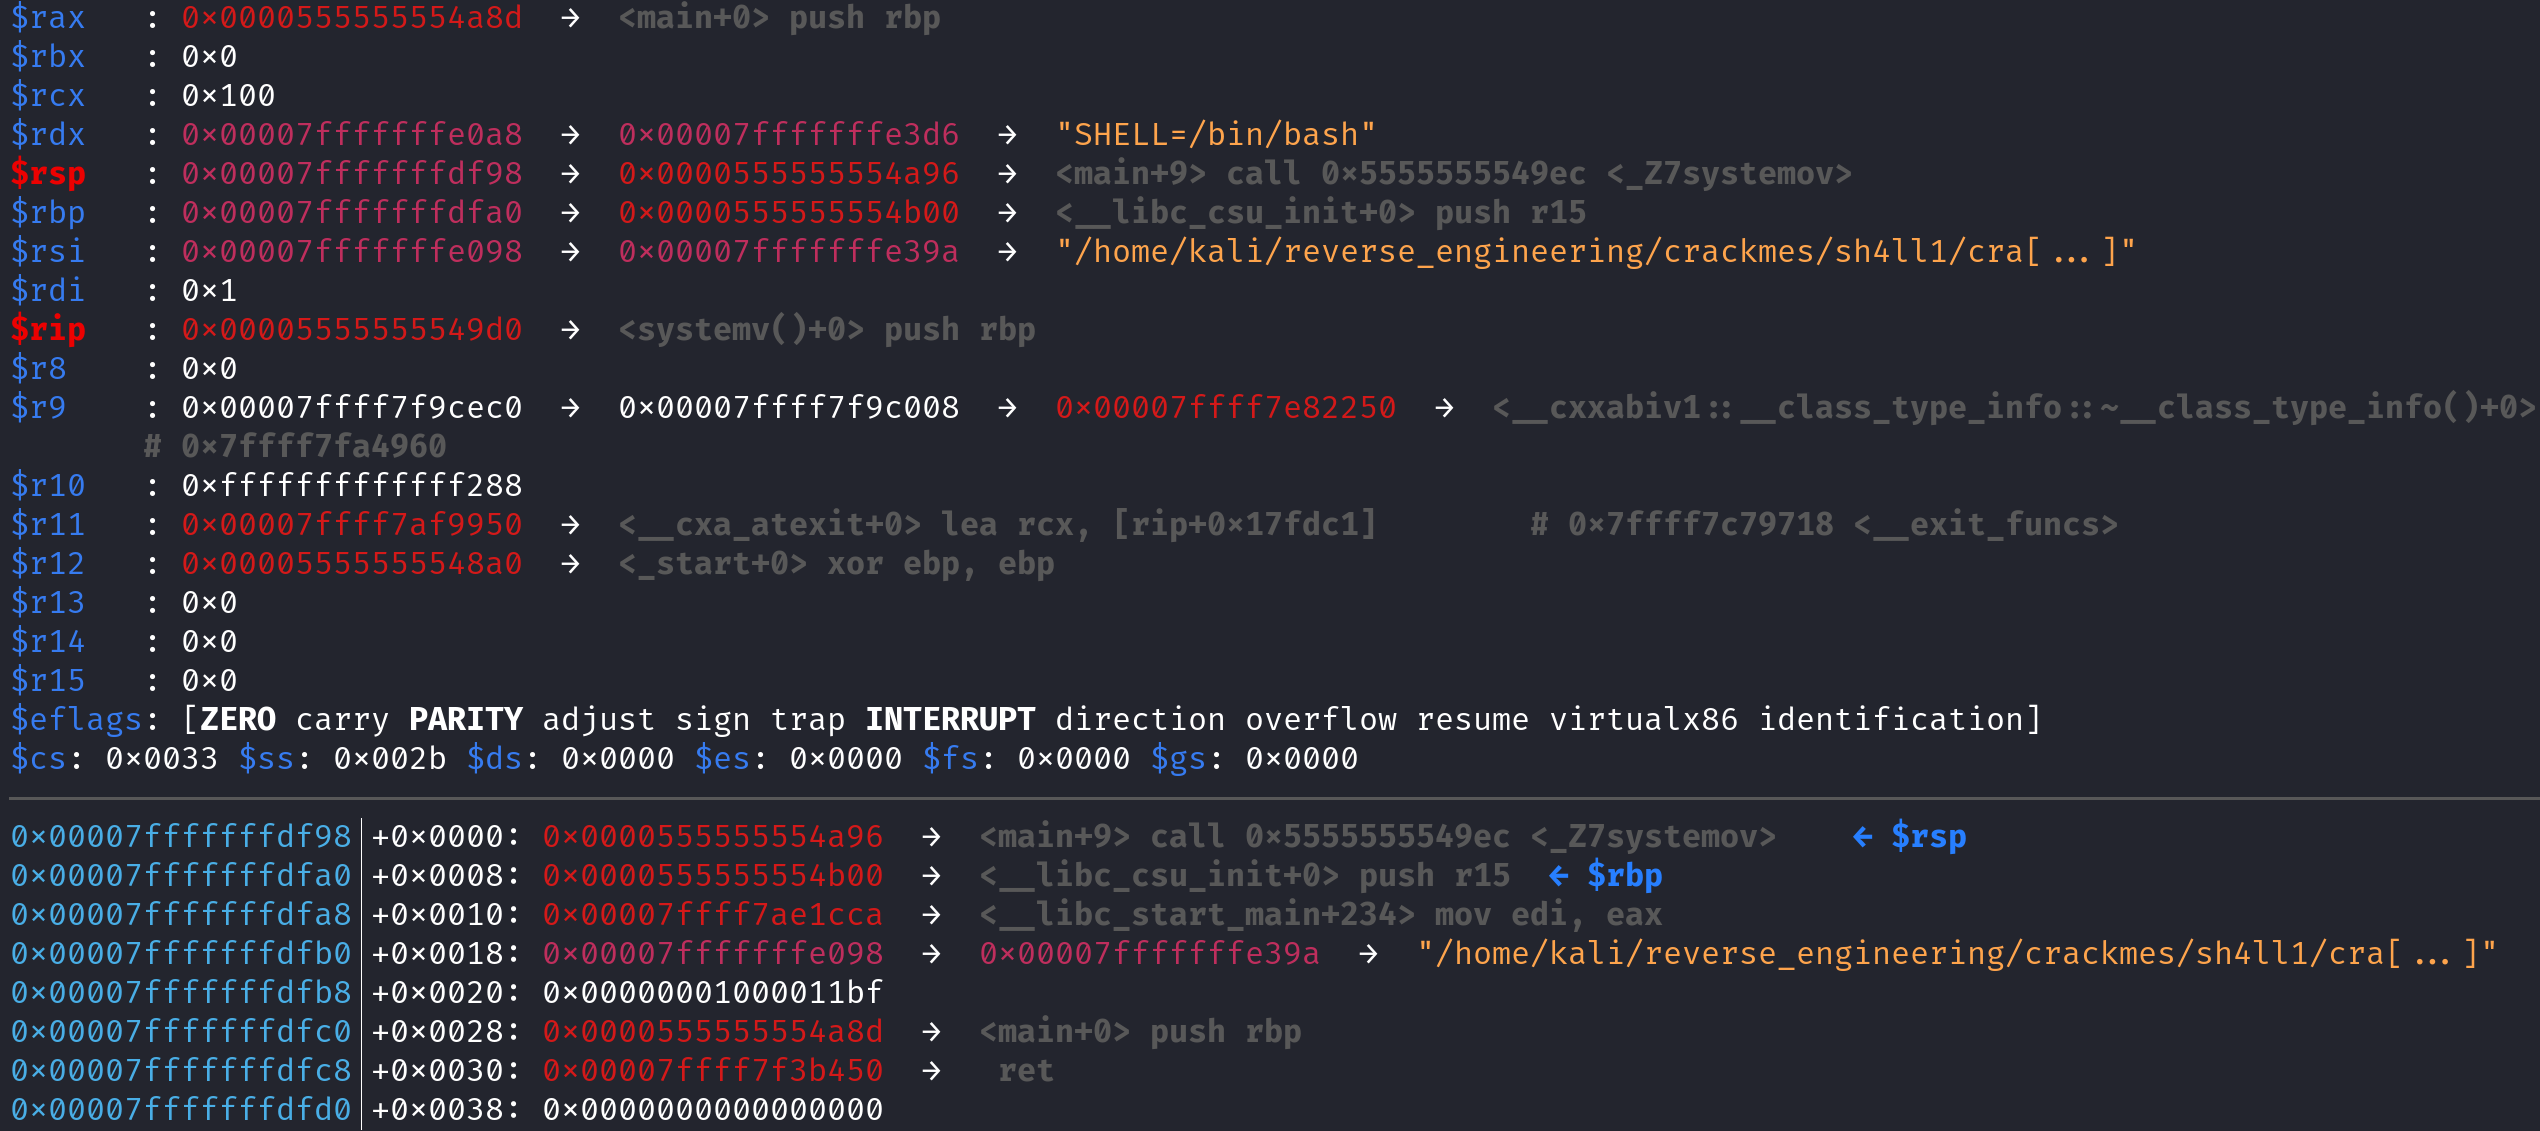
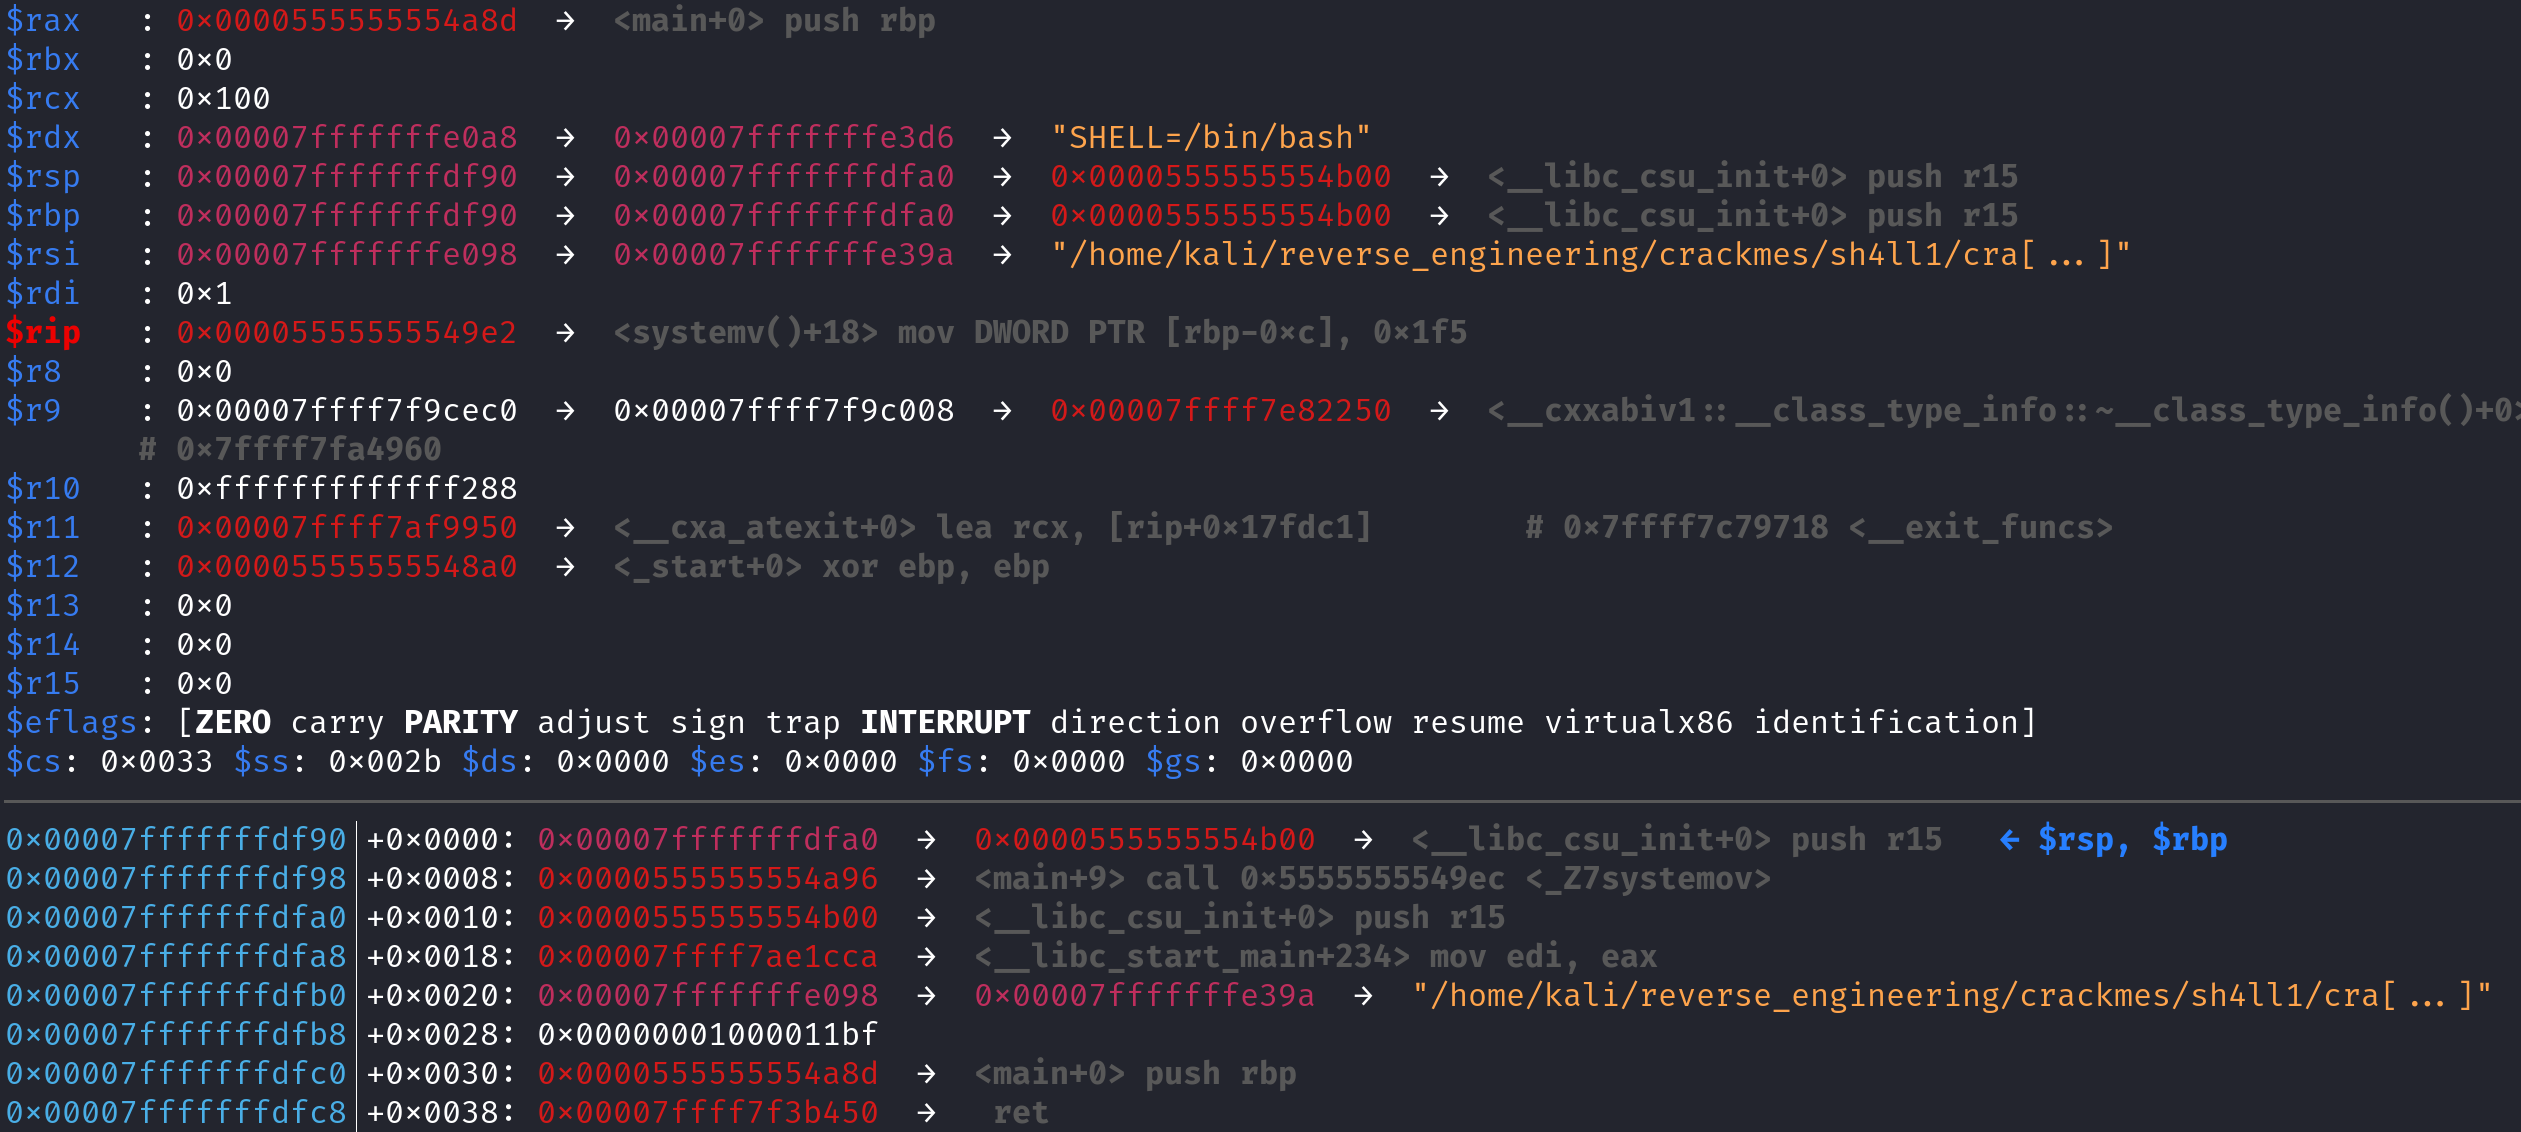
As you can see, before the function prolog, RSP gets decremented by 8 and but RBP remains the same. Also note the return address (0x0000555555554a96) is at the top of the stack. Now remember, this function executes 3 instructions before it returns: mov [rbp-0x4], 0x5, mov [rbp-0x8], 0x7, and mov [rbp-0xc], 0x1F5. After this function returns the stack will be restored to the state it was in before the function call. Then we call the systemo function. Let's step into that function and skip to the end of the function prolog. That is, after the sub rsp, 0x10 instruction is called and take a look at the stack.
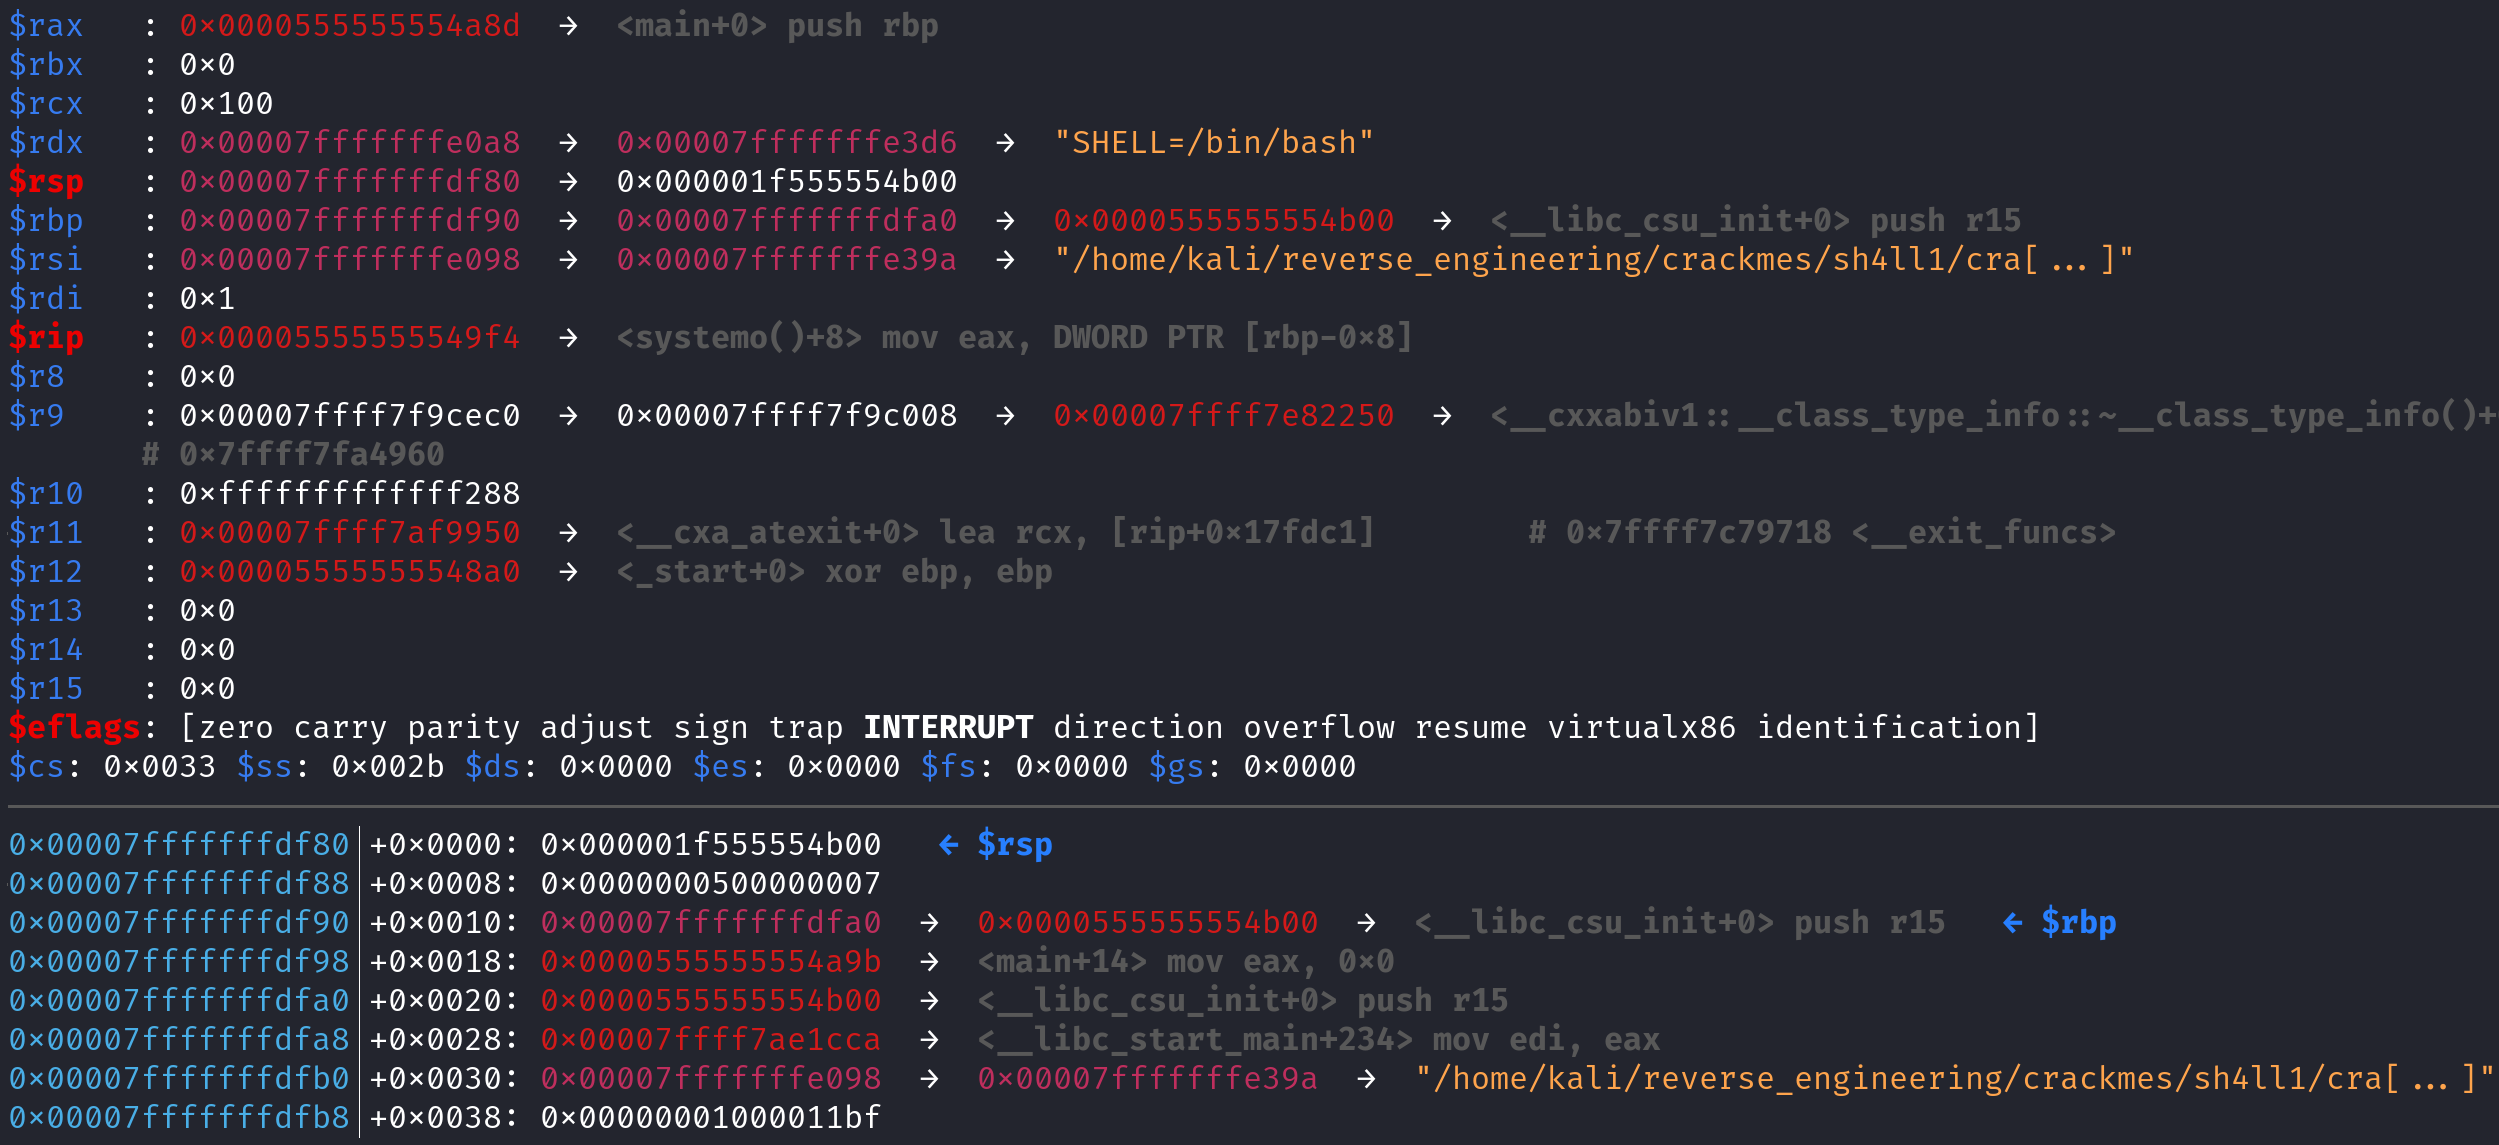
Well would you look at that! We recognize these values from earlier! Because the systemv function technically never created a stack frame, the systemo function will have a similar stack layout. Therefore, when you create variables in the systemo function, they take the values previously set by the systemv function. I really hope that makes sense! I know it's a little confusing especially if you don't have any experience with the stack. If you have any questions feel free to hit me up! My contact info is at the bottom of this blog post! This will only work if there is no other function call in between systemv and systemo. If you're using my VM I created a few different variations of this program that will produce the expected result and some that will not. Feel free to play around with them. If you aren't using my VM you can find the source code here.
Conclusion
This challenge was a little on the easier side but it did require us to know about stack frames and how they can be manipulated. I hope you all enjoyed this and learned something from this tutorial. If you have any questions feel free to hit me up on Twitter, Instagram, or Discord: jaybailey216#6540. If you have a challenge you want me to try next, let me know and I'll give it a shot! I'll see you all next time!
Peace out! ✌🏾