

Introduction
Hello! Welcome to my first blog post! In this post, we will take a look at a simple reverse engineering challenge called Sh4ll0 from the website crackmes.one. My intended audience are noob reverse engineers like myself. However, if you are more experienced I'd be delighted if you gave this a read and let me know how I can further improve my skills! I tend to be verbose in my walkthroughs. I also refrain from using the decompiled output as I think it will make us better reverse engineers by reading and understanding the disassembly. If you are a more visual person, I have a YouTube video where I walkthrough this challenge. You can find that here:
Optional Materials to Follow Along
If you want to follow along feel free to download the VM I provide. You can find instructions on importing the VM here. If you don't want to use my VM that's fine, my feelings won't be shattered. But you will at least need the binary. You can download the binary here. The binary comes in a password protected zip file. The password is crackmes.one.
You'll also need a disassembler. I recommend IDA or Ghidra. With all of that out of the way, let's get reversing!
Initial Triage
When reversing, I start by running the file command. The file command provides some elementary information about a file (whether the binary is 32- or 64-bit, whether the binary is stripped, etc.). Go ahead and run file on the binary. You should see the following output:

We see that we are dealing with a 64-bit non-stripped binary. Non-stripped binaries are my favorite to analyze because user-defined symbols (like function names) are present in the binary. We can view these symbols using the nm command.
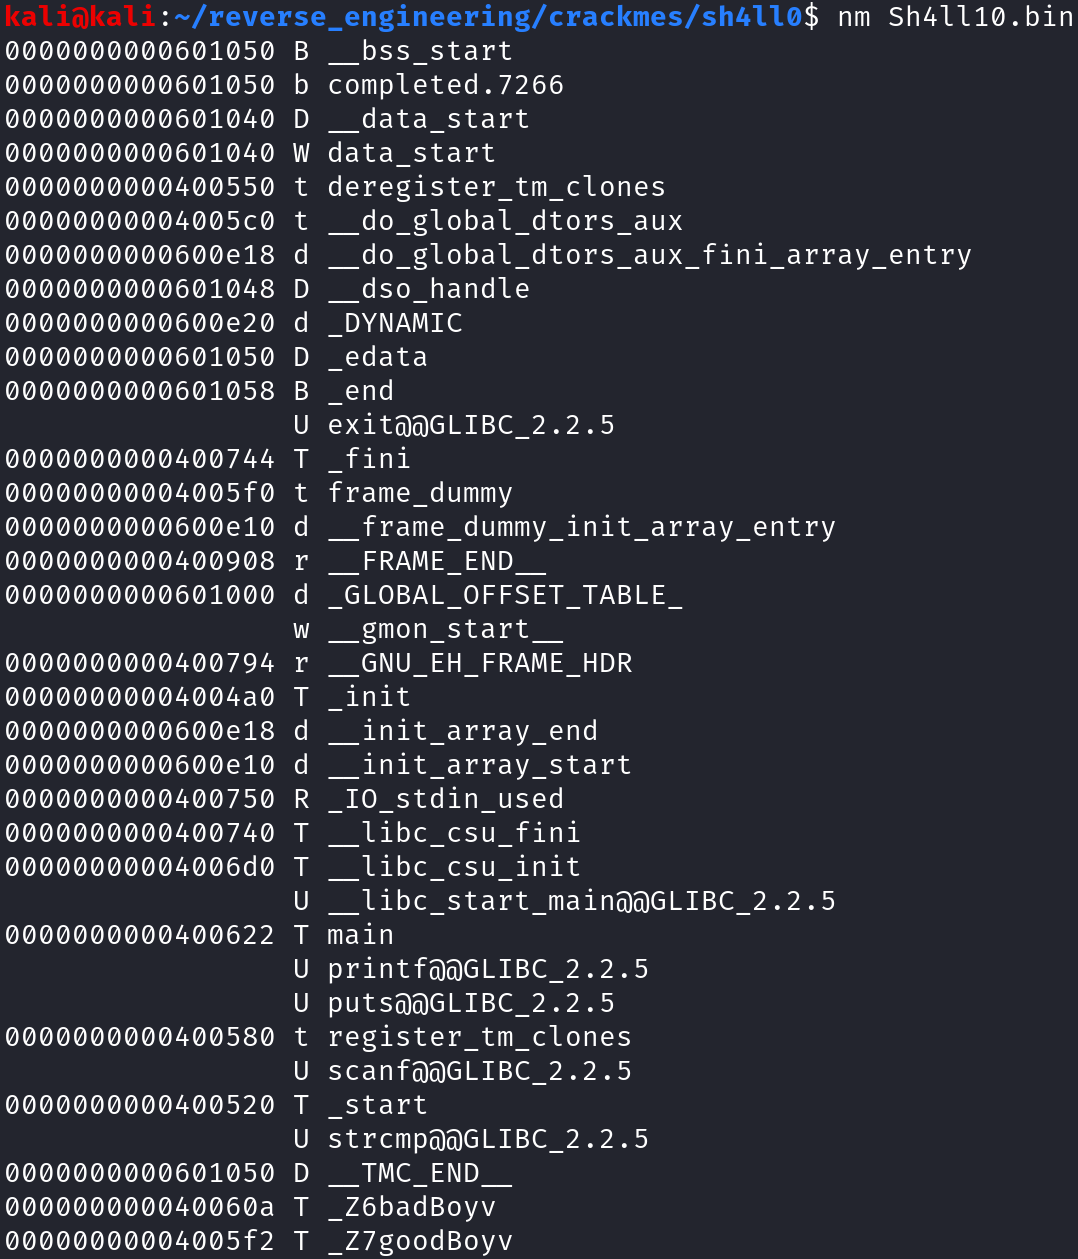
The output format is as follows: address of the symbol, symbol type, and symbol name. You can look at the man page for a full breakdown of the different symbol type identifiers. We see there are two functions of interest: badboy and goodboy. I picked out these two functions because these are not standard C functions. Intuitively, we want to execute the goodboy function because we are good boys and girls, right 😀. We also see the strcmp and scanf functions are used. The author is likely taking our user input and comparing it to some known string. Before we open this in Ghidra, the last thing I like to do is run strings on the binary. strings prints all ASCII characters that are at least four characters. The output is long and contains much of the same information we saw in the from nm. However, we do find out a little bit of extra information.
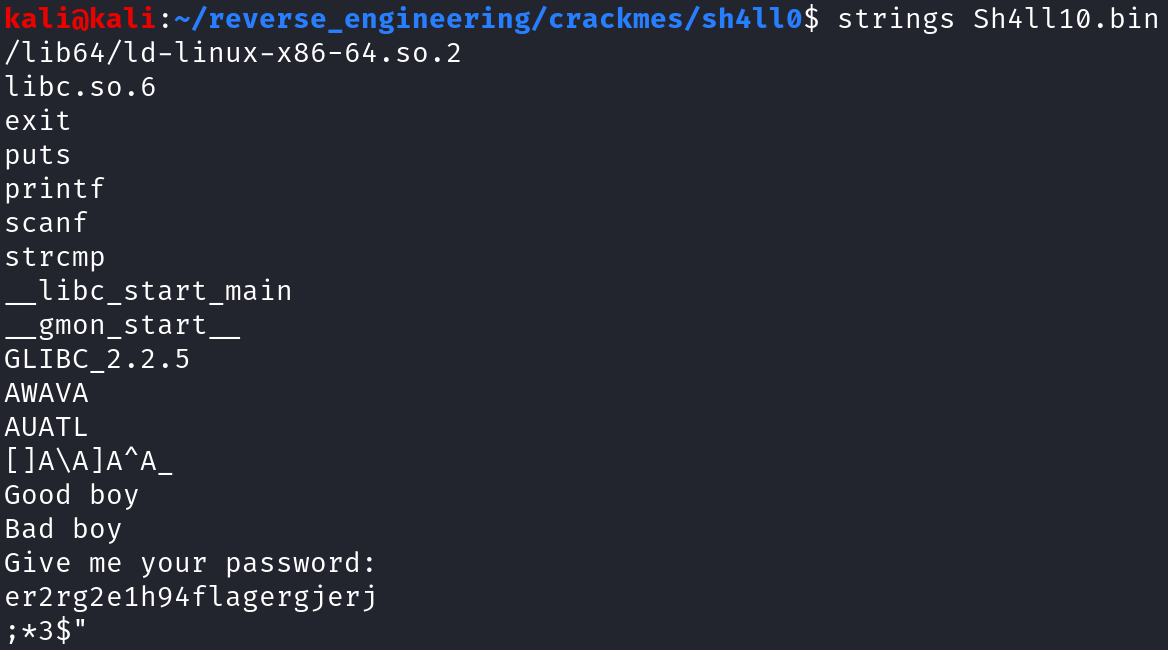
I am only showing a subset of the strings output above. We see what looks like a prompt "Give me your password: " We also see what looks to be the program output: "Good boy" if we type the correct password, and "Bad boy" if we type the wrong password. Finally, we see a password we can try: "er2rg2e1h94flagergjerj". Since we know the binary takes our input and uses the strcmp function, we can probably safely assume that if we provide the password above, we will get the "Good boy" output. All of this helps us drive our analysis when we open a binary in Ghidra. Before we do that, let's run the binary with the potential password and see what happens.

This is not what we were expecting to see in the slightest! We can try different standard passwords, but we will always get a segmentation fault. Clearly, we do not understand the program as well as we think we do. So, let's finally open this up in Ghidra. If you are unfamiliar with creating a project in Ghidra feel free to check out this short blog post detailing all of the steps.
Analyzing the Binary in Ghidra
In my YouTube videos, I always create a "pseudo.c" file. This file will hold the disassembly instructions translated to C-like syntax. I'll be updating this as we learn about the binary. Let's start with the first few lines of the main program.
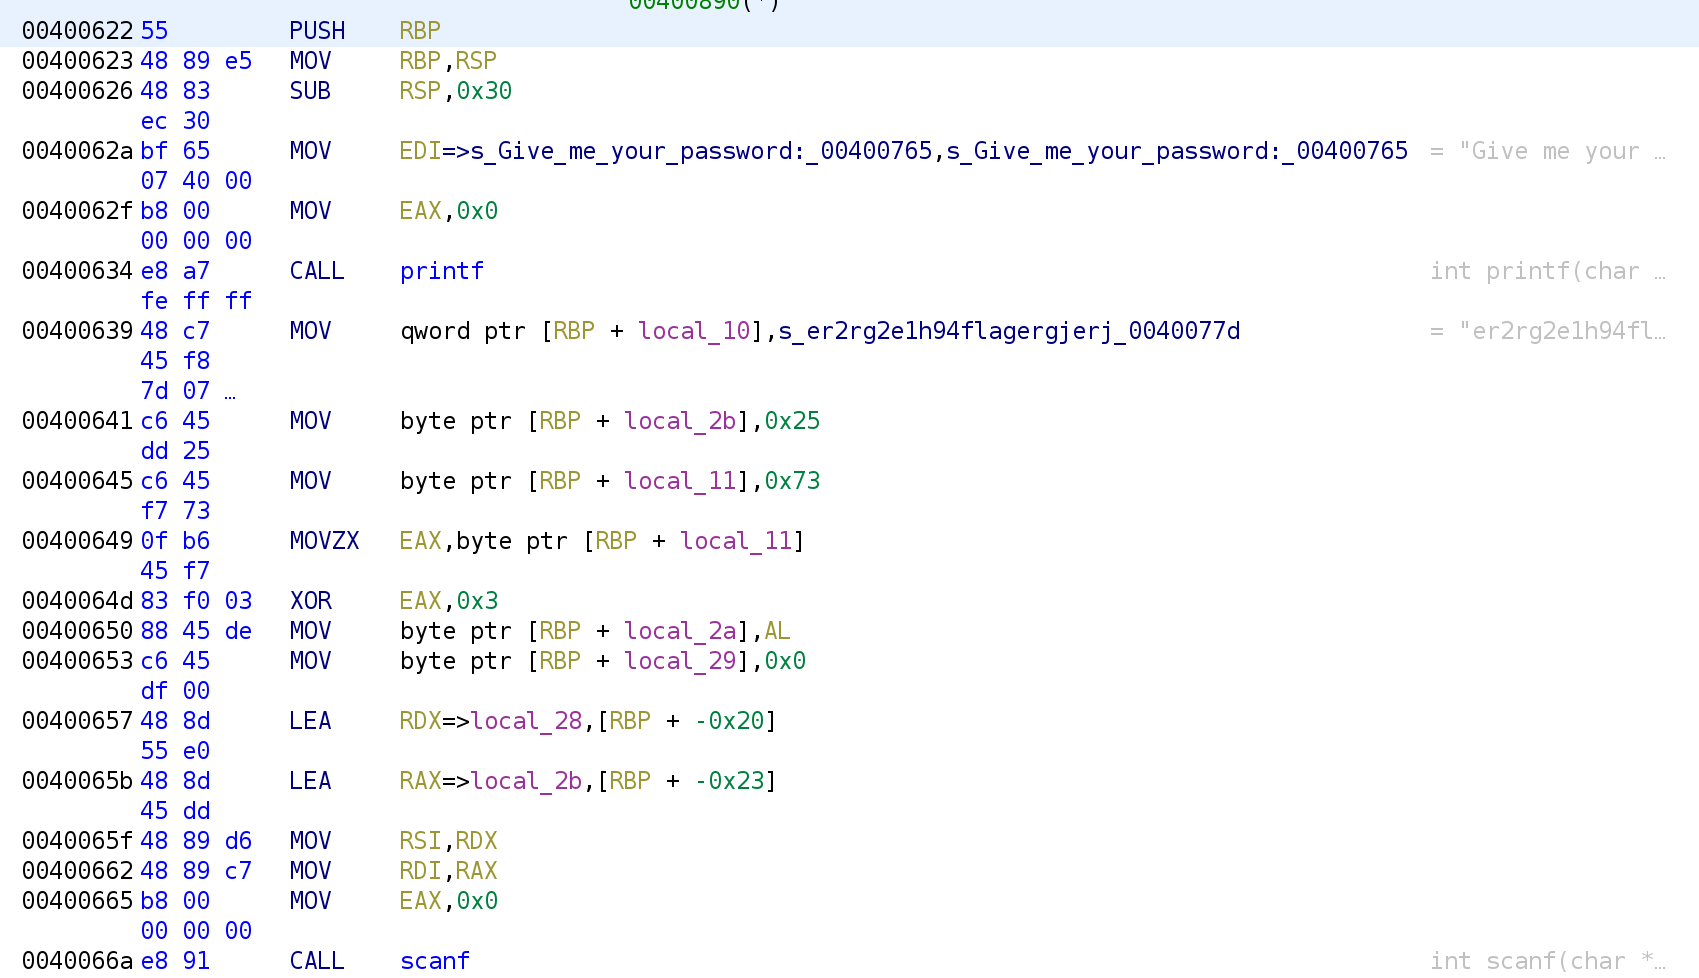
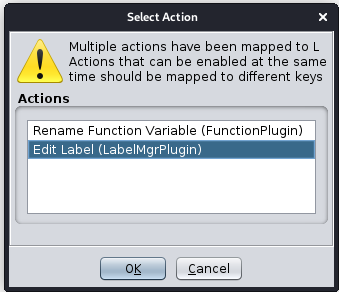
Right away, we see some familiar strings. The prompt "Give me your password" gets loaded into the EDI register, and the printf function is called a few lines after that. We also see the fake flag is stored in a variable local_10 at address 0x400639. Since this is not a memorable variable name, let's rename it to fake_flag. In Ghidra, you can rename stack variables by clicking on the variable you want to rename, local_10, and pressing the L key. The L key is mapped to two different actions so, Ghidra will ask which action to perform. Select "Edit Label" and press Ok.
Rename the variable to fake_flag. You'll see the change reflected in the disassembly.

As you can see, the variable has been renamed. Wherever this variable is used within the main function, it will have our updated name. The C-like syntax for the lines above roughly translates to the following:
fake_flag = "er2rg2e1h94flagergjerj"; MOV [RBP+fake_flag], er2rg2e1h94flagergjerj
/*
MOV EDI, "Give me your password: "
MOV EAX, 0x0
CALL printf
*/
printf("Give me your password: ");
In next code segment we see two variables (local_2b and local_11) get assigned the values 0x25 and 0x11 respectively. I like to rename everything because the default names are difficult to remember. Since we do not know the variable's purpose, let's rename them to their assigned value. So, local_2b becomes is_0x25 and local_11 becomes is_0x73.
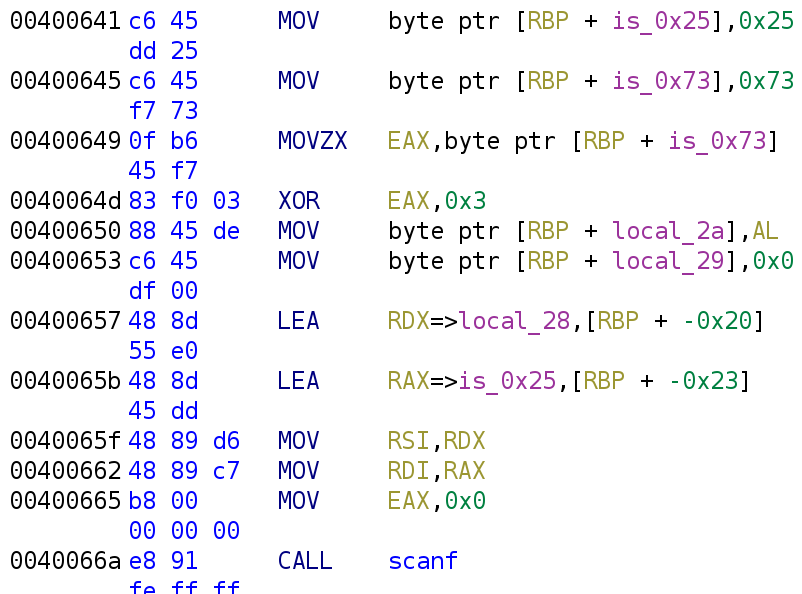
At address 0x400649, we see the value 0x73 is loaded into the EAX register that is then XORed with 3. So, the value of the EAX register holds ox73 ^ 0x3 -> 0x70. At address 0x400650, we see the variable local_2a is assigned the value of the AL register. The AL register holds the lower 8 bits of the EAX register. So this is essentially assigning 0x70 to local_2a. Right below that, we see local_29 get assigned to 0x0. Just as we did before, let's rename these variables to the value they have been assigned. I've done that below.
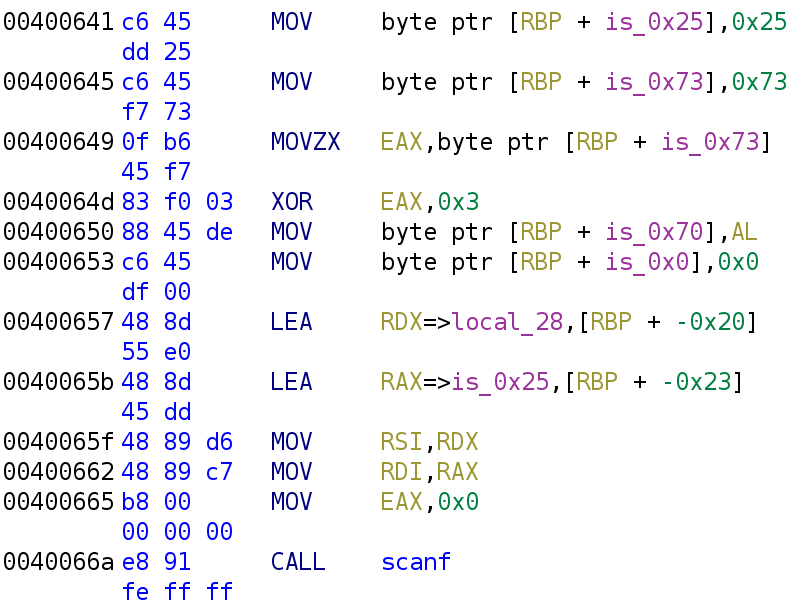
Now we get to lines 0x400657 and 0x40065b, both of which use the LEA instruction. This instruction stands for "Load Effective Address." LEA loads an address calculated by the operand. Ghidra makes the instruction a little more confusing by adding local_28 in the instruction. The actual instruction looks like LEA RDX, [RBP + -0x20]. Ghidra adds the local_28 identifier because the value of [RBP + -0X20] is a variable on the stack, which Ghidra named local_28. So, it is essentially storing the address of local_28 in the RDX register. Similarly, the instruction below is LEA RAX, [RBP + -0x23]. The following instructions set up the scanf function call. In 64-bit binaries, arguments are passed via registers. The RDI and RSI register holds the first and second arguments, respectively. With this in mind, we can infer that local_28 is the user input and is_0x25 is the format specifier. I've renamed the variables to reflect this new information.
Note: The
EAXregister is set to 0. If you recall,EAXwas set to 0 earlier, before the call toprintf. Functions with a variable number of arguments use theALregister to hold the number of vector registers. Vector registers are usually used to hold floating-point values. So,printf("%f", 1.0f);would result inEAXbeing set to 1.
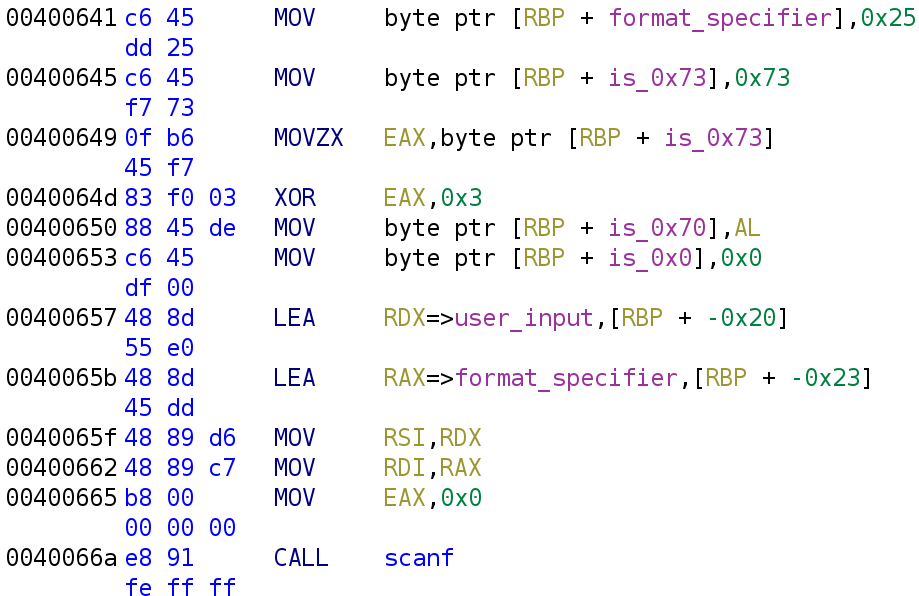
You might notice a problem here. A format specifier needs an identifier that tells the compiler what type of data is in the variable (e.g. s, x, f). At first, I assumed the format specifier was %s, but you know the saying about making assumptions. The author did a little tomfoolery here. Instead of using a static format specifier, the author calculated the specifier and assigned the result to a variable. If that doesn't make sense, hopefully, it will be clear when I write the code.
int is_0x73;
char format_specifier[3];
format_specifier[0] = '%'; // MOV [RBP+format_specifier], 0x25
format_specifier[2] = is_0x73 ^ 3; // MOV [RBP+is_0x70], AL
format_specifier[3] = '\0'; // MOV [RBP+is_0x0], 0x0
Of course, I'm not 100% sure this is verbatim what the author wrote, but it makes sense given the disassembly output. We can infer the format specifier is %p (0x70 is p in ASCII). So our pseudo.c file looks like this now:
fake_flag = "er2rg2e1h94flagergjerj"; MOV [RBP+fake_flag], er2rg2e1h94flagergjerj
/*
MOV EDI, "Give me your password: "
MOV EAX, 0x0
CALL printf
*/
printf("Give me your password: ");
int is_0x73 = 0x73;
char format_specifier[3];
format_specifier[0] = '%'; // MOV [RBP+format_specifier], 0x25
format_specifier[2] = is_0x73 ^ 3; // MOV [RBP+is_0x70], AL
format_specifier[3] = '\0'; // MOV [RBP+is_0x0], 0x0
Now, let's look further down and see how our user input is used.
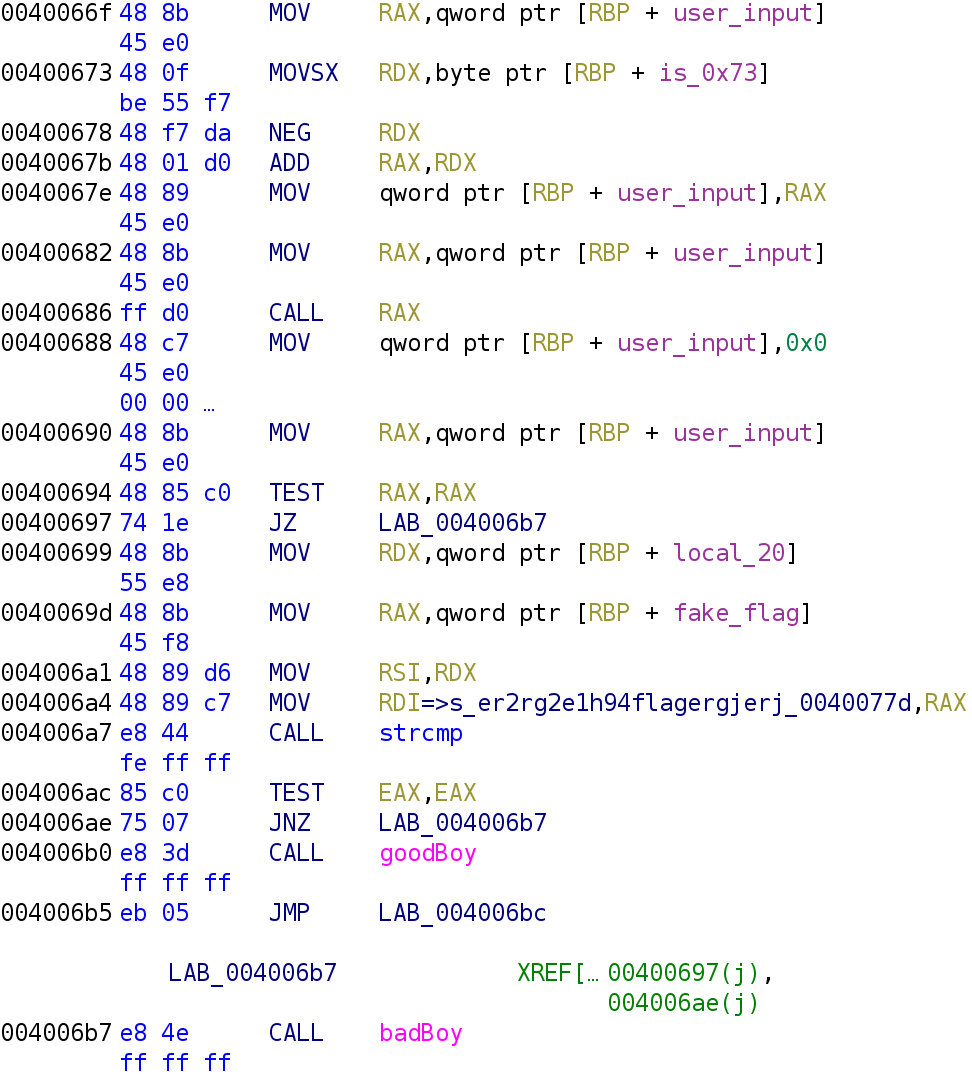
We see user_input gets loaded into the RAX register. Then, the is_0x73 variable is loaded into the RDX register and is then negated. Next, at address 40067b, the RAX register is added to the RDX register. This essentially subtracts 0x73 from our user_input. The updated user_input variable is stored in the RAX register. Finally, we get to the crux of the code. At address 400686, the RAX register is used as the operand of the CALL instruction. Our user_input is used as a function pointer. This explains why we received a segmentation fault. If it's not clear, I'll provide a brief explanation.
When a program is executed, it is given an address space that it can use for all of its resources required, like functions and variables. A binary can ONLY access the memory inside this address space. Any attempt to access memory outside of its allowable address space will result in a segmentation fault because the program isn't allowed to access that memory. If you're a terrible programmer like me, you received many of these errors in your programming classes when using pointers.
The code looks something like this:
/*
	MOV RAX, [RBP+user_input]
    MOVSX RDX, [RBP+is_0x73]
    NEG RDX
    ADD RAX, RDX
    MOV [RBP+user_input], RAX
*/
user_input -= 0x73; // The above assembly block translates to this line of C
(*user_input)(); // CALL RAX
Debugging Sh4ll0.bin with GDB w/ GEF
Now let's talk about what happened when we provided the fake flag "er2rg2e1h94flagergjerj" to the program. I'll use a debugger to demonstrate.
Let's open this up in gdb. If you installed gef, it'll look like this:
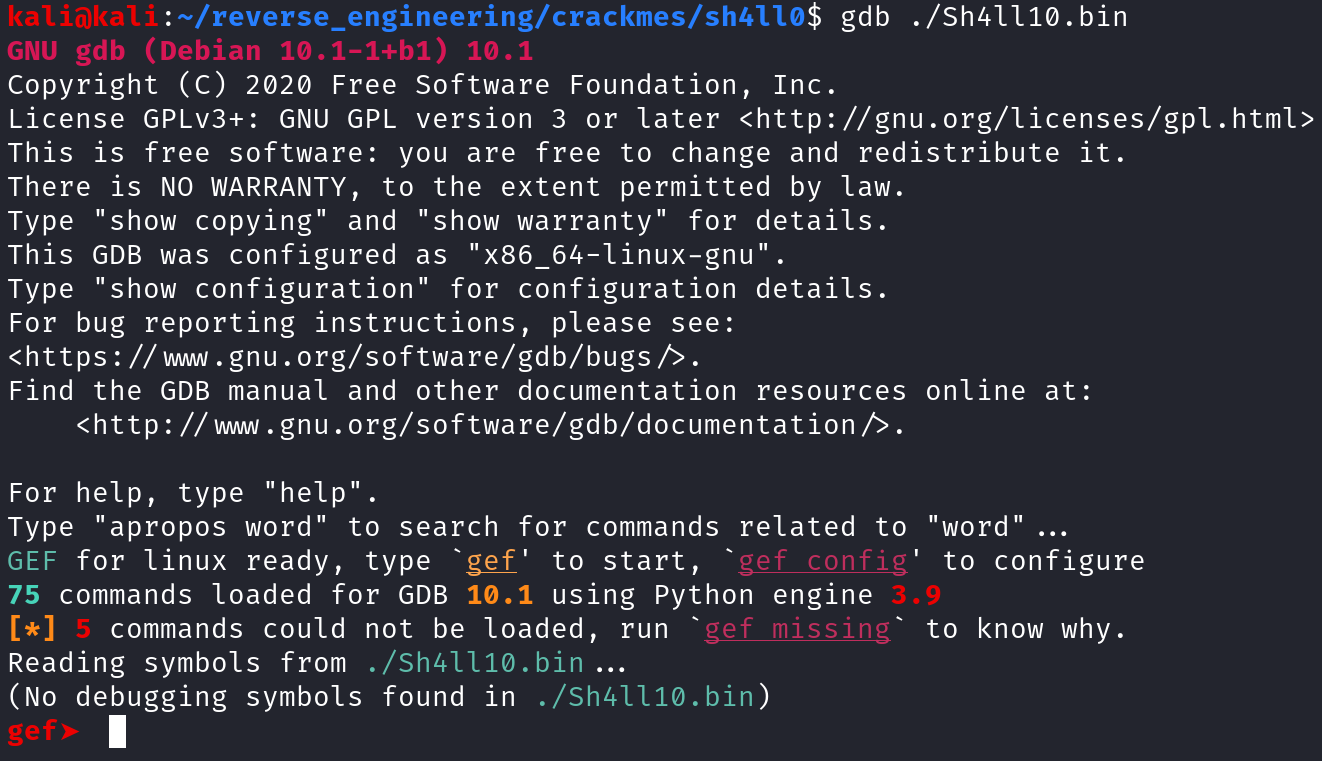
Because we have symbols, we can disassemble the main function by typing disas main.
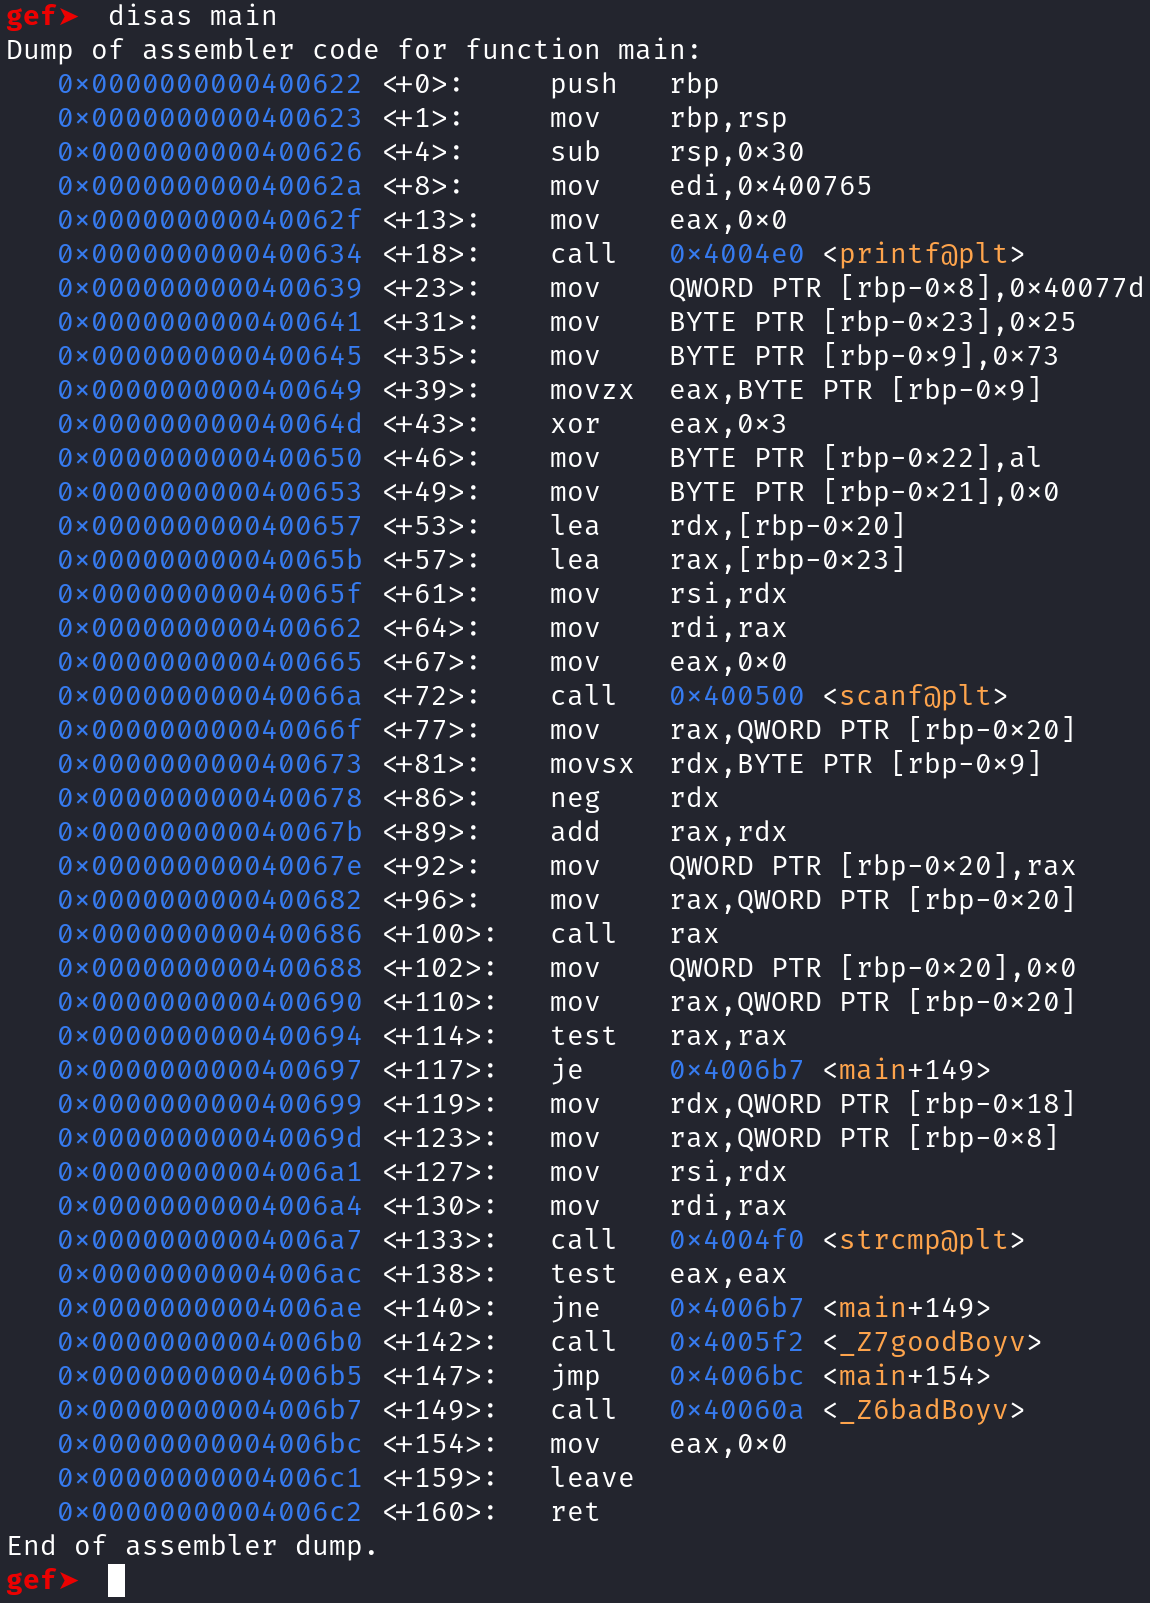
Let's set a breakpoint at address 0x400686 by typing b *0x400686 and run the program by typing r. When you run the program, you'll get prompted to insert a password. Insert the password from earlier: "er2rg2e1h94flagergjerj".

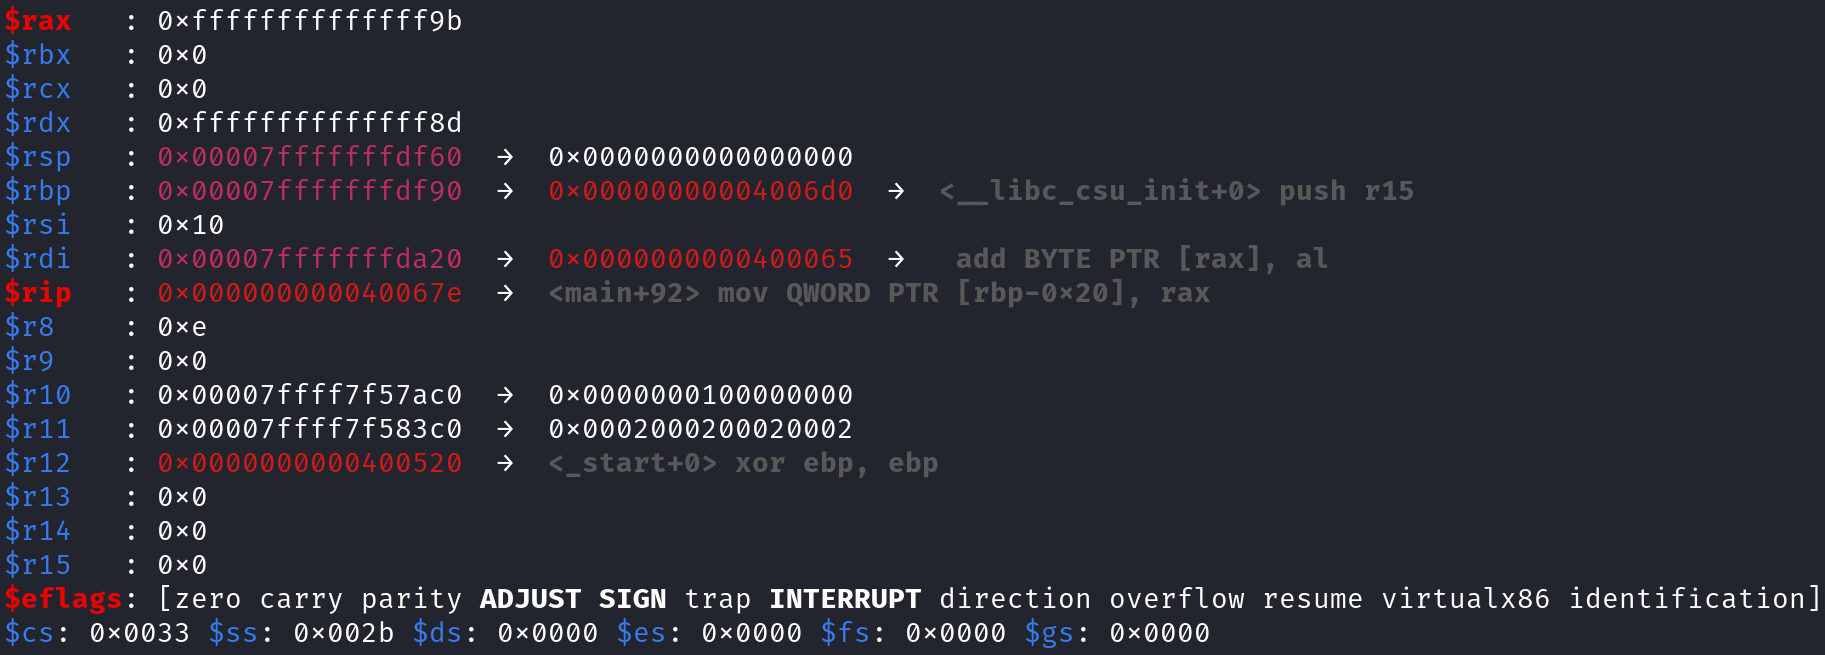
After you type in the password, the program will pause at the address we specified. This is just before our user input is placed in the RAX register. In gdb, our user input is represented as [rbp-0x20]. Unfortunately, we cannot change this identifier. At least I don't know how to do so. Let's execute this instruction and pause. We can do this by typing step instruction. Alternatively, you can simply type si which has the same effect. Once you do that, take note of the value stored in the RAX register.
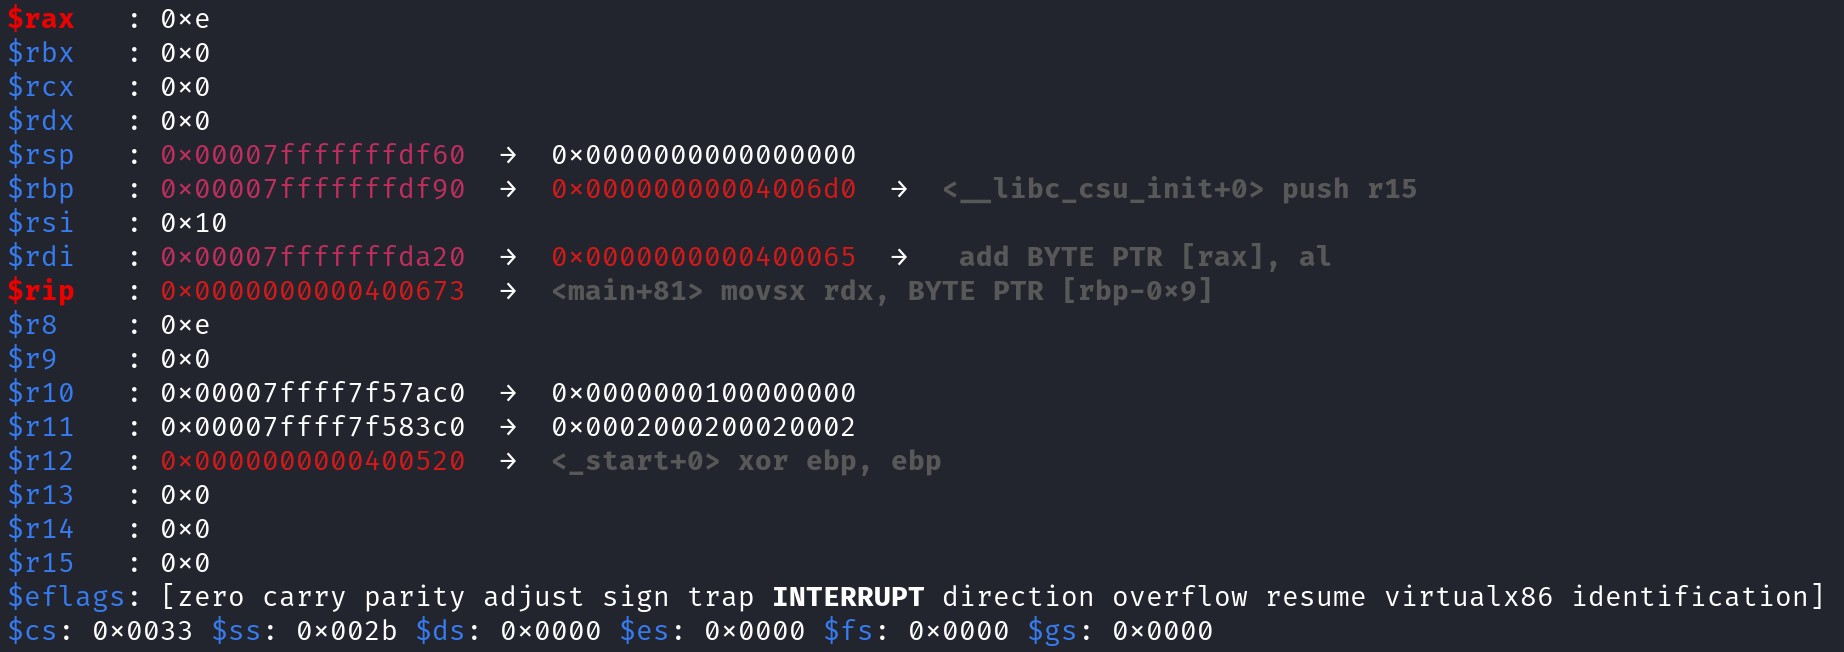
0xe even though we provided er2rg2e1h94flagergjerjThe RAX register holds the value 0xe but we typed er2rg2e1h94flagergjerj. Why is that? Because the format specifier, %p, expects a pointer. Pointers can only store hexadecimal values. Since e is a valid hexadecimal value, but r is not, only e was stored in our user_input and the rest was discarded. You might already see the problem. When we reach the instruction at address 0x40067b, we subtract the value stored in the RDX register (0x73) from the value stored in the RAX register (0x3).
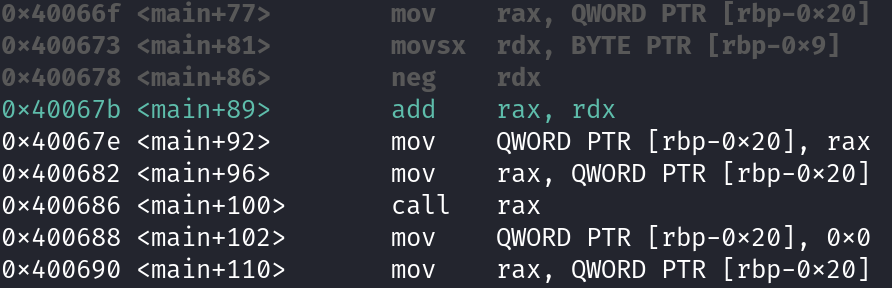
You can see the results by stepping through the instructions 3 times. So, type si and press enter 3 times. Now, look at the value stored in the RAX register.
0xffffffffffffffff9bThe value in RAX is 0xffffffffffffffff9b. This address is going to be used in the CALL instruction at address 0x400686. This is problematic because this address does not fall within the allowable address space for this program thus resulting in a segmentation fault.
Let's solve this challenge already!
Alright, now let's put everything together and solve this challenge. Let's take a look at our completed C code.
char fake_flag = er2rg2e1h94flagergjerj;
printf("Give me your password: ");
int is_0x73 = 0x73;
void(*user_input)(); // Creating a void function pointer because the function we want to call does not return a valed nor does it accept an argument
char format_specifier[3];
format_specifier[0] = '%';
format_specifier[2] = 'p';
format_specifier[3] = '\0';
scanf(format_specifier, &user_input);
user_input -= is_0x73; // We must add 0x73 to the address of the function we want to call
(*user_input)();
With this in mind, it is clear that we have to provide the program the address of the goodboy function (0x4005f2) plus 0x73. Where did I get the address? If you recall, when we ran the nm command earlier, we saw the address of the goodboy function. You can also see it in Ghidra by filtering for goodboy in the symbol tree and double-clicking on the function name.
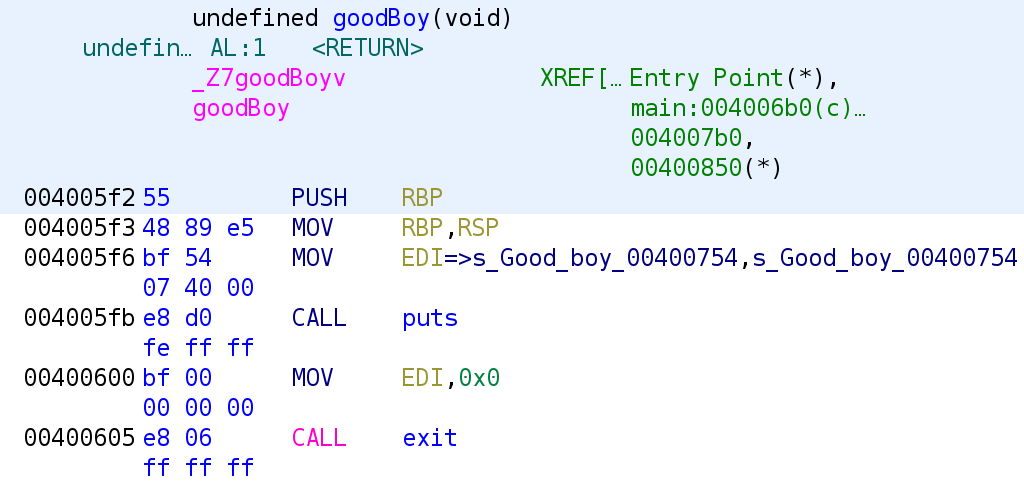
This function simply prints out the string "Good boy" and exits. So, let's test our theory and run the program and provide 400665 (4005f2 + 0x73).

If you wanted to live on the edge you could also execute the badboy function which prints out "Bad boy". I'll leave that for you to try on your own if you wish.
Conclusion
Alright, that's it for this challenge. I hope you learned something new and enjoyed reading this post. Feel free to check out my YouTube channel and/or other blog posts! If you have any questions feel free to reach out to me on Twitter, Instagram, or Discord: jaybailey216#6540. If you have a challenge you would like me to try, let me know and I'll give it a shot! I'll see you all next time!
Peace out! ✌🏾