

Introduction
Hello and welcome back! I'm excited because this challenge was written by a good friend of mine! It's called "Zed's Crackme" and it is hosted on the website crackmes.one. I really enjoyed solving this challenge and making the video/this blog post. In the description the author mentions our goal is to find the serial and he set 2 restrictions on us: "we cannot patch" and "we cannot bruteforce." These are not terrible restrictions, we haven't patched a binary yet and bruteforcing is beneath us right 🙂? Fair warning, the author is tricky and he left in an annoying rabbit hole which I fell for when I initially solved this challenge. I will take you down this rabbit hole as I think it is a good exercise to improve our reversing chops. The more disassembly we read the better right? However, I will clearly mark where the rabbit hole is so you can skip that section if you feel so obliged. As always I hope you have a good time reading! I also have a YouTube channel and you are free to check out the corresponding video for this challenge here:
Optional Materials to Follow Along
If you want to follow along feel free to download the VM I provide. You can find instructions on importing the VM here. If you don't want to use my VM that's fine, my feelings won't be shattered. But you will at least need the binary. You can download the binary here. The binary comes in a password protected zip file. The password is crackmes.one.
You'll also need a disassembler. I recommend IDA or Ghidra. With all of that out of the way, let's get reversing!
Initial Triage
We start out with some initial analysis of the binary we received. We are going to run file to see what type of binary we are dealing with.

See something rather strange about this binary. We see it was statically linked and there is no section header. Without going into too much detail, executable and linkable format (ELF) is a standard file format for executables, object files, and others. This format consists of the ELF header, followed by a program header or section header, or both. A section header points to different sections in an ELF file. If you're interested you can read more about it here: https://man7.org/linux/man-pages/man5/elf.5.html. The section header isn't necessary to run the program so despite not having any sections, we can still run the binary. Unfortunately, this binary seems to have been corrupted when uploaded to the crackmes.one website thus if we try to run our binary we will get a segmentation fault. That's ok though. We will still be able to solve this challenge. Let's go ahead and run strings on this binary to see if we can find out any additional information.
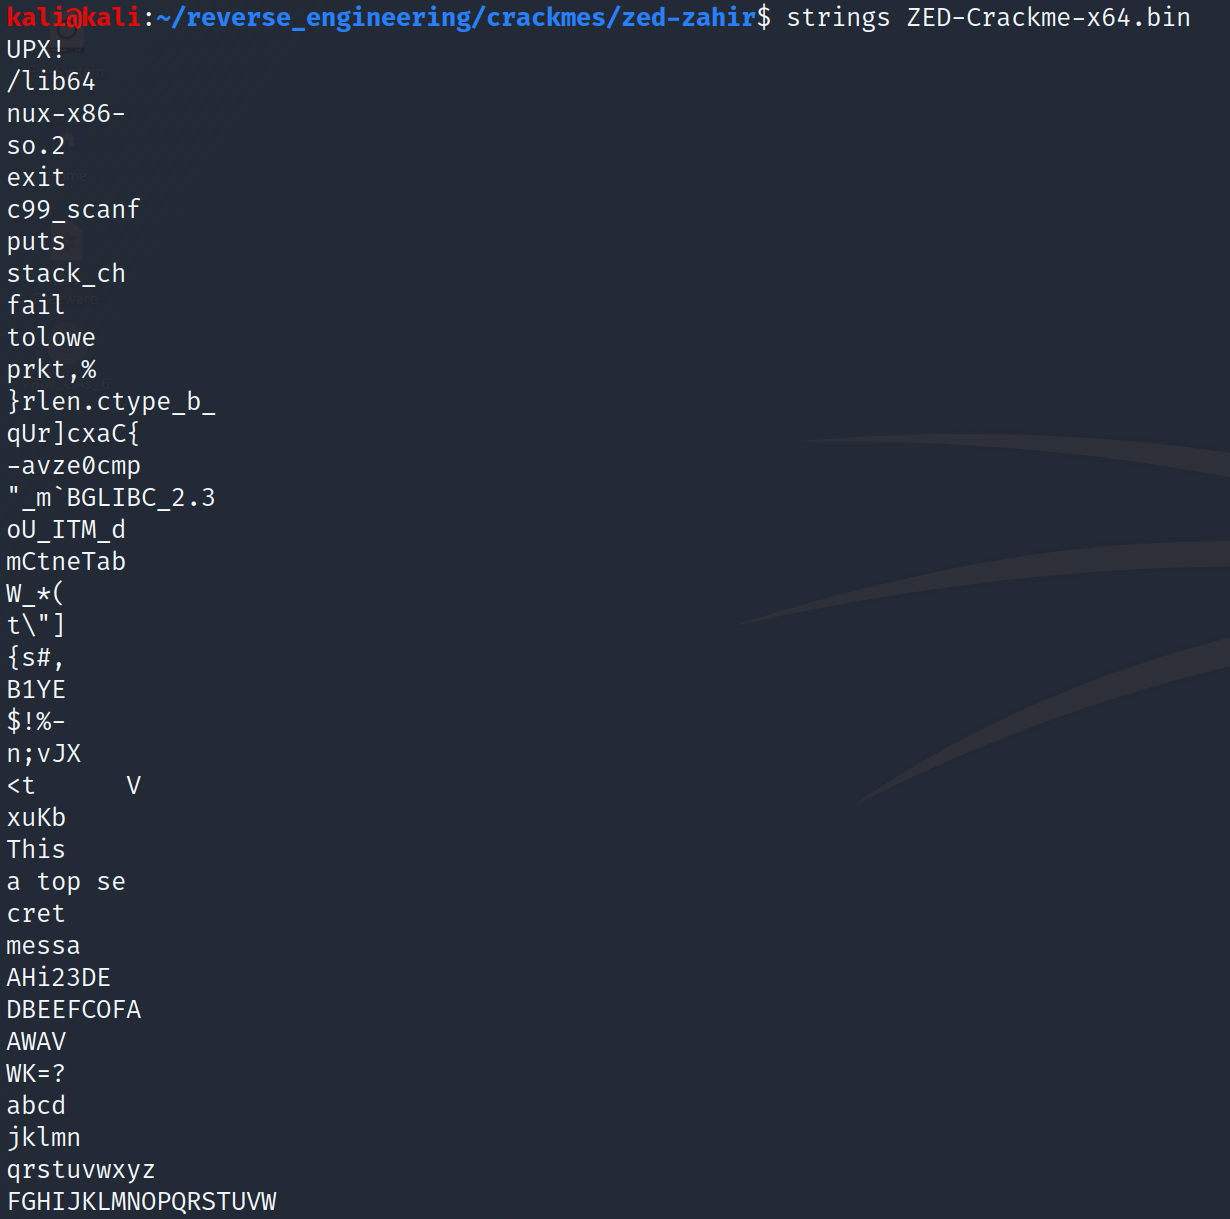
We see some ascii strings but it appears some of the strings were cut off. For example, tolower appears to be missing the "r." This is somewhat consistent among the other strings. We also see something interesting at the very first line "UPX!" A quick Google search shows us that UPX is an executable packer.

Simply put, a packer is a way of compressing executable files. The packer will compress the executable and at runtime the executable decompresses the code and executes it. You'll often see packed binaries when dealing with malware but legitimate software vendors have reasons to pack binaries as well. Or a devious crackme author 😉. Since we know the packer used to compress the binary, we can easily unpack it. If you don't have UPX installed you can install it with the following command:
sudo apt install upx-ucl -yNow that we have UPX installed, let's decompress our binary by running UPX ZED-Crackme-x64.bin -o unpacked_ZED. This will decompress the binary and store the uncompressed binary in "unpacked_ZED." Let's run file on our unpacked binary and see if there were any significant changes.

Look how different our binary looks now! We see it was dynamically linked and it wasn't stripped! Let's go ahead and look at the symbols with the nm command.
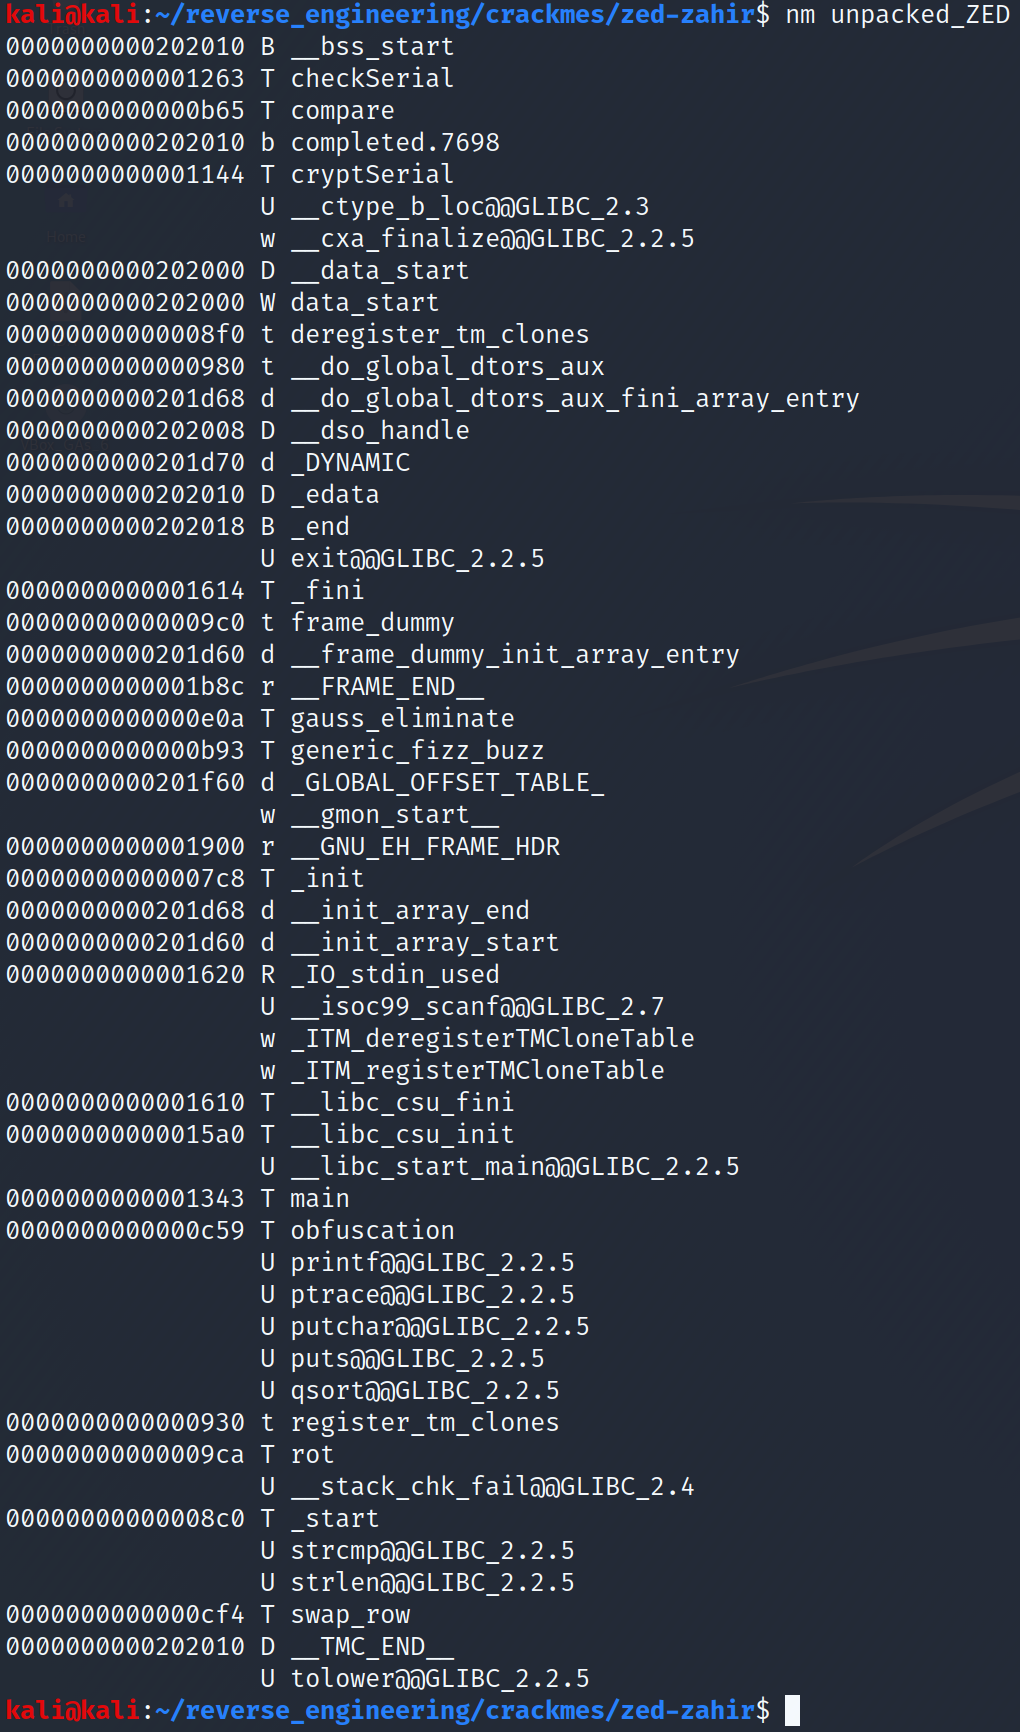
We see a bunch of things in there. It's a tad bit overwhelming if you ask me. There are lots of functions that sound interesting: checkSerial, compare, cryptSerial, and obfuscation. The other functions might be interesting to us but since our goal is to find the serial we should focus on functions that will most likely lead us in that direction. Additionally, we see the ptrace function is used. ptrace is an anti-debugging measure that programmers use to stop people like us from debugging their programs. There are two ways I know to get around this: one is to patch that part of the code that runs this function. Since the author said we cannot patch this is not a viable option. The other option uses a debugger believe it or not. Yes, we can use a debugger to bypass this anti-debugging measure 😂. Let's continue our triage by running strings on our unpacked binary:
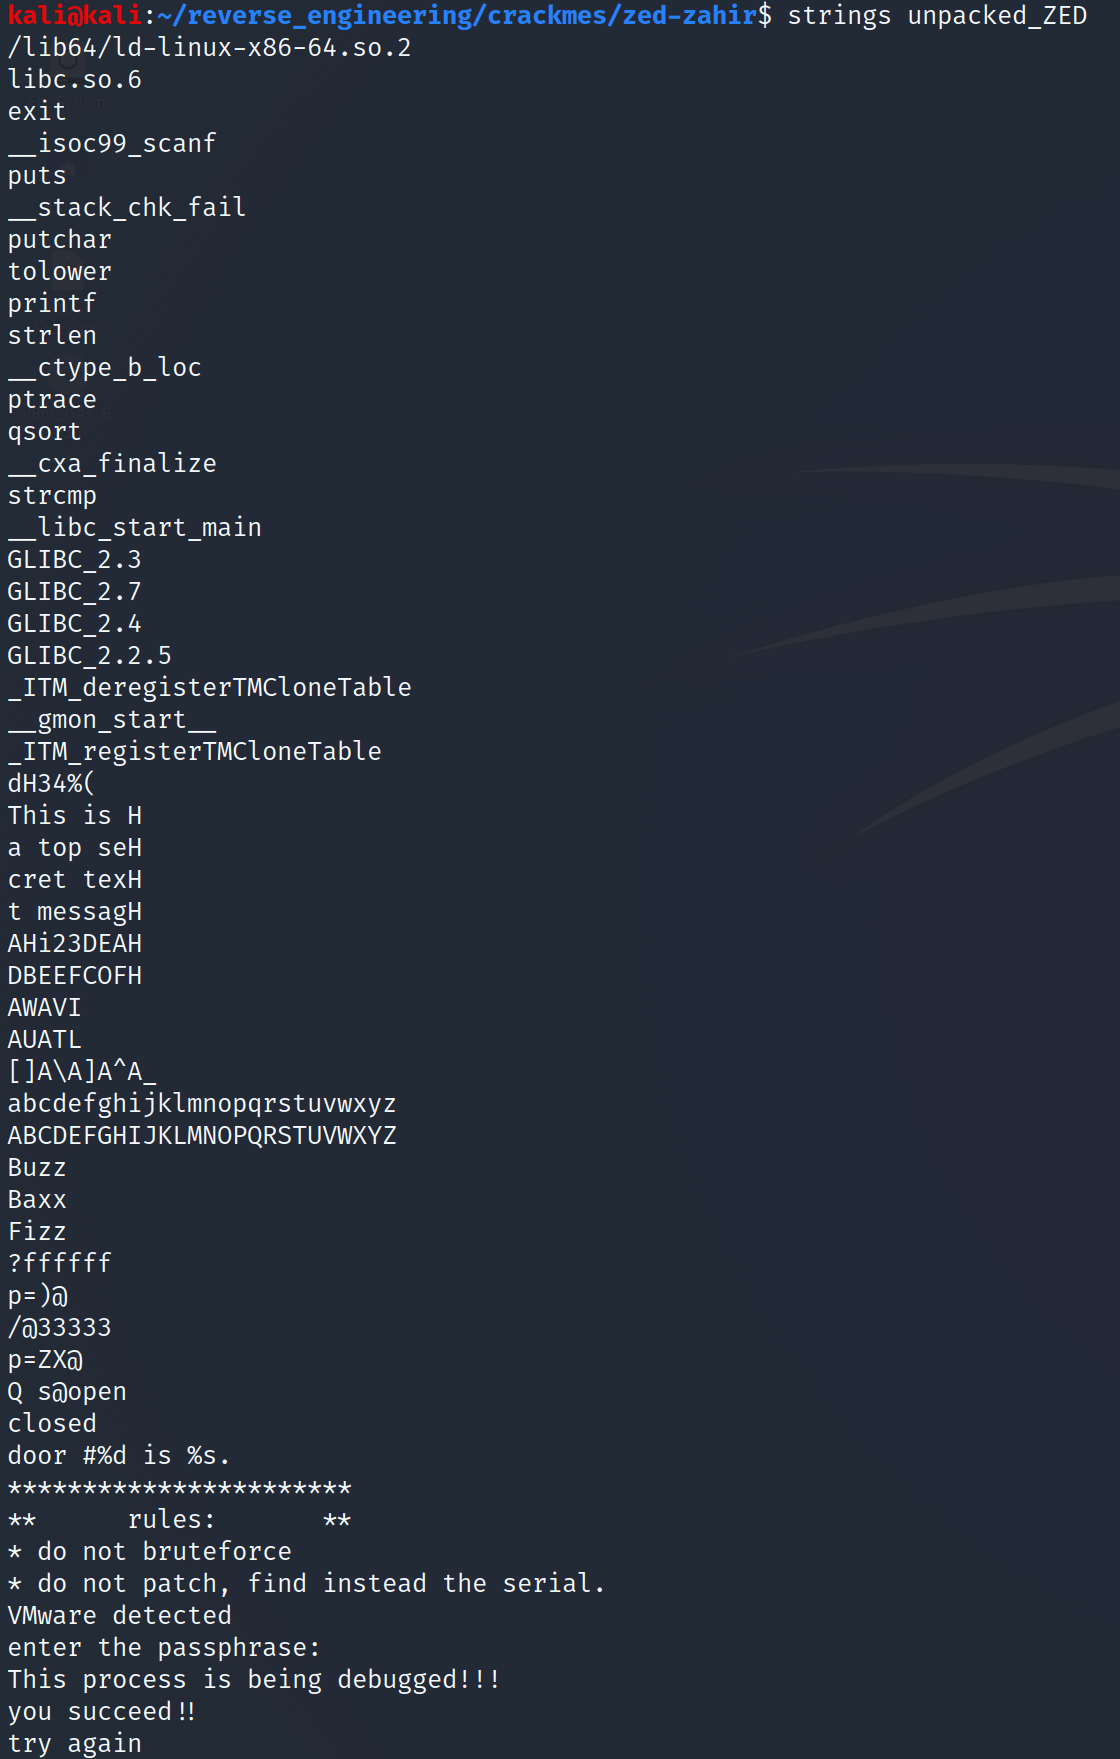
This is much better right? We see a message that we only saw parts of before: "This is a top secret text message" Additionally, we see what looks like a prompt and some success/error messages. Additionally, we see that he checks whether we are running the binary on VMware! Spoiler alert, for some reason this check actually doesn't work. It's not the fault of the author but just a quirk of checking for this type of thing. In any case, we now have a better idea of what the binary is doing. Further, we have an unpacked binary to analyze. So, let's open this up on IDA shall we?
Static Analysis in IDA
When you open it up in IDA you should see this:
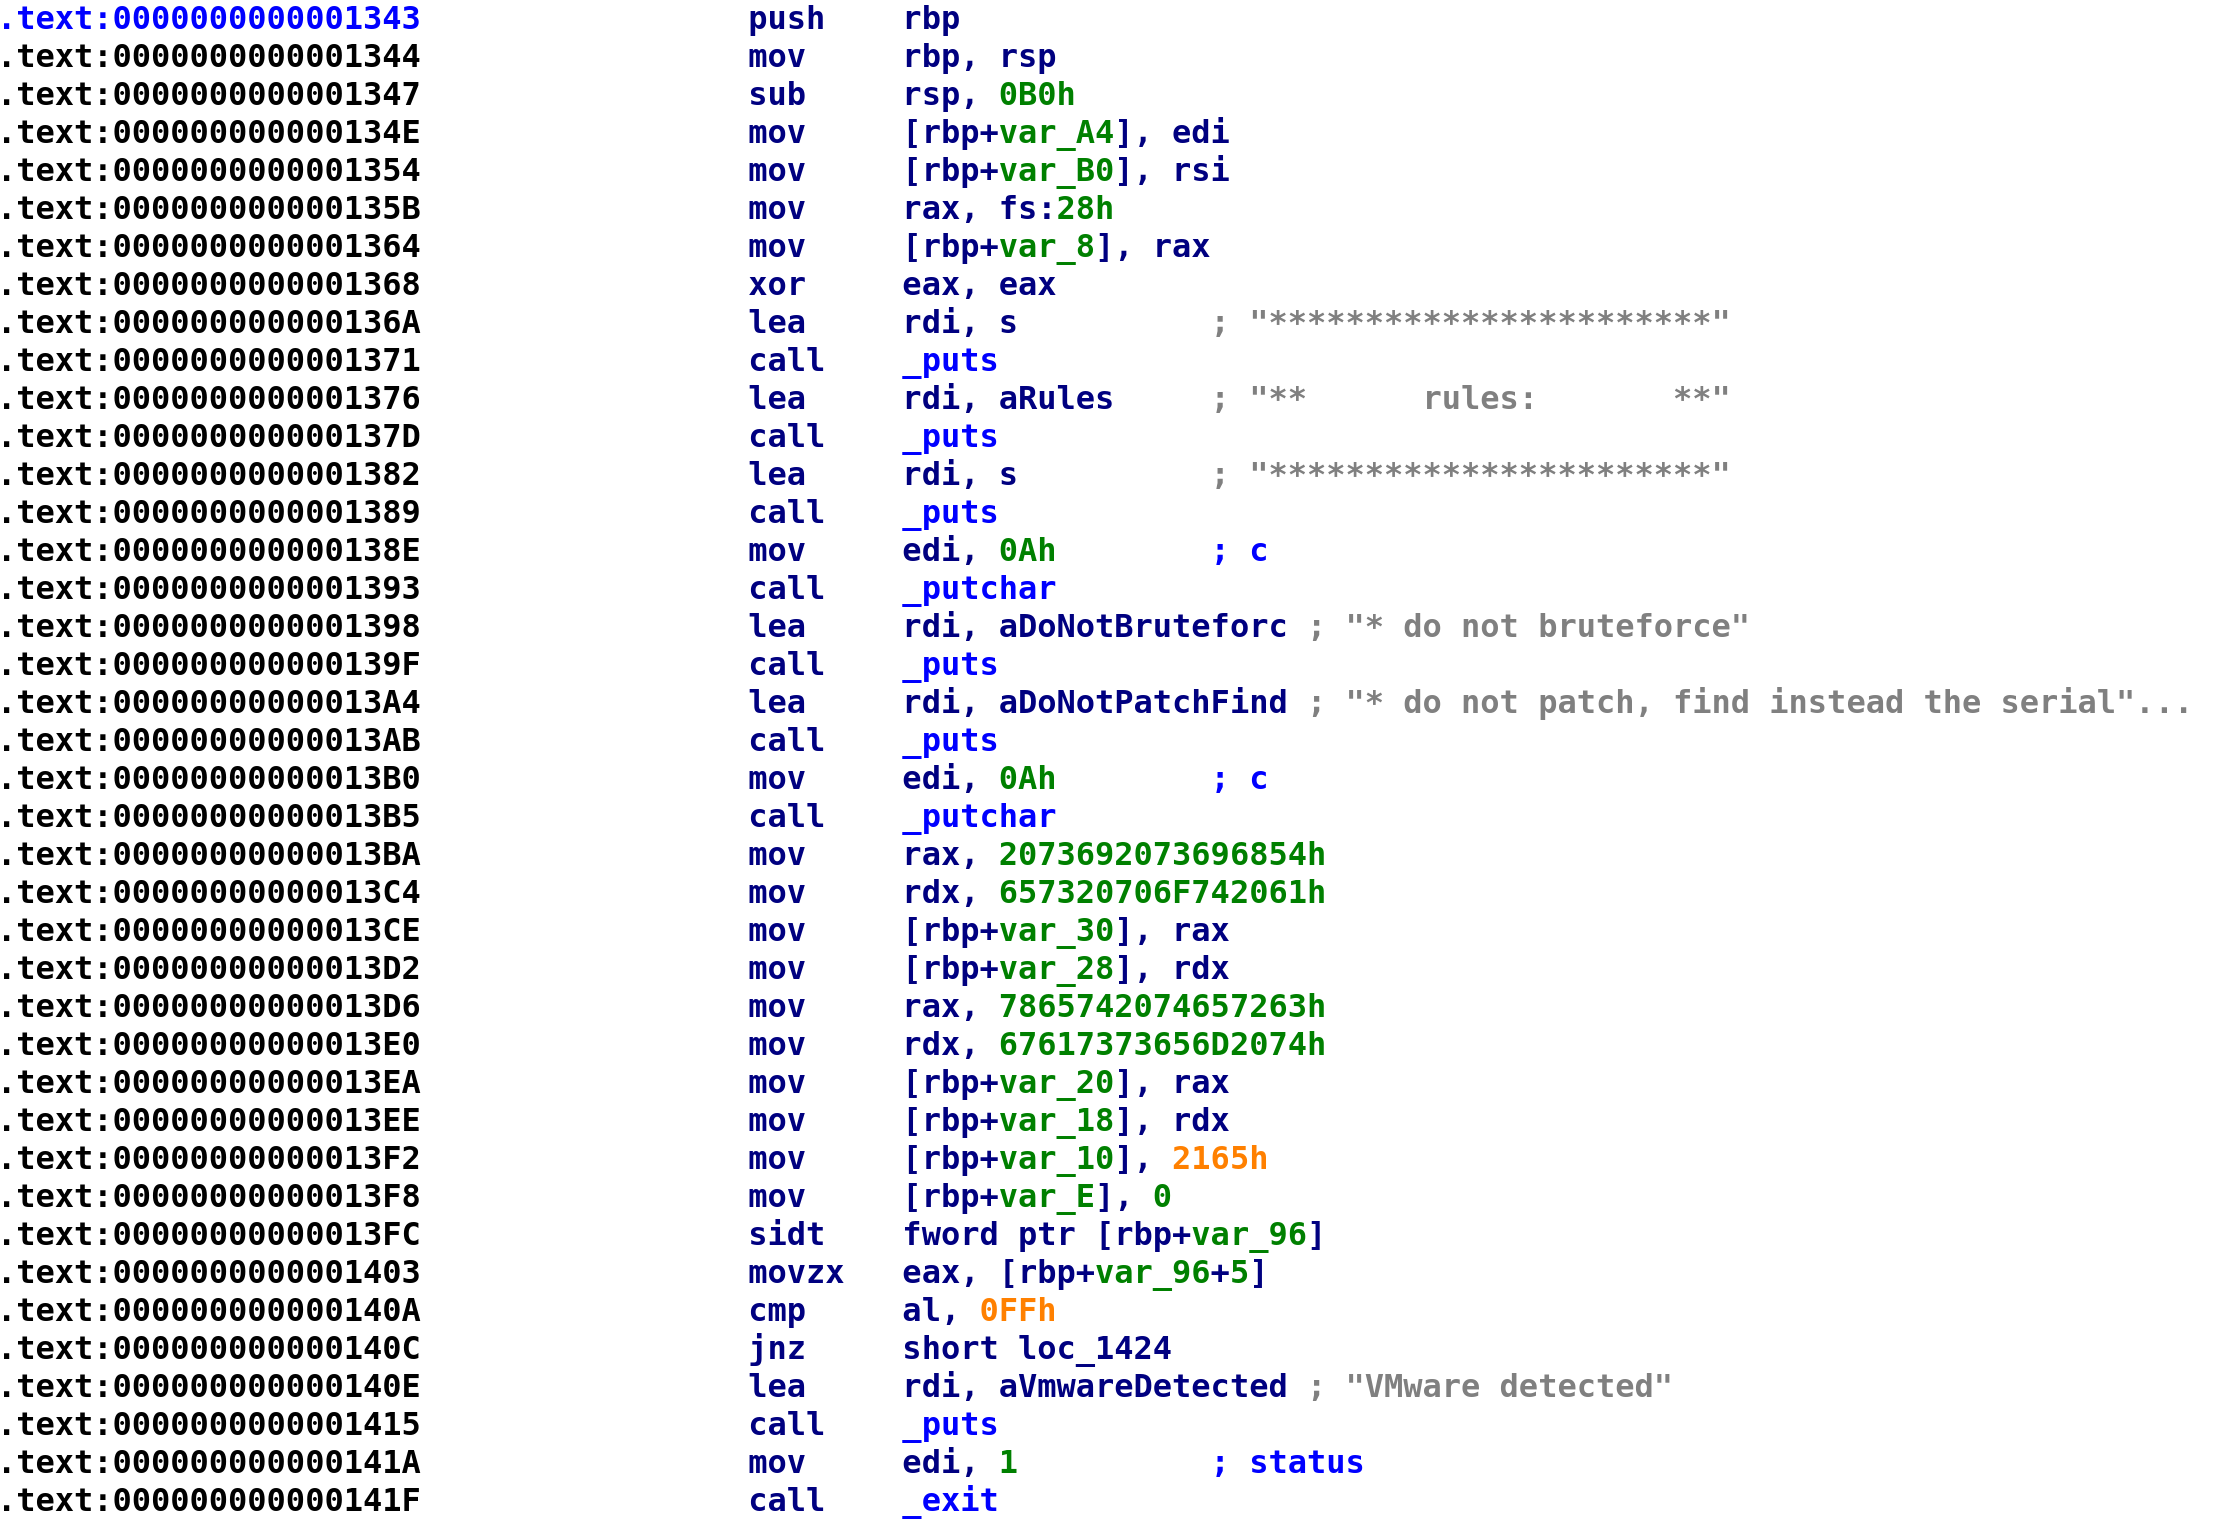
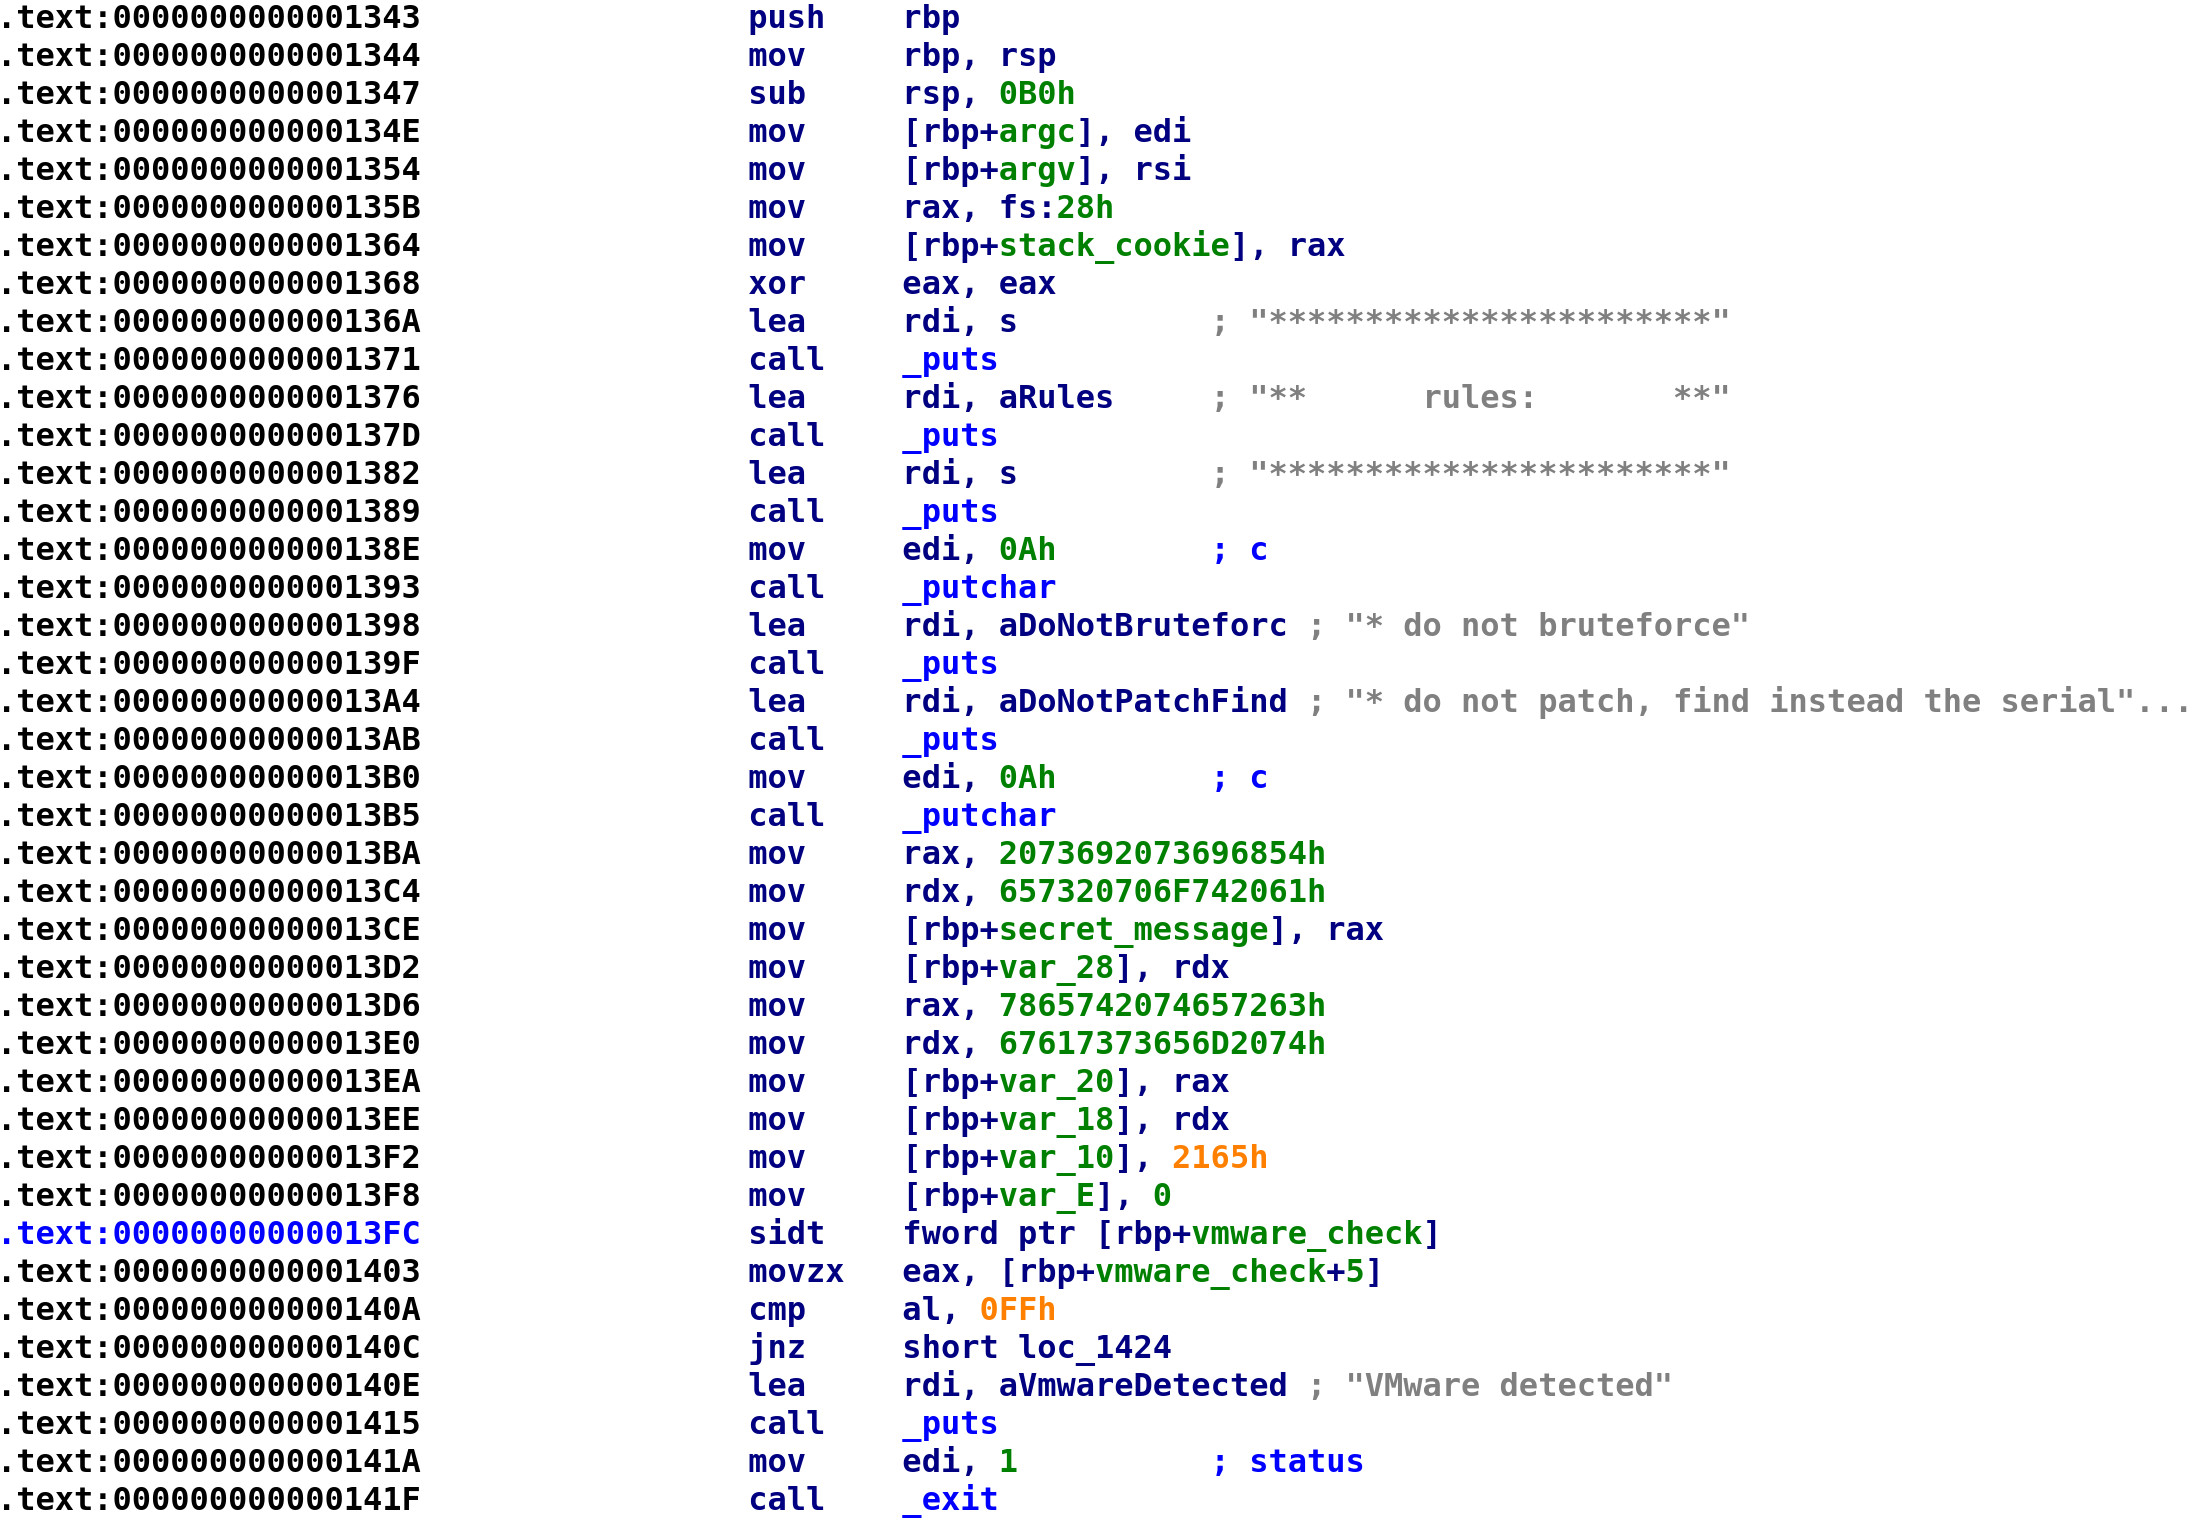
We see the main function has two arguments. I know this because we see the edi and rsi registers being loaded into two variables var_A4 and var_B0. Since we know these arguments are argc and argv respectively, we can rename these variables accordingly. After we store argc and argv we see something we haven't seen before mov rax, fs:28h. This is a stack canary (also referred to as stack cookies) that aims to prevent stack-based buffer overflows. You can read more about them here: https://en.wikipedia.org/wiki/Buffer_overflow_protection. We then see canary get stored in a variable var_8 so we can rename this variable to stack_cookie. We see the prompt that we saw earlier that gets printed to the screen and then we see something pretty interesting. Beginning at address 0x13BA, we see hex characters get stored in a series of variables. Because we can only deal with 8 bytes at a time, the variable assignment is split into multiple assignments. var_30 , var_28, var_20, var_18, var_10, and var_E are all the same variable. I'm not sure how to get IDA to display them as a single variable but this isn't necessary. Let's go ahead and rename var_30 to secret_message. It will be come apparent why I'm choosing this name in a second. Since these are hex values we can easily translate them to alphanumeric text. However, we have to remember that we are dealing with a little-endian CPU. This simply means that things get stored in reverse order. So, the string "Hello, World", would be stored as "dlorW ,olleH". Of course this would be in hexadecimal format but I think this is easier to see. So what we have to do is reverse the hex characters first, starting from 0x2165, reverse them and convert those characters to alphanumeric characters. You can copy the bytes by clicking on the characters and pressing Ctrl+C. Then paste them somewhere. You'll have to remove the "h" at the end of each hex string. I used Python to reverse the strings although I'm 99.99% sure there's an easier way to do this.
ba = bytearray.fromhex("216567617373656D20747865742074657263657320706F7420612073692073696854")
ba.reverse()
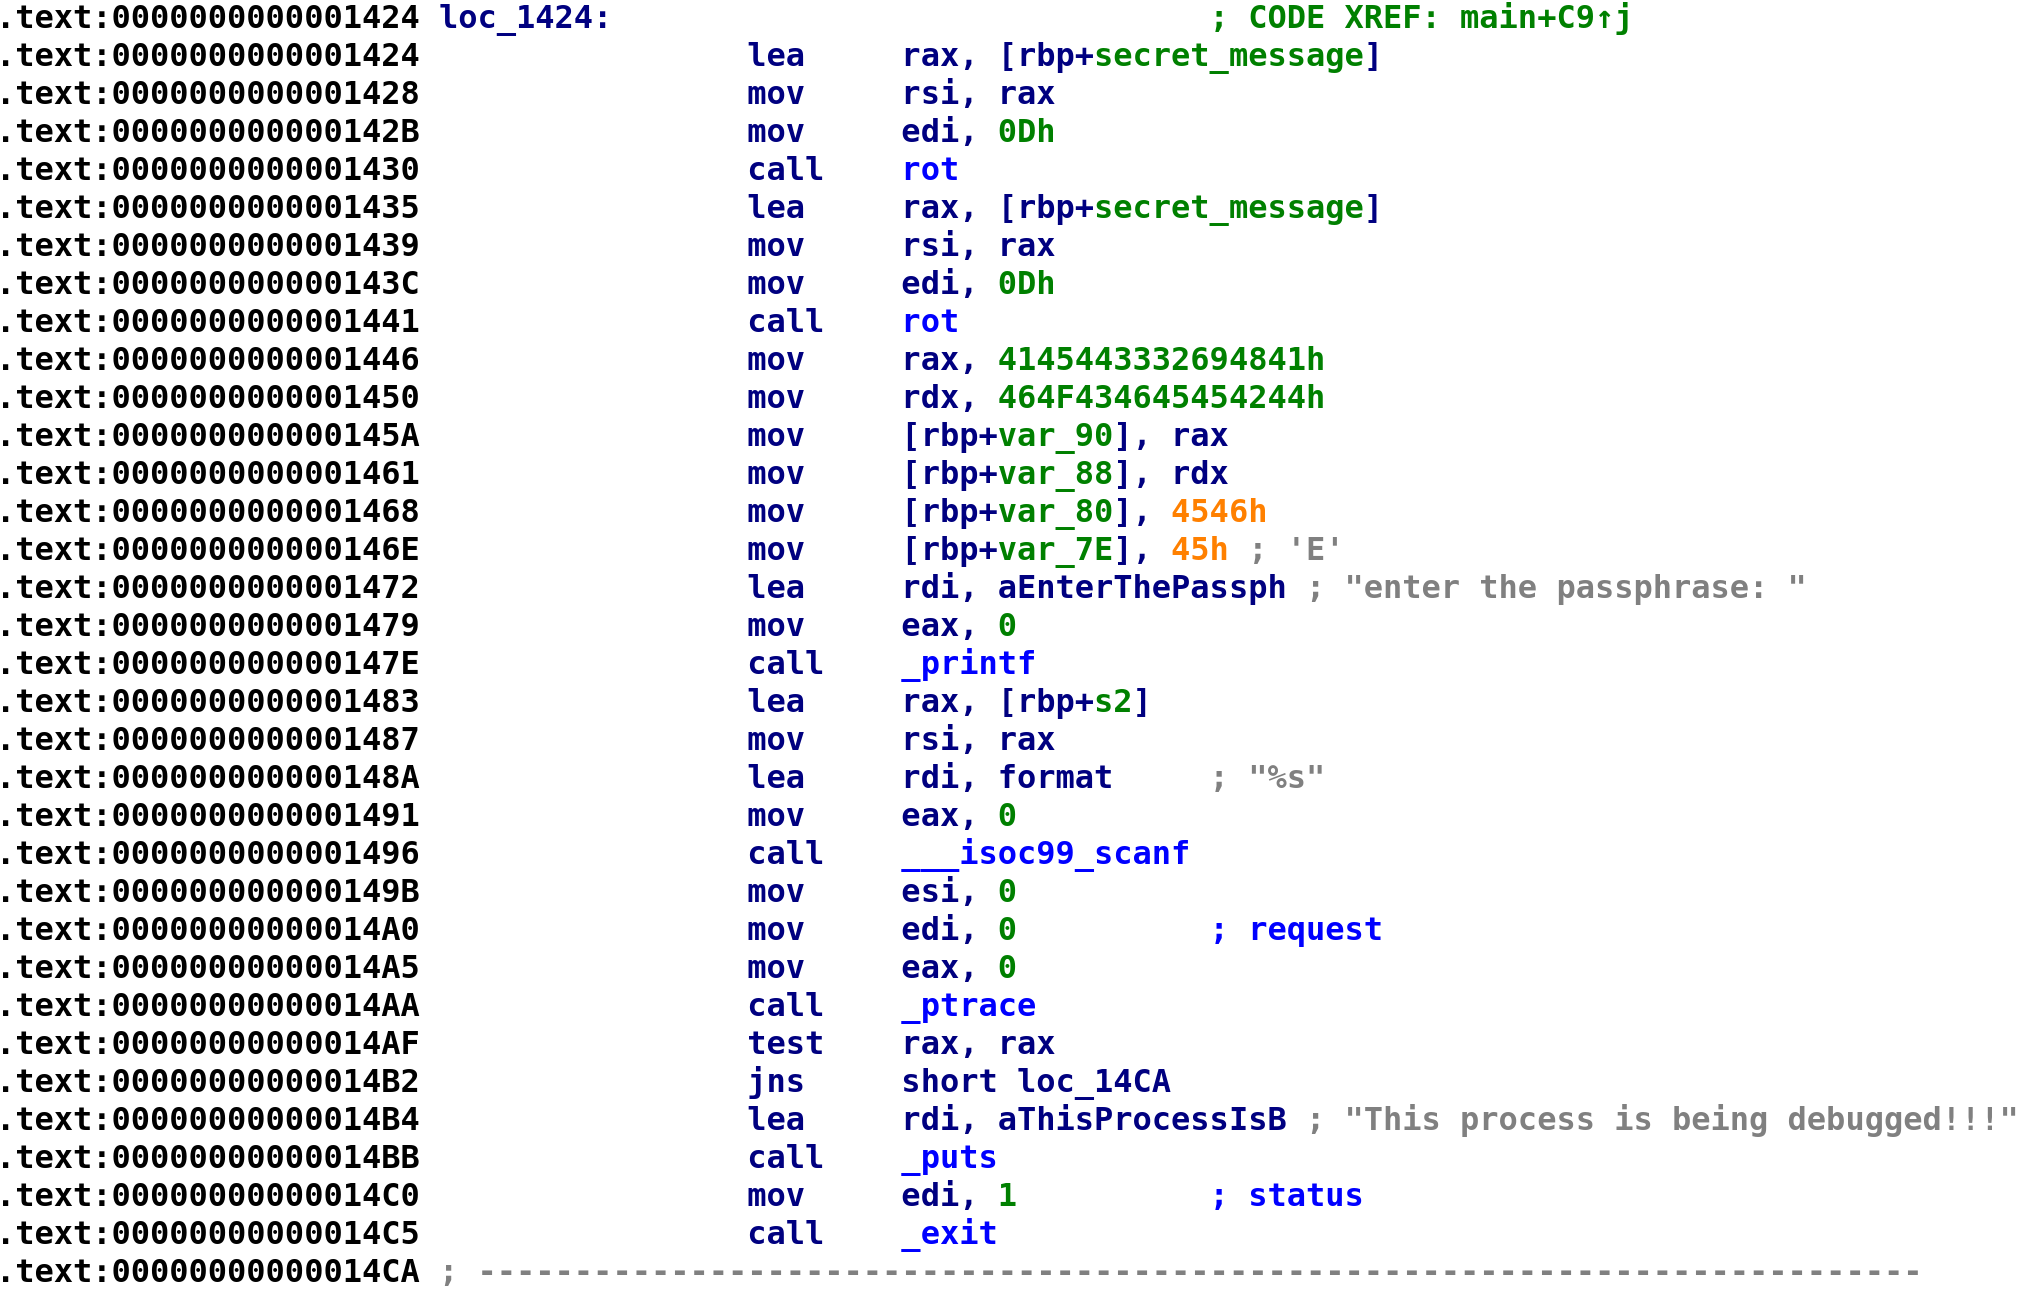
print ba.decode()Again, there's probably an easier way but the above Python code will spit out the alphabetic characters which turns out to be "This is a top secret text message!" Finally, after the "secret message" is stored, we see an instruction we never seen before, sidt. This instruction stands for "Store Interrupt Descriptor Table" and it writes the interrupt descriptor table to the memory pointed to by the rbp+var_96 in our case. This is how the author checks if we are using a VM. You can read more about this instruction here: https://www.felixcloutier.com/x86/sidt. Since we know what this variable's purpose is we can rename it to vmware_check. After renaming all of the variables, your IDA should look like this:
Travelling Down a Rabbit Hole
As promised this next section will take us down a rabbit hole. Feel free to skip this section, but you are always welcome to continue reading 🙂.
We now progress to the next section of code:
We see the secret_message gets passed to this rot function. We saw this function earlier during our initial triage. We see that the EDI register is loaded with 0xD and our secret_message is eventually loaded into the RSI register before the call to rot. This means 0xD and secret_message are parameters to the rot function. With this in mind let's go ahead and take a look and see what this function is doing. Double-click on the function and it'll bring you to the function:
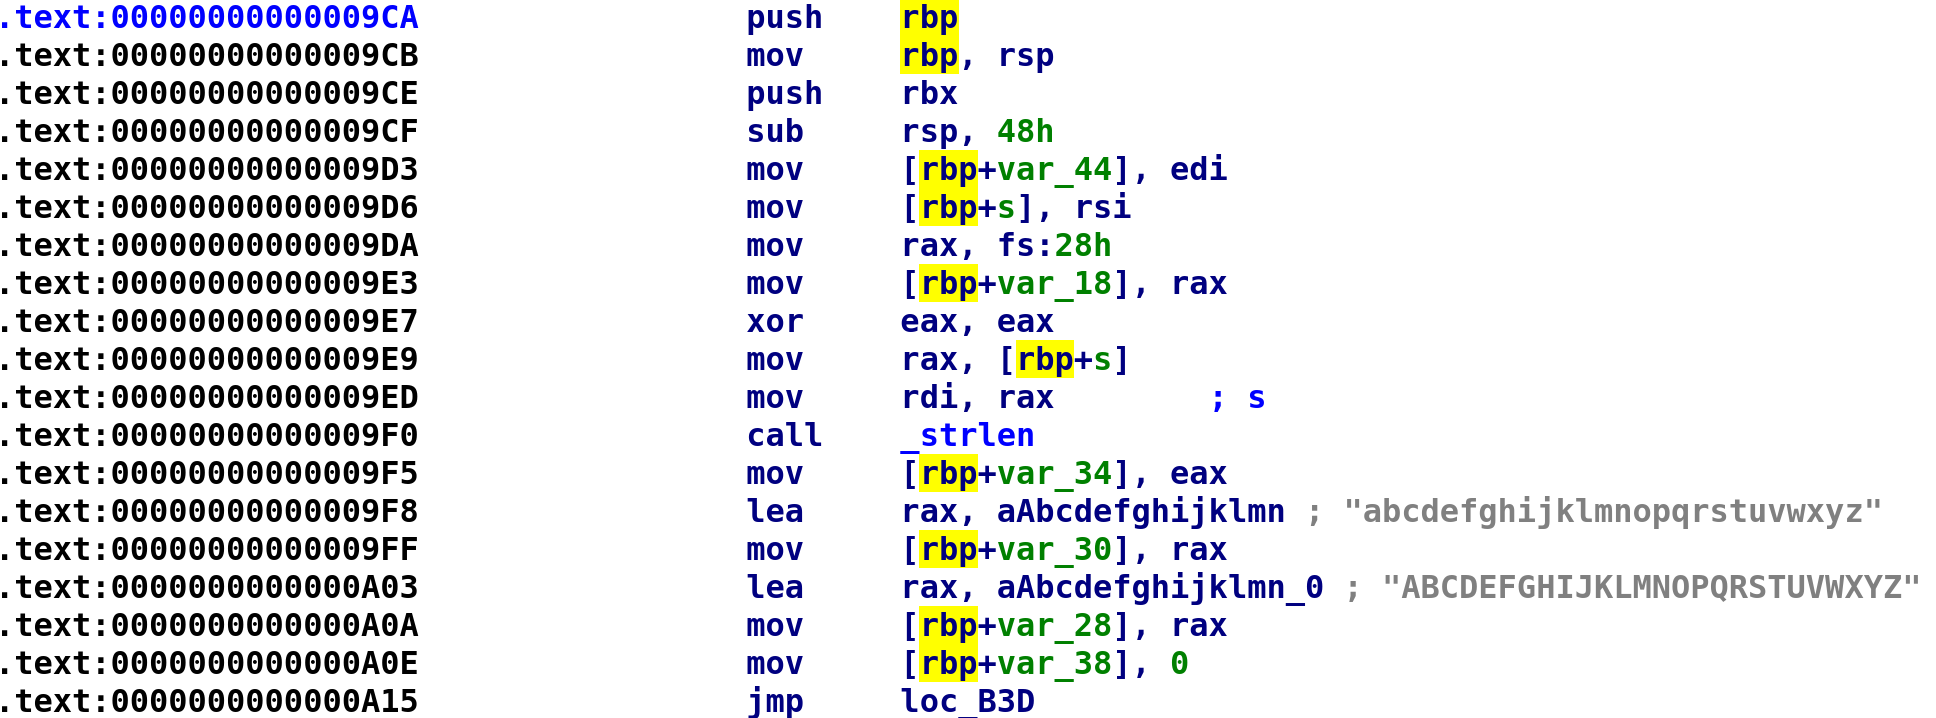
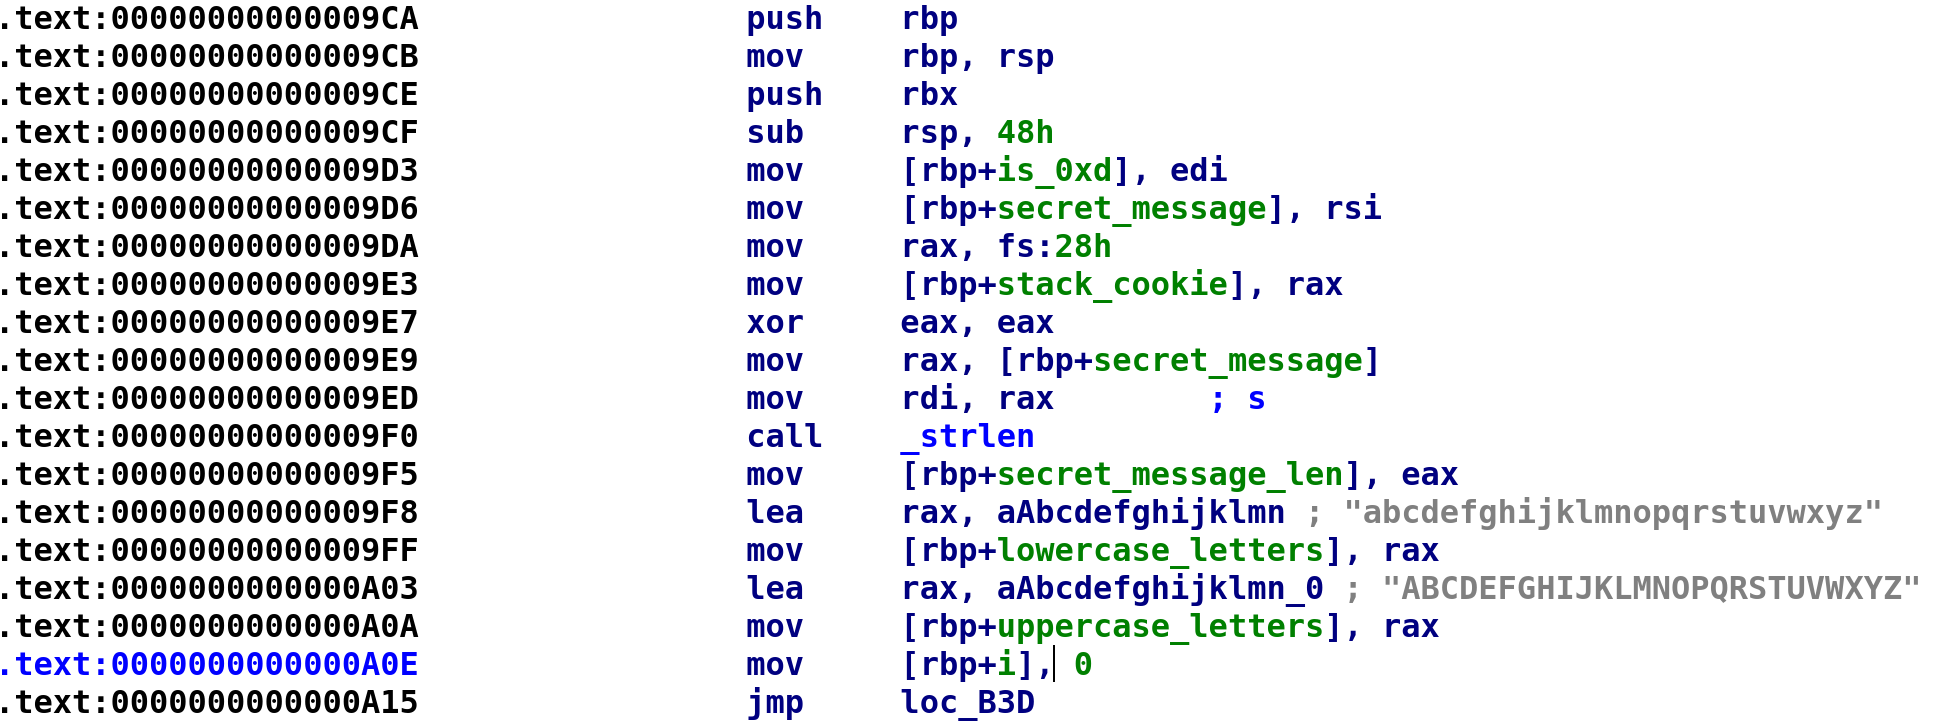
We see our two parameters are placed in var_44 and s. Let's rename these variables to is_0xD and secret_message respectively. We also see another stack cookie being assigned. Let's rename var_18 to stack_cookie.
Note: We can only use identical names for different variables if they are in different functions.
After the stack cookie is stored we see our secret_message is passed to the strlen function at address 0x9f5. It is then stored in var_34 so we can rename that to secret_message_len. Next, we see all lowercase and uppercase letters are stored in var_30 and var_28 respectively. Let's rename these variables to lowercase_letters and uppercase_letters respectively. Lastly, we see var_38 is set to 0 followed by an unconditional jmp instruction. This is most likely the start of a loop, so let's rename var_38 to i. After renaming the variables, our IDA should look like this:
When you double-click on the loc_B3D, it'll land you here:

We see that i is compared to secret_message_len and we jump to loc_A1A if i is less than secret_message_len. Double-click on loc_A1A and that will bring us to the contents of the while loop. Let's see what's going on here!
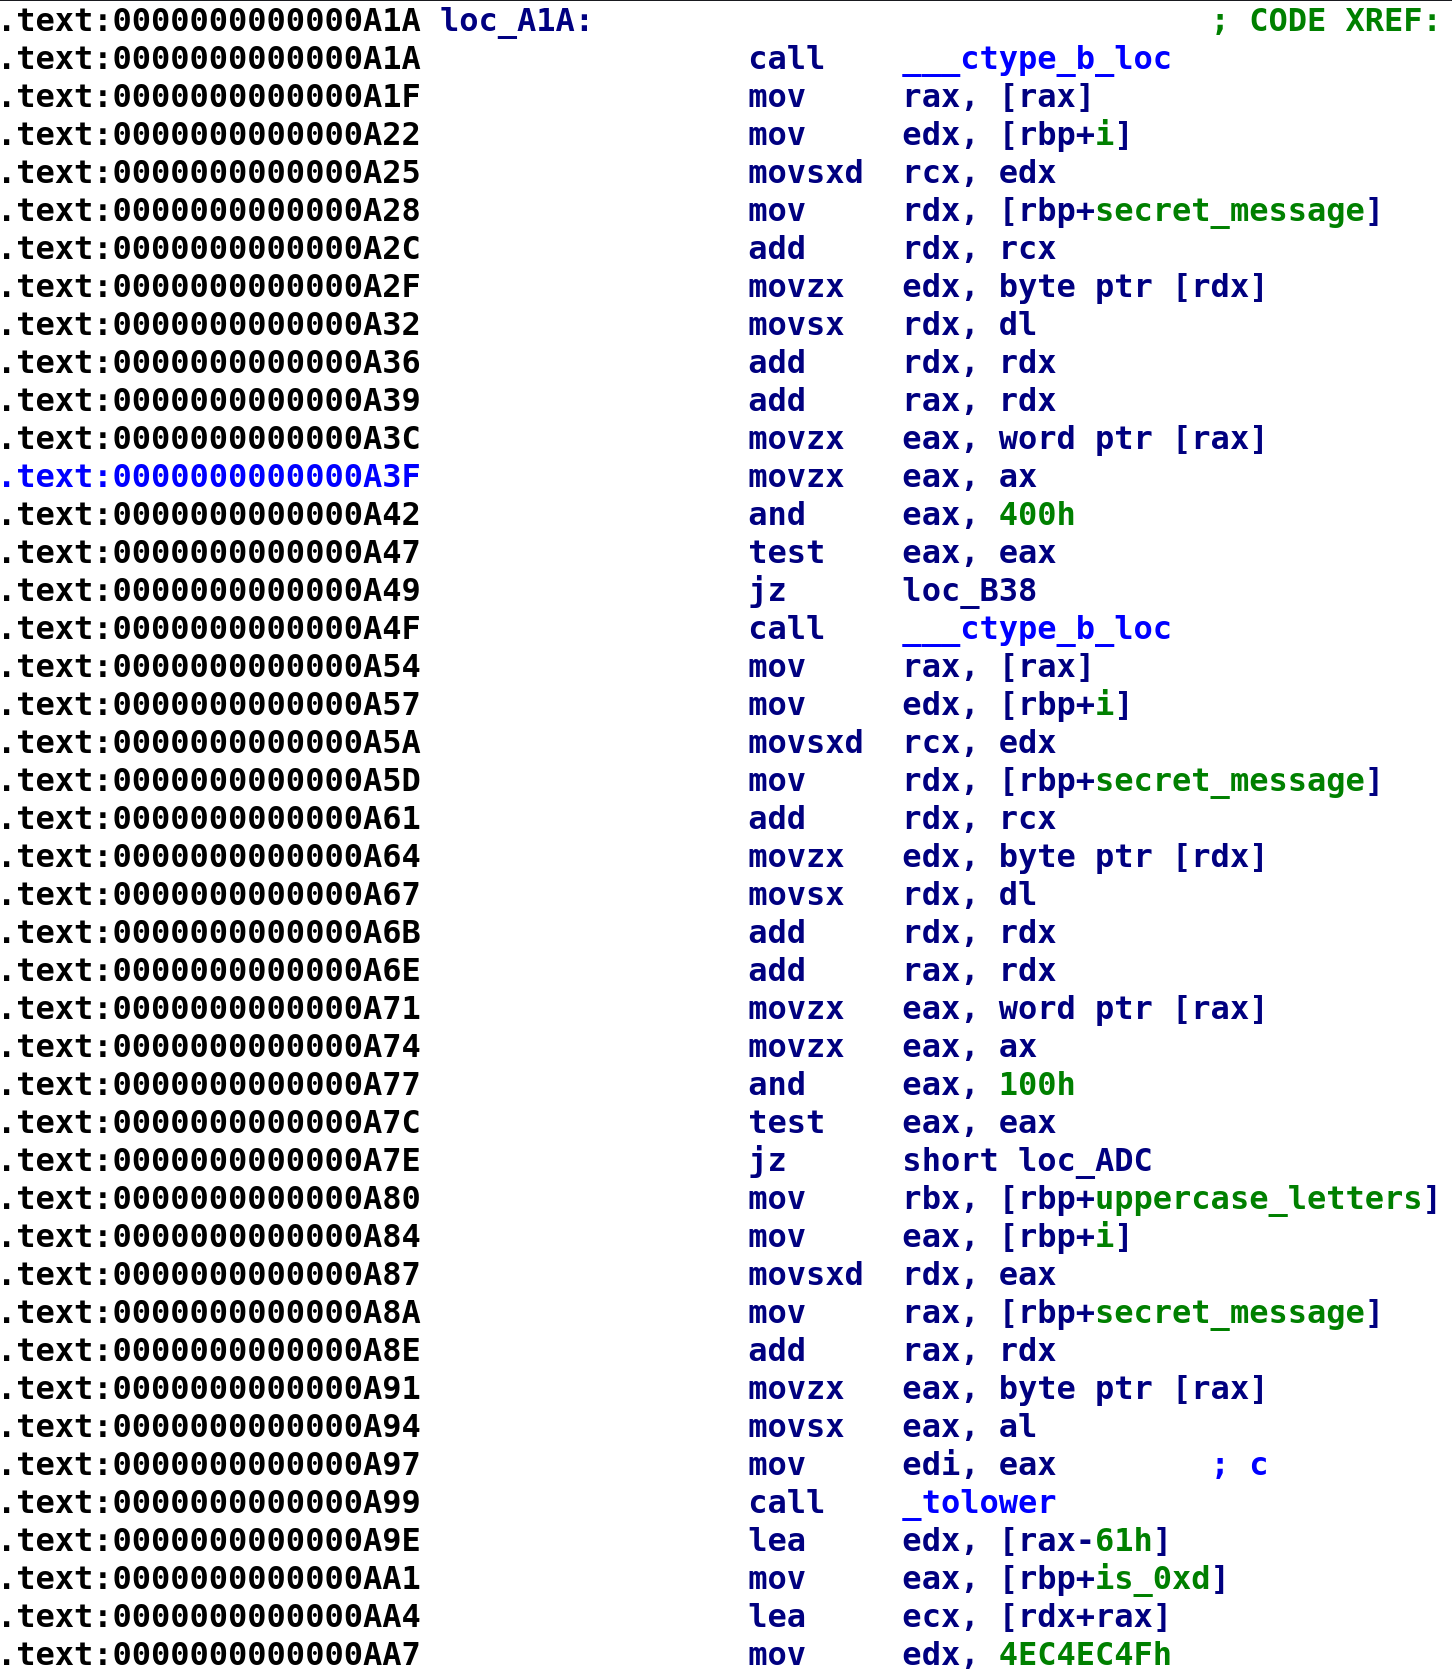
Alright, so there's a lot to unpack here! If you want a detailed explanation of the ctype_b function you can go here. It's a really great article and a short read. However, the TLDR is, this is going to take a character and check whether it is an alphabetic character. This happens at address 0xA42. The 0x400 is a mask. Similarly, 0x100 will check if a character is uppercase. What's a little confusing is, if the test eax, eax instruction does not result in the zero flag being set, this means the check is passed. For example, if secret_message[i] is an alphabetic character, the check at address 0xA42 will result in the zero flag NOT being set. Therefore, the program will not perform the jmp instruction. If that doesn't make sense hopefully the C code below will shed some light on what's going on here:
while(i < secret_message_len)
{
	if(isalpha(secret_message[i]))
    {
    	if(isupper(secret_message[i]))
        	do stuff
        else			// secret_message is lowercase
        	do other stuff
    }
    i++;
}
With this in mind, let's analyze what happens when a character is uppercase. Spoiler alert, whether the character is uppercase or lowercase, the same instructions happen.
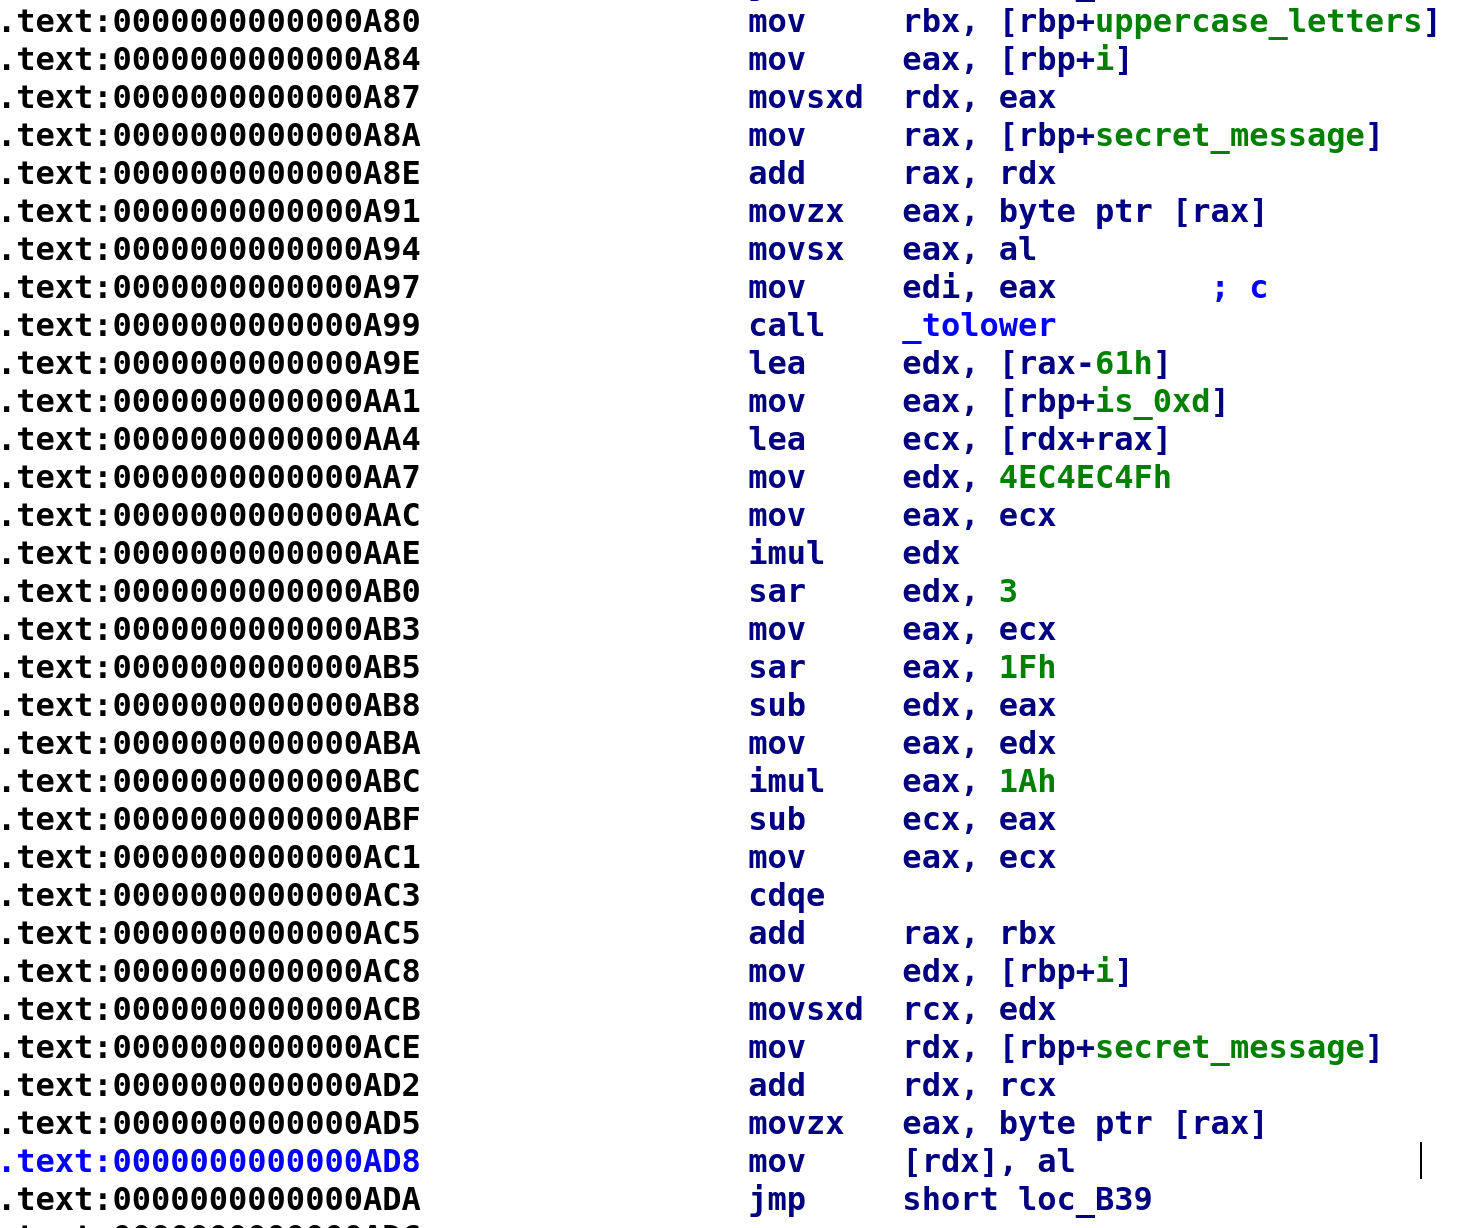
The above image is the code path taken if a character happens to be uppercase. It starts out fairly simple. We place all of the uppercase letters in the RBX register and call the tolower function on secret_message[i]. After that it becomes a little difficult to decipher. I still have not figured out how to decompile lines 0xA9E through 0xAC1, but there is a stack overflow answer that may provide someone with better math skills some insight. You can check it out here. I can provide some insight into why this happens. Division is an expensive operation. Meaning, division takes more CPU cycles to complete than multiplication. Because of this, the compiler will avoid division whenever possible. What's happening here is the compiler is performing division by multiplication. Beyond that I have no idea how it comes up with the assembly. It's all magic to me! So I had to turn to Ghidra to decompile this section for me. The decompiled code is shown below:
num = tolower(secret_message[i]);
secret_message[i] = uppercase_letters[(num - 0x61 + 0xd) % 0x1a]
I added in an extra variable, num, for clarity. After tolower is called, the result is stored in RAX. Right after that, we see RAX used in the LEA EDX, [RAX - 0x61] instruction. In the C code I wrote, num is essentially RAX. As I mentioned earlier the exact same thing happens for the lowercase letters with only 1 minor difference. The lowercase_letters array will be used instead. With this in mind, let's update our C code from earlier, replacing "do stuff" with actual code!
while(i < secret_message_len)
{
	if(isalpha(secret_message[i]))
    {
    	num = tolower(secret_message[i]);
        secret_message[i] = uppercase_letters[(num - 0x61 + 0xd) % 0x1a];
    }
    else
    {
    	num = tolower(secret_message[i]);
        secret_message[i] = lowercase_letters[(num - 0x61 + 0xd) % 0x1a];
    }
    i++;
}
And that's the entirety of the rot function! Now here's the kicker and where the author made me very upset! This function is essentially encrypting the secret_message variable with a key of 0xd or 13. Decrypting a simple shift like this shouldn't be too difficult right? Well before we do that, let's go back to the main function and see what happens.

Do you see what this pesky crackme author did!? He calls the rot function with secret_message and 0xd as arguments as I just said. But he calls the function again with the same arguments which decrypts the string! Yes you read that right, he encrypted and decrypted the string just to mess with us! When he watched my YouTube video he had a great laugh at my expense 😂.
Crawling Out of the Rabbit Hole
Alright, let's get the heck out of this rabbit hole and continue! We see he's creating another string and storing it in the var_90 variable. We can use the same technique from earlier to see what ASCII contents of this string:
ba = bytearray.fromhex("454546464F4346454542444145443332694841")
ba.reverse()
print ba.decode()
Running the script above will give us this string: AHi23DEADBEEFCOFFEE. Let's rename var_90 to coffee. The rest of this section simply grabs our user input, stores it in s2, and checks if we are debugging the program. Let's rename s2 to user_input and move onto the next section of code.
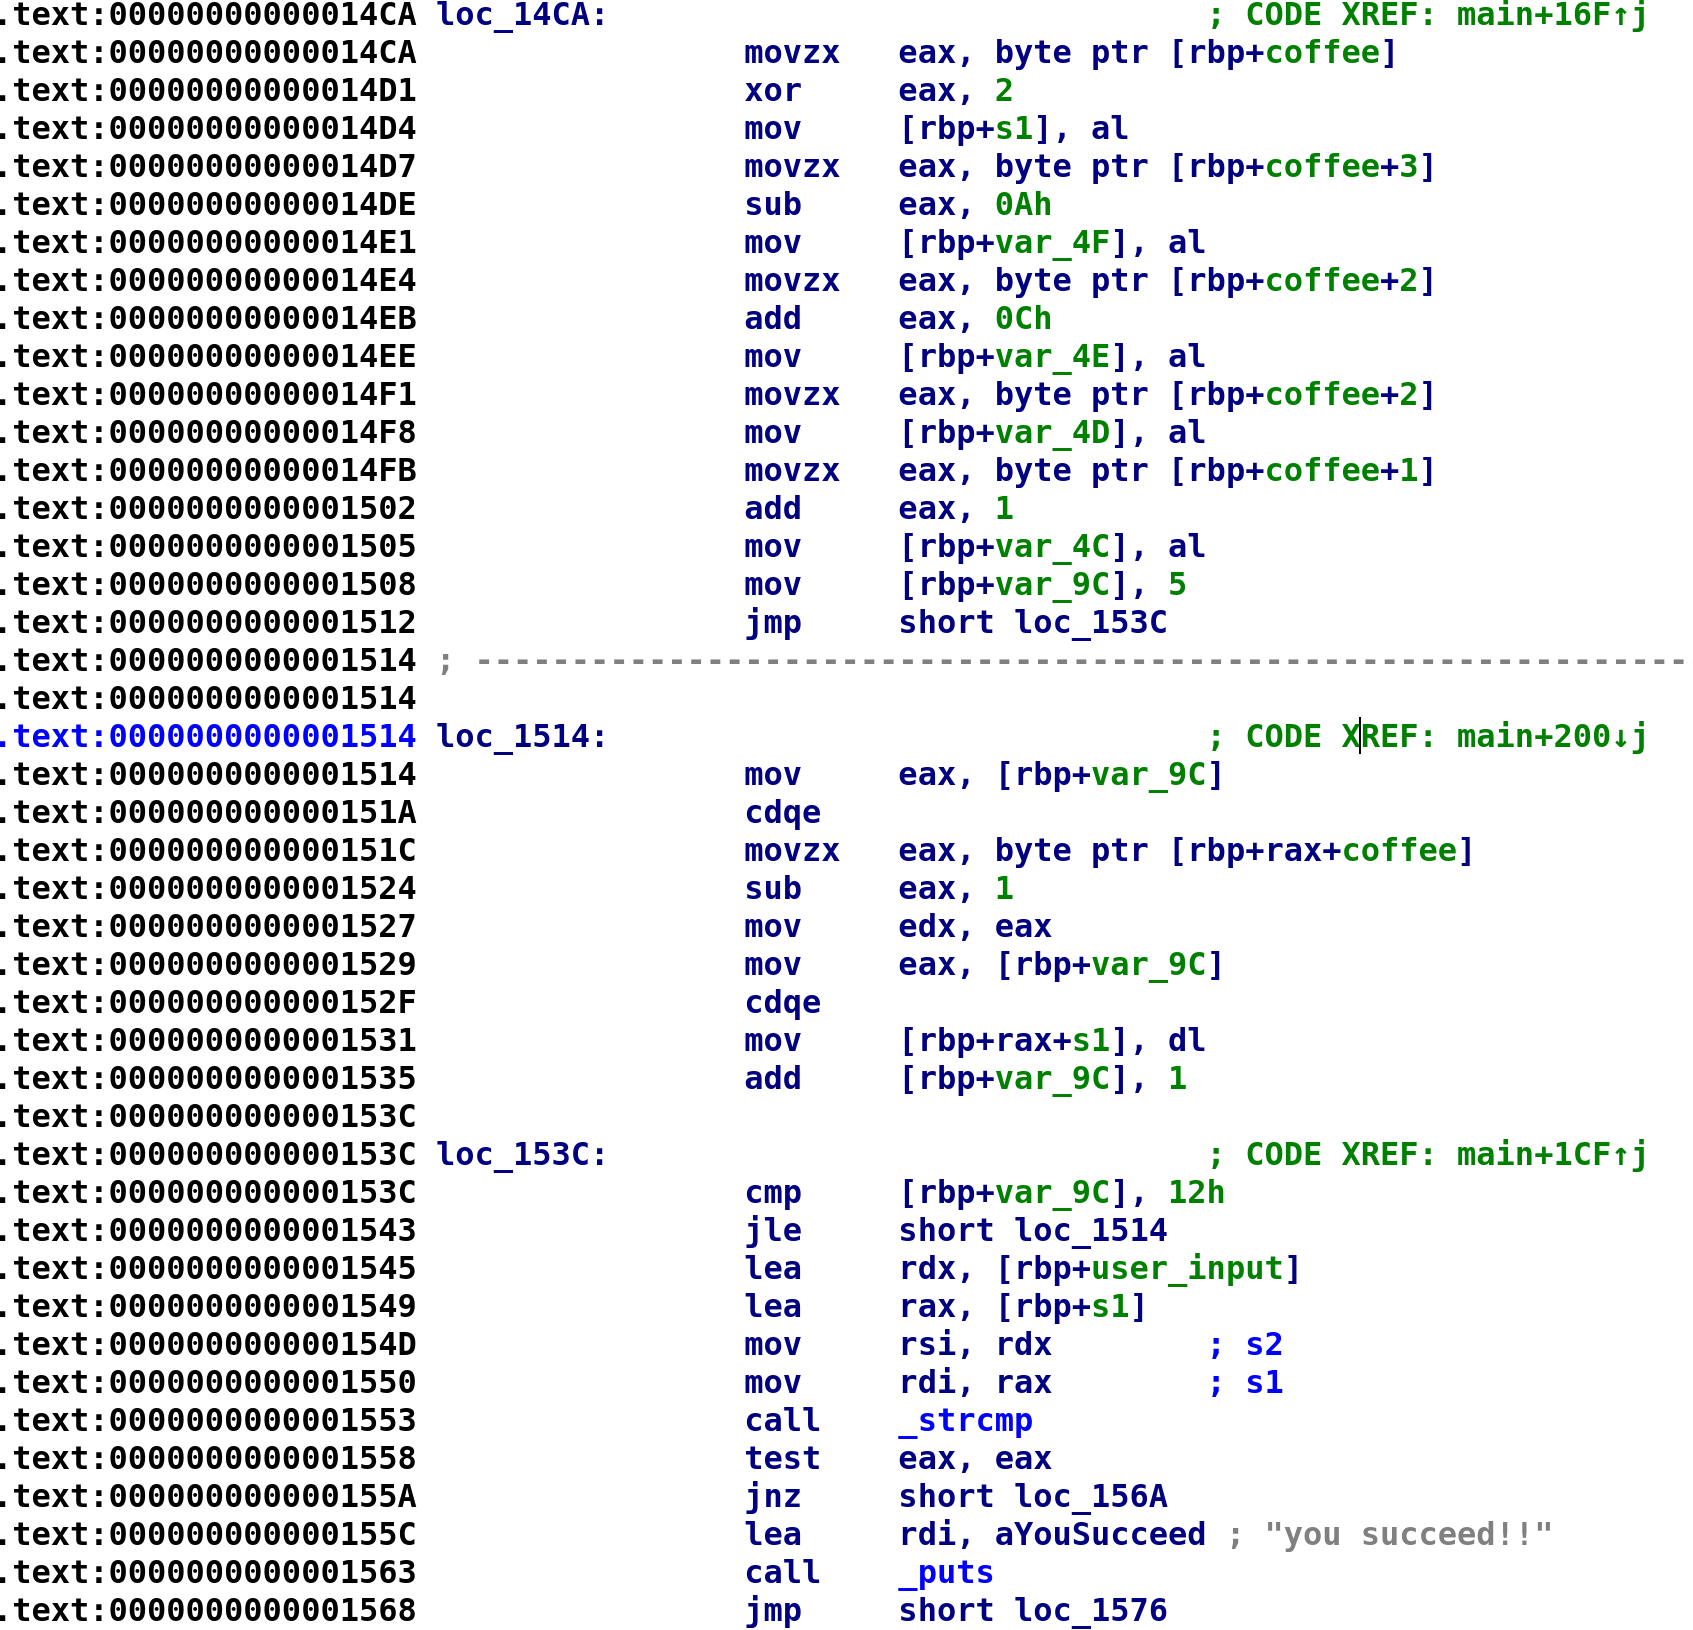
The code starts out by XORing the first character in the coffee variable with 2. The result is then stored in a separate string, s1[0]. We'll rename this to dec_coffee. The next instruction takes coffee[3] and subtracts 0xa and stores the result in dec_coffee[1]. The next instruction adds 0xc to coffee and stores the result in dec_coffee[2]. Then, coffee[2] is stored in dec_coffee[3] without any manipulation. Finally, 1 is coffee[1] and the result is stored in dec_coffee[4]. Then we see 5 is stored in var_9C before an unconditional jump. We've seen this before and this is most likely going to be the beginning of a loop with var_9C being our loop control variable. Let's go ahead and rename var_9C to i. Following the jump instruction, we see i is compared to 0x12. If i is less than or equal to 0x12 we jump to loc_1514, the meat of our loop. The loop is pretty simple. All he's doing is adding 1 to coffee[i] and storing the result in dec_coffee[i]. The C code for this section looks something like this:
char coffee[19] = "AHi23DEADBEEFCOFFEE";
char enc_coffee[19];
enc_coffee = coffee[0] ^ 2;
enc_coffee = coffee[3] - 0xA;
enc_coffee = coffee[2] + 0xC;
enc_coffee = coffee;
enc_coffee = coffee[1];
i = 5;
while (i <= 18)
{
	enc_coffee[i] = coffee[i] - 1;
    i++;
}
Pretty simple. Finally, we see our user_input compared with enc_coffee. If they are equal to each other then we succeed! We can manually work this out or we can turn to Python yet again! The following Python script will do the trick!
def decrypt_serial(enc_serial):
dec_serial = ""
dec_serial += chr(enc_serial[0] ^ 2)
dec_serial += chr(enc_serial[3] - 0xa)
dec_serial += chr(enc_serial[2] + 0xC)
dec_serial += chr(enc_serial[2])
dec_serial += chr(enc_serial[1] + 1)
j = 5
while j <= 0x12:
dec_serial += chr(enc_serial[j] - 1)
j += 1
print dec_serial
if __name__ == '__main__':
enc_serial = bytearray.fromhex("454546464F4346454542444145443332694841")
enc_serial.reverse()
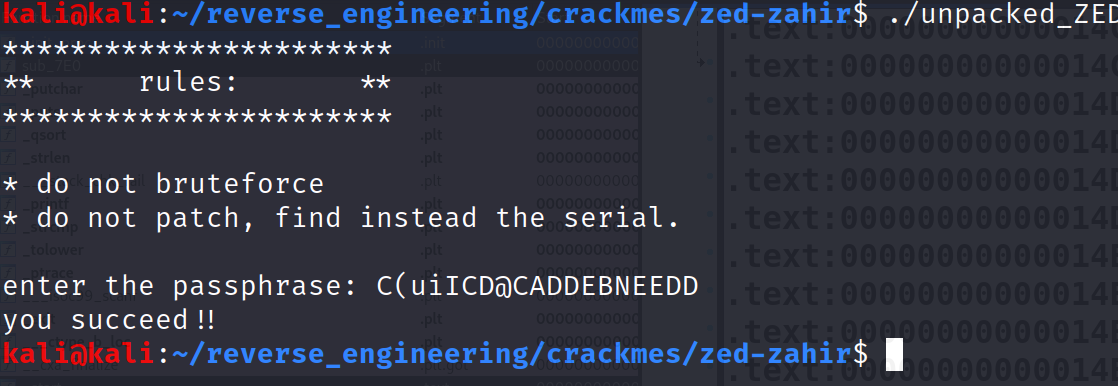
decrypt_serial(enc_serial)Running the script will give the following output: C(uiICD@CADDEBNEEDD. Providing that to the program will give us the success message!
And that's it; we did it! An interesting challenge by one of my good friends! I hope you enjoyed it as much as I did.
Conclusion
Alright that is all that I have for this blog. If you made it this far give yourself a pat on the back you earned. This challenge was pretty tricky especially since the author threw in a tempting rabbit hole! I hope you enjoyed reading this writeup! If you have any additional questions feel free to reach out to me on Twitter, Instagram, or Discord jaybailey216#6540. If you have a challenge you would like me to try, let me know and I'll give it a shot! I'll see you all next time!
Peace out! ✌🏾