

Introduction
Hey! It is your boy Jaybailey and I'm back with another interesting challenge. This was one of the more difficult challenges that I've tackled. This challenge confused me for quite some time until I finally figured out what was going on! This challenge was actually submitted by one of you! I hope you enjoy! The YouTube video is available as always.
I only received the binary and was instructed to find the flag. If there were any constraints like no patching, no bruteforcing, etc. I was unaware. Still we did not need to patch or bruteforce to find this flag. Alright enough of me talking let's get on with it!
Optional Materials to Follow Along
If you want to follow along feel free to download the VM I provide. You can find instructions on importing the VM here. If you don't want to use my VM that's fine, my feelings won't be shattered. But you will at least need the binary. You can download the binary here.
You'll also need a disassembler. I recommend IDA or Ghidra. With all of that out of the way, let's get reversing!
Initial Triage
Just like our previous challenges let's start by running file.

We see this is a 32-bit binary. Even better we see the binary was not stripped! Let's go ahead and take a look at the symbols using nm.
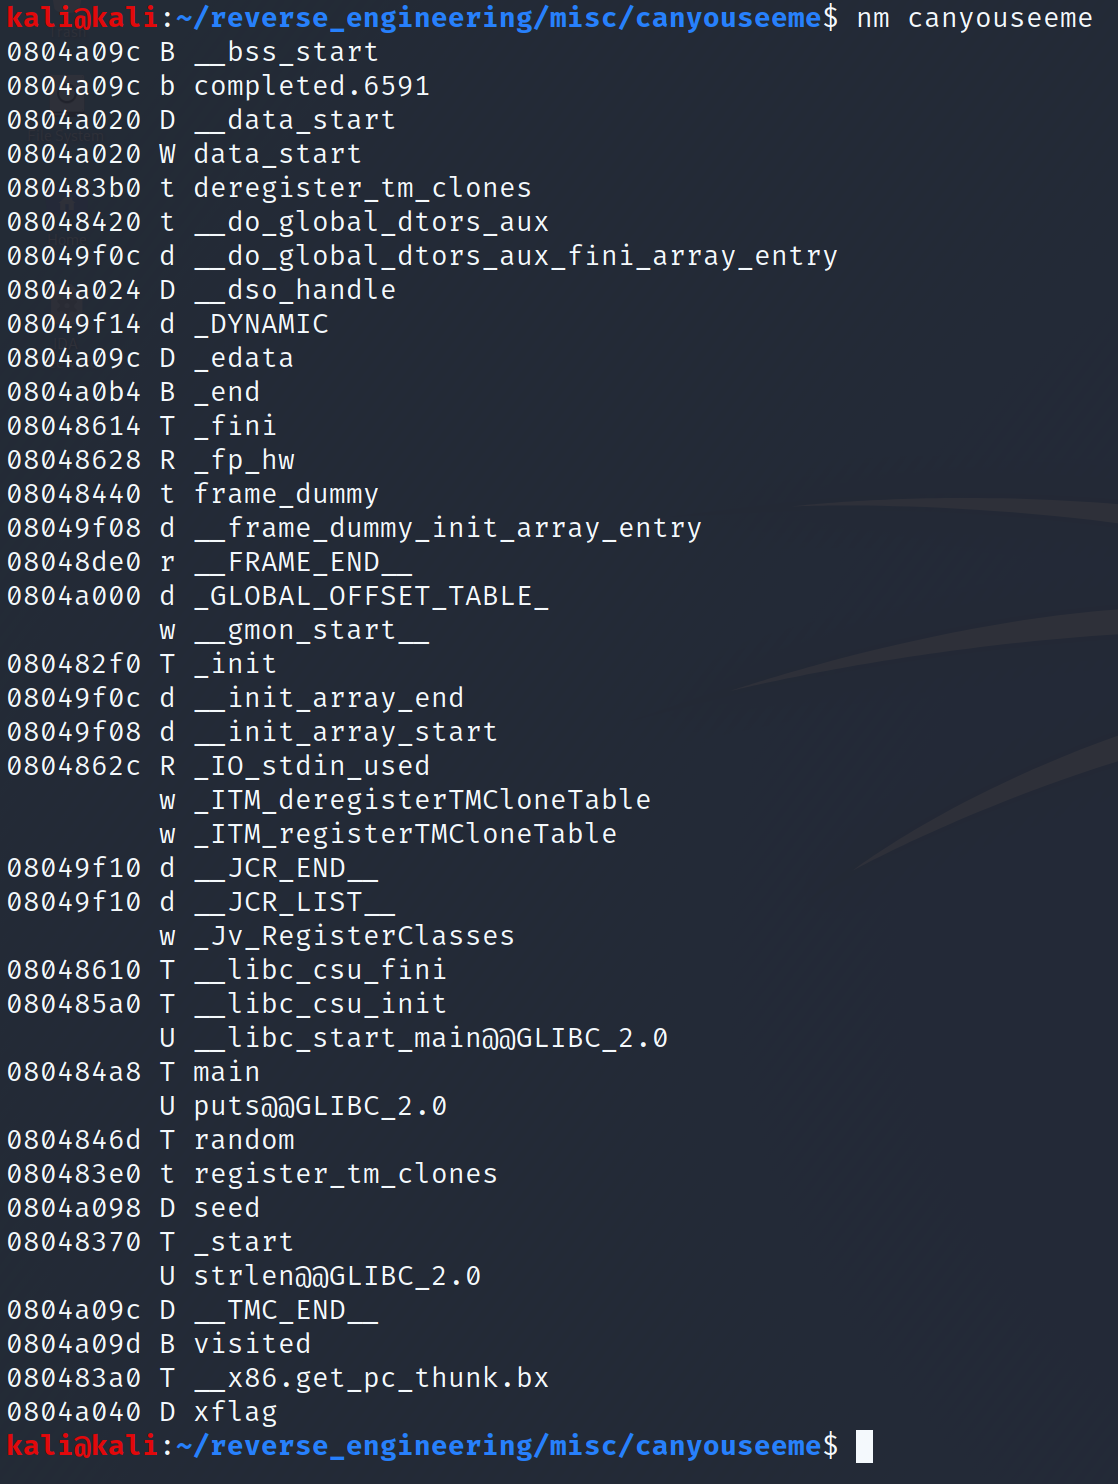
What sticks out to me are a few things. First, we see there is a random function. Notice though, that this function does not have the "@GLIBC_2.0" at the end. That means the author wrote a random function manually. Additionally, we see a seed variable. This variable resides in the data section which means it has been initialized. This is good because that means the seed to the random function will likely be static thus reducing the randomness. Furthermore, we see a visited variable. Unlike seed, this variable resides in the BSS section which means it has not been initialized. However, when the program is run, it will be set to 0. This will be important later on. Finally, we see an xflag variable. This is likely our encrypted flag. Again this variable is in the data section which means it was initialized to some value. We can actually see the value these variables hold using the objdump command. Let's go ahead and run the following command to inspect these variables:
objdump -s -j .data canyouseeme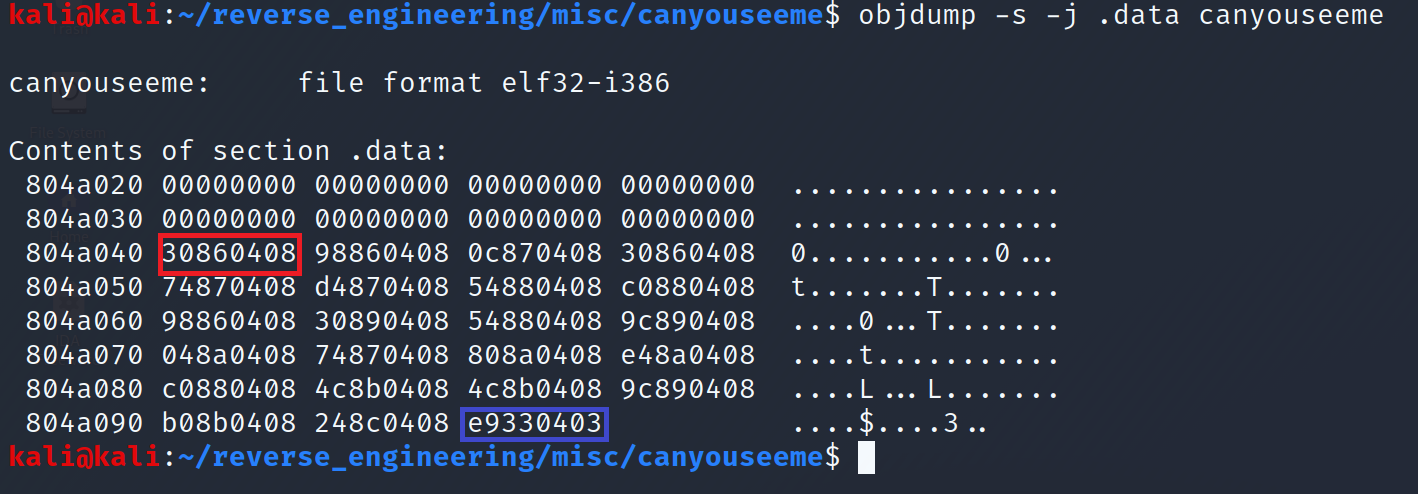
To make things a little easier, I highlighted the values of interest. The red rectangle represents the xflag variable and the blue rectangle represents the seed variable. Something important to remember, these values are displayed in little-endian. This means the bytes are reversed. So xflag is actually, 08048630, and seed is 030433e9. So can we simply view the memory at this address and get the flag? Well, it's not that easy as you'll see in a moment. Let's do our final step in the triage and run strings.
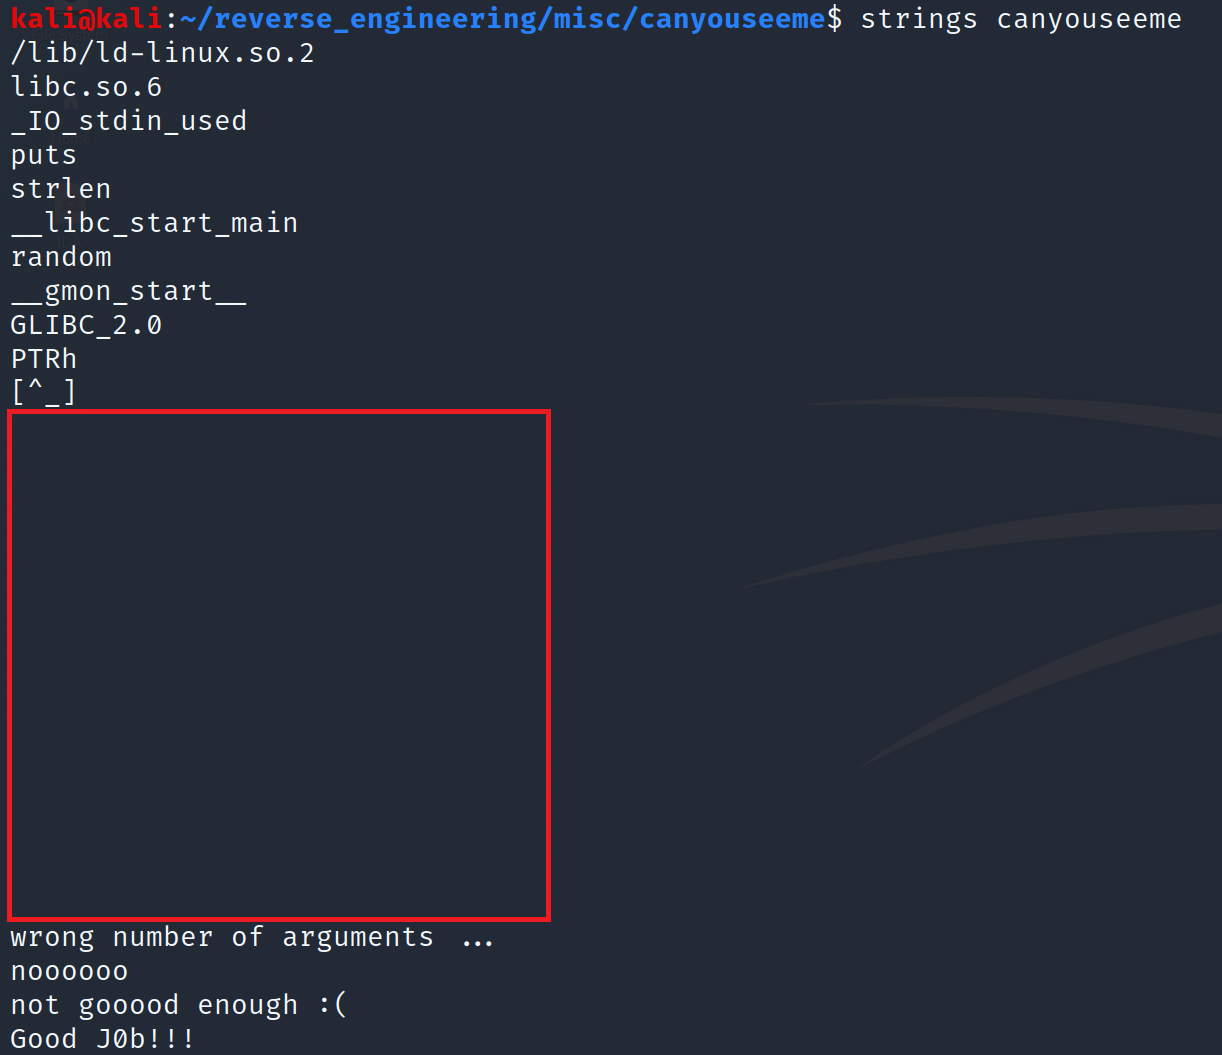
We don't get much information from the output of strings. We do see that we have to provide the binary with a certain amount of arguments. Additionally, we see what looks like a success and failure messages. But what's the deal with that big chunk of space!? A little weird if you ask me. Anyway let's go ahead and open this up in Ghidra for some static analysis!
Static Analysis in Ghidra
Once you open this up in Ghidra, go ahead and jump to the main function. I'm going to focus on the disassembly for now. We will use the decompiled output but only for a specific section.
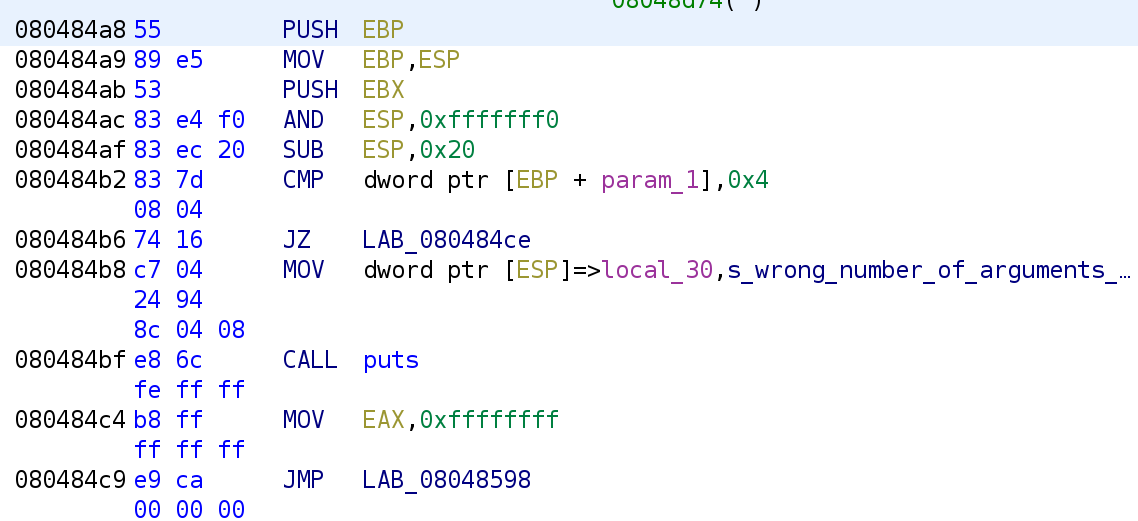
The main function starts by comparing param_1 to 4. Since this is the main function, we know that param_1 is argc, the number of arguments passed via the command line. This roughly translates to the following C code.
int main(int argc, char* argv)
{
	if(argc != 4)
    {
    	printf("wrong number of arguments\n");
        return 0;
    }
}
Note: this includes the binary name itself
So, we know we are supposed to pass the binary 3 arguments. Assuming we pass the correct number of arguments, we jump to LAB_080484CE.
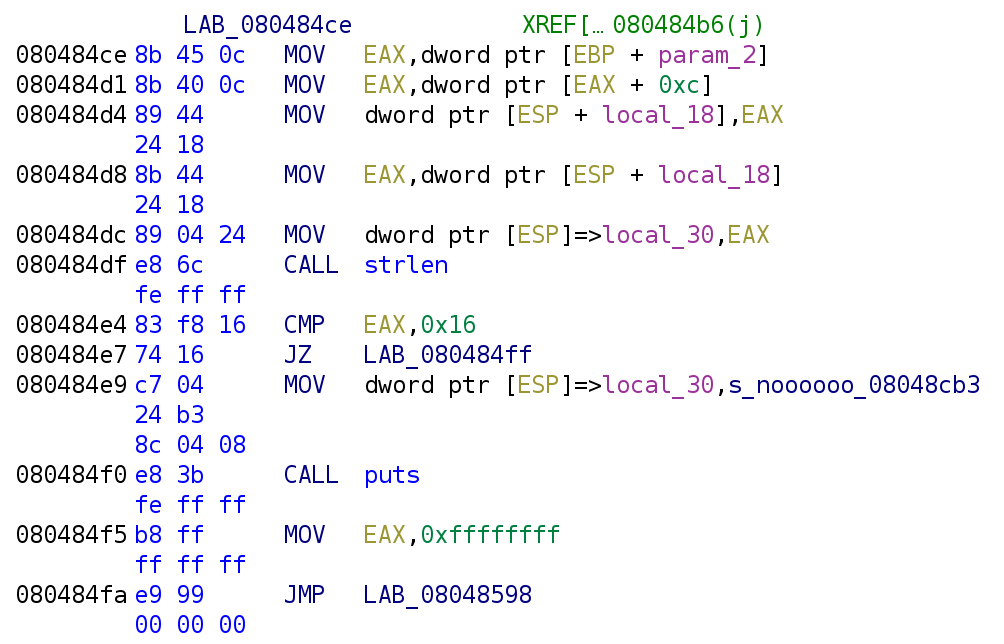
Now we see the binary begins to use the parameters we passed. It takes param_2 or argv and adds 12 to (0xc is hexadecimal for 12). This will grab the last argument we passed to the binary (argv[3]). How did I get argv[3]? This diagram should help:

We then see that argv[3] is stored in the local_18 variable. Let's rename this variable to user_input. The MOV instruction at address 0x080484dc is actually preparing the call to strlen. This is a 32-bit binary and arguments are passed on the stack. So, this instruction is placing our user_input at the top of the stack. The strlen function will then be able to access our user_input. After strlen is called, we see it is compared to 0x16. We can translate the above disassembly to:
user_input = argv[3];
if(strlen(user_input) != 0x16)
{
	printf("noooooo\n");
    return 0;
}
So, we still don't know anything about the first two arguments, but the 3rd argument, has to be 22 characters long. Otherwise we fail. Let's continue!
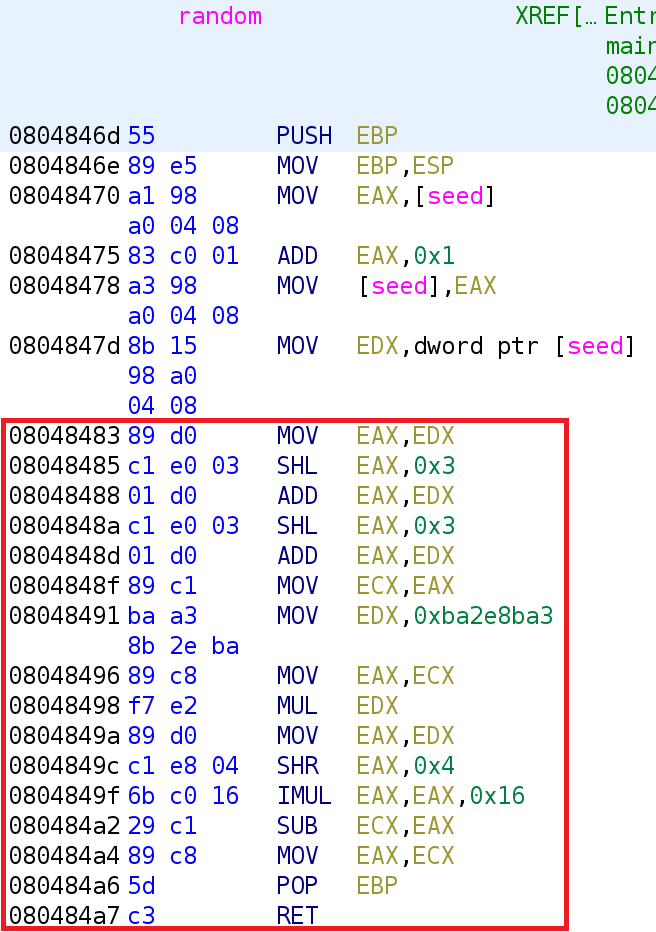
Now, we get to the interesting section of the code. This is the meat and potatoes! It starts off by setting two variables to 0 followed by an unconditional jump instruction. If history has taught us anything, one of these variables will be our loop control variable. Let's go ahead and rename them local_1d and local_1c to i and j respectively. Take a look at the instructions at the destination of the unconditional jump:
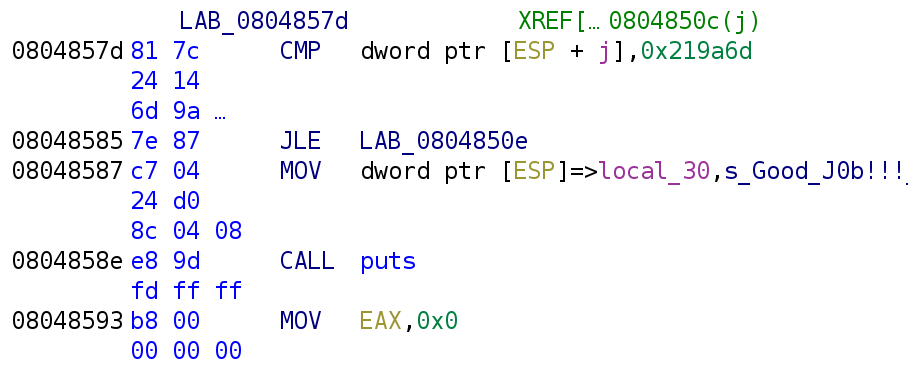
We see the variable j is compared to a REALLY big number 0x219a6d! If j is less than or equal to this number, then we jump to LAB_0804850E. Otherwise, you see that we actually finish the challenge. Let's go ahead and take a look at LAB_0804850E.
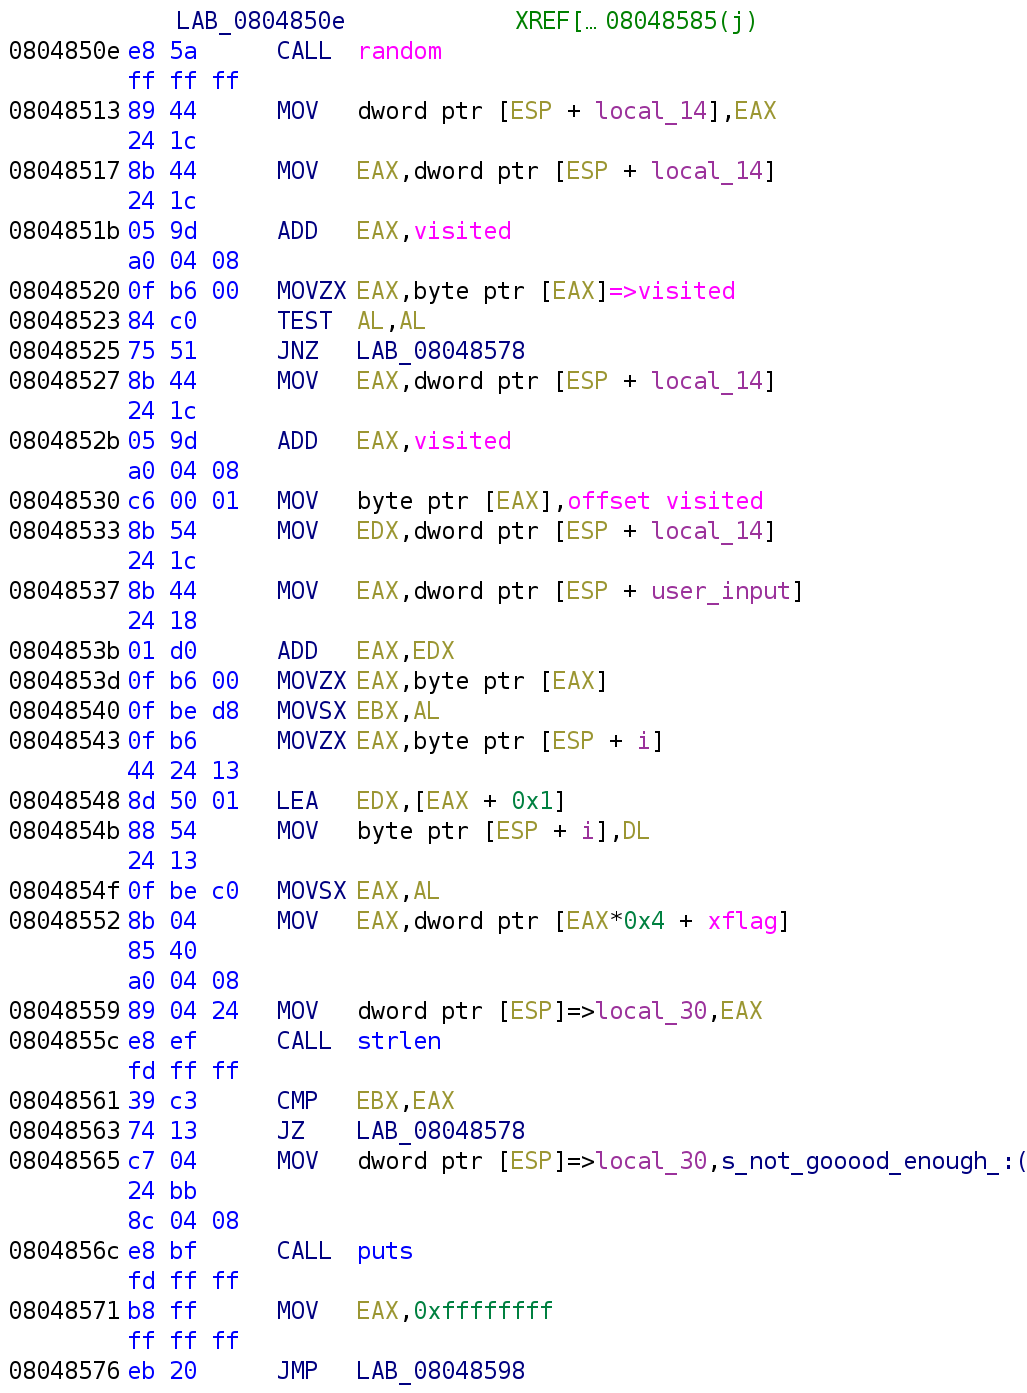
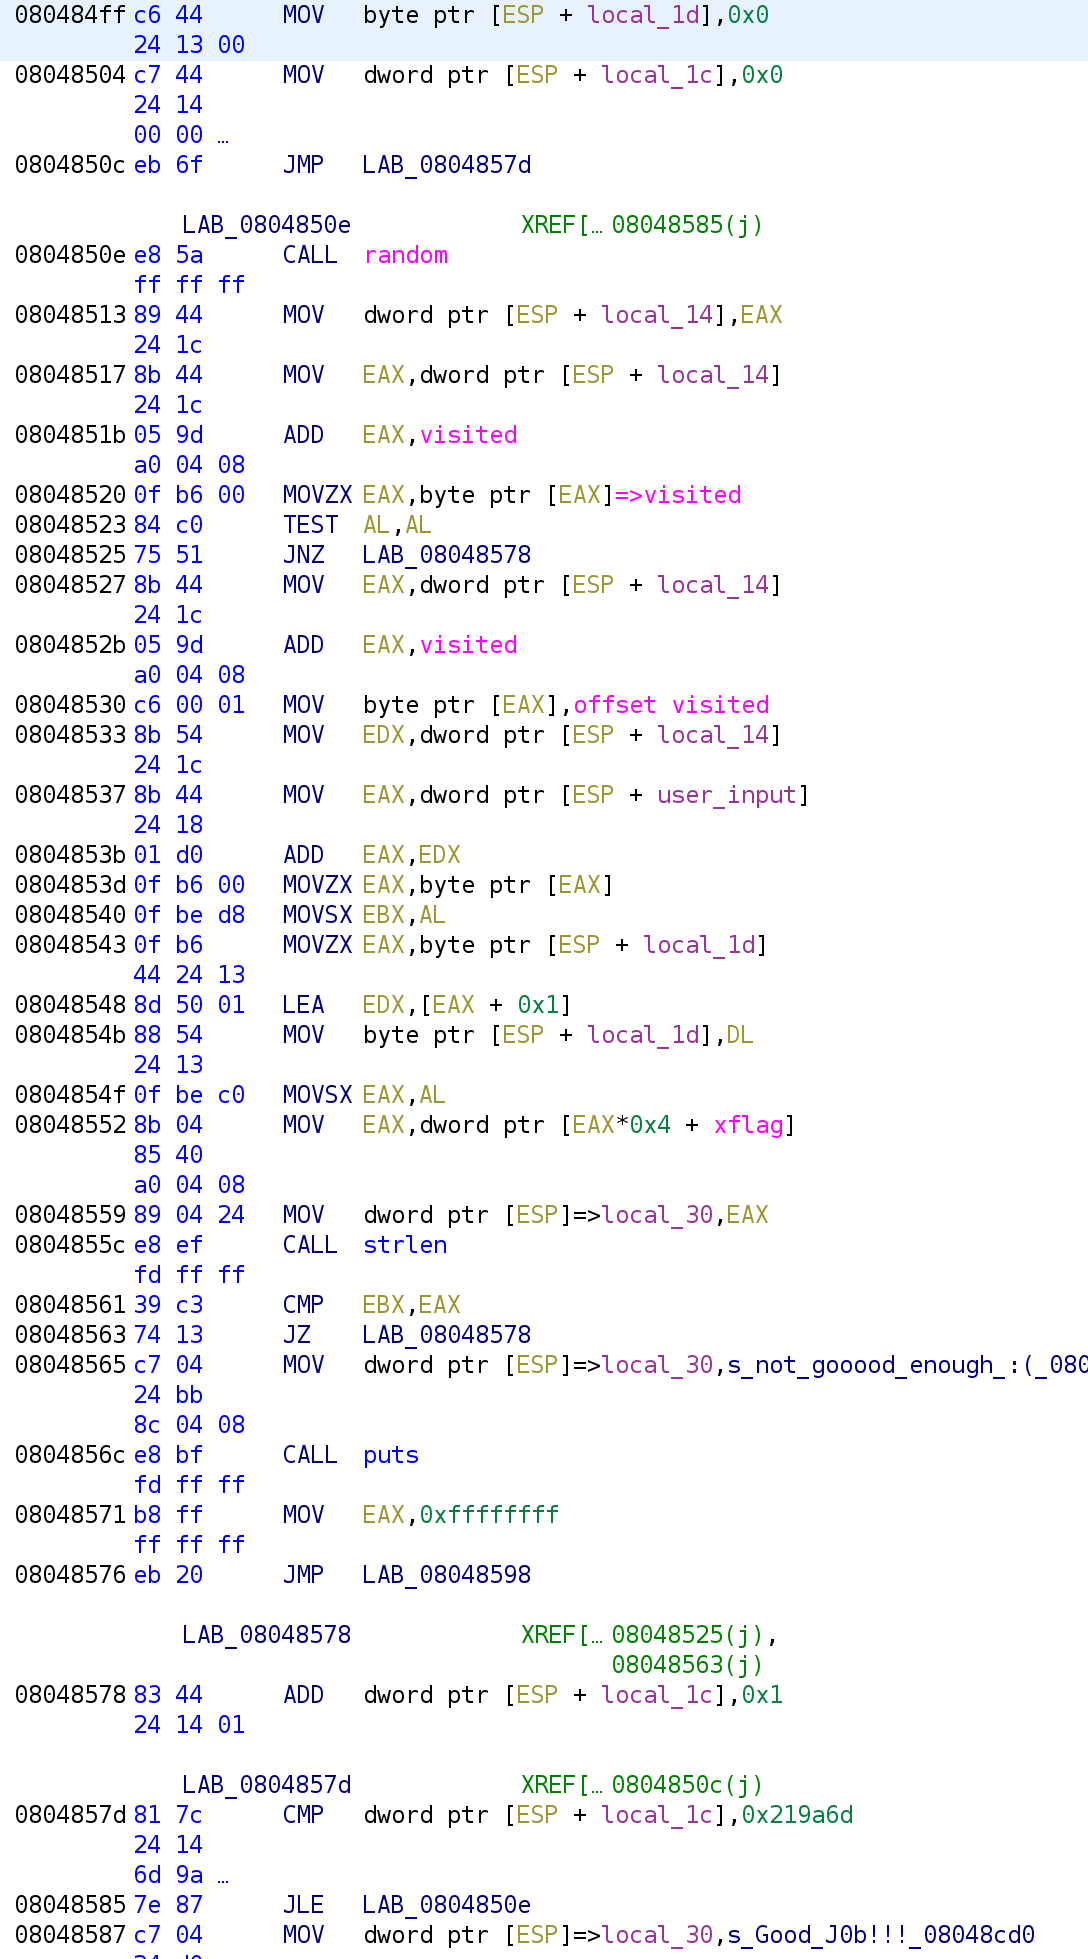
The first thing we do is call the random function. Before analyzing that function let's take a look at what it does with the output. The output is stored in the local_14 variable. The output of functions are always placed in the EAX register. The ADD EAX, visited, instruction will index the visited variable using random_num as the index. This looks something like this:
random_num = random();
visited[random_num]
So we know that visited is not just a single variable but actually an array. Also recall that these values are all set 0 when the binary runs. So, initially, visited[random_num] is going to be 0 for every random_num. For simplicity, let's assume the random_num is 0. This is important because the next instruction will grab the value of visited[0] and store it in the EAX register. That's what the MOVZX EAX, byte ptr [EAX] is doing. After that we see a TEST AL, AL instruction. This performs a bitwise AND on the AL register which is the lower 8 bits of the EAX register. If the operation is not zero, meaning EAX is something other than 0, then we jump to LAB_08048578. Otherwise, we index visited again with the same random_num. I'm not particularly fond of what Ghidra is doing at the instruction at address 0x08048530. Let's highlight that instruction and press Ctrl+Shift+G. You might get a prompt asking if you are sure you want to patch this instruction. Hit yes. We are not going to patch the instruction but it will allow us see the actual instruction.
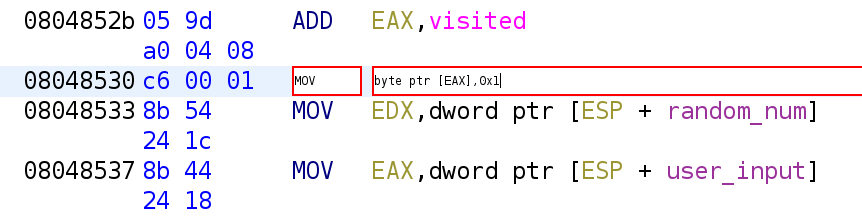
As you can see, the value 1 is being placed in [EAX]. Recall, this holds visited[0]. So, this is essentially, marking this index as visited by placing a 1 in the index. The next time the loop runs into visited[0] it will pass and move on to the next index. So, now it has marked, visited[0] let's see what it does next.
![After marking visited[random_num]](https://jaybailey216.com/content/images/2021/01/More-Stuff.png)
Now, random_num is being used to index our user_input variable. The value of our user_input is stored in EAX. That value is then stored in the EBX register. So, EBX holds user_input[random_num]. We see the i variable is stored in the EAX register. The LEA EDX, [EAX + 0x1] instruction is a little misleading. Although LEA stands for load effective address, in this case, it not loading an address. What happens here is, EAX + 0x1 will be evaluated and stored in EDX. So, since i is 0 at this point, EDX will hold 1 after this instruction executes. That value is then placed in i. Then, we see EAX being used to index the xflag variable. Here, EAX is acting as i in this case. Recall, that before we added 1 to i, we stored the original value in the EAX register. So, incrementing i would actually happen after we use it to index xflag. So, just like visited, xflag is not a single variable but an array. Then we see something pretty interesting, xflag[i] is passed to strlen. The length is then compared to EBX. Recall that EBX stores user_input[random_num]. What the heck is going on here!? The length of this xflag[i] is compared to a value in our user input? This confused me for quite a while I kid you not. Let's take a closer look at the xflag variable.
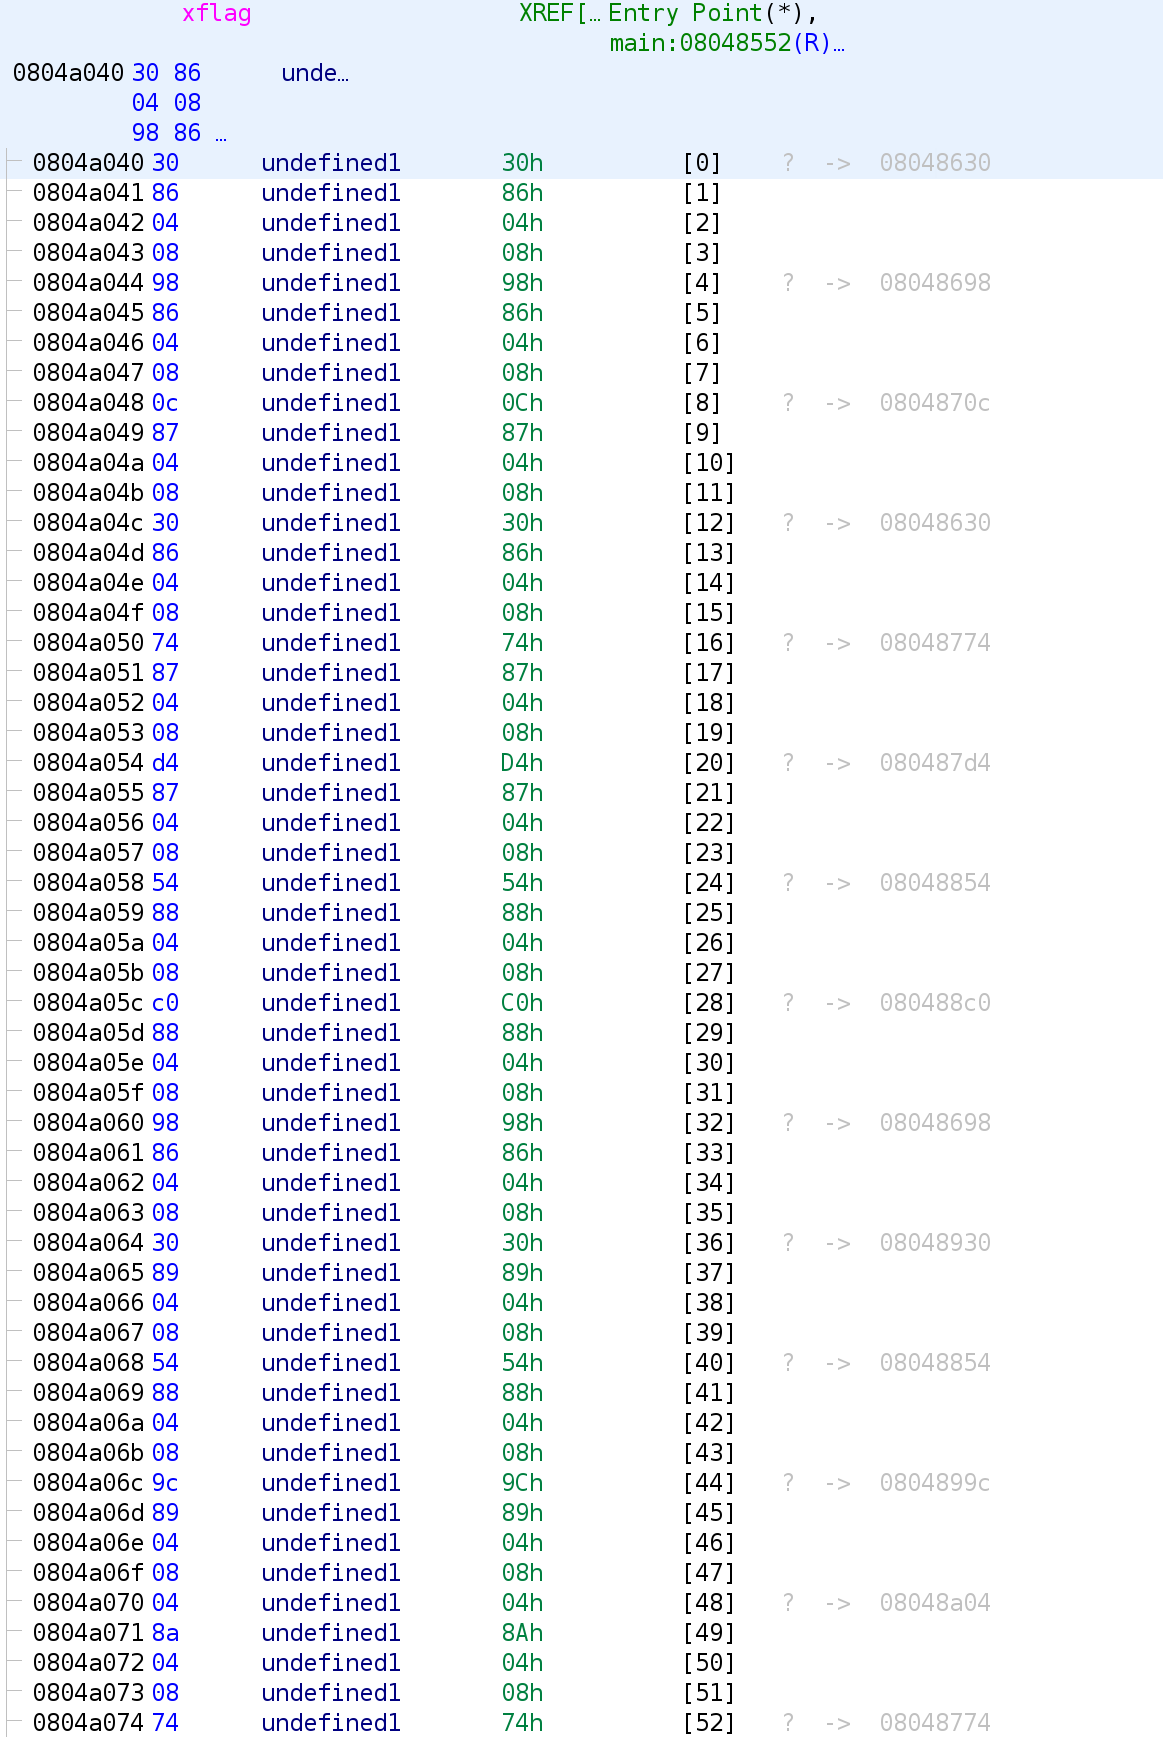
Uhh this kind of raises more questions than answers. This isn't the entirety of xflags but all of the entries follow this pattern. Let's double click on the address 0x08048630. It's highlighted in the image above. This brings us to what is stored in this index.
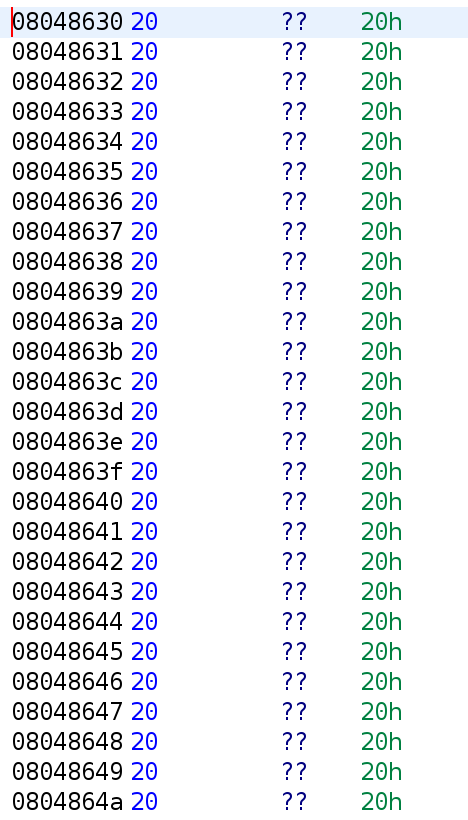
Hmm. There's just a bunch of 0x20 values stored here. Let's go back and select 0x08048698.
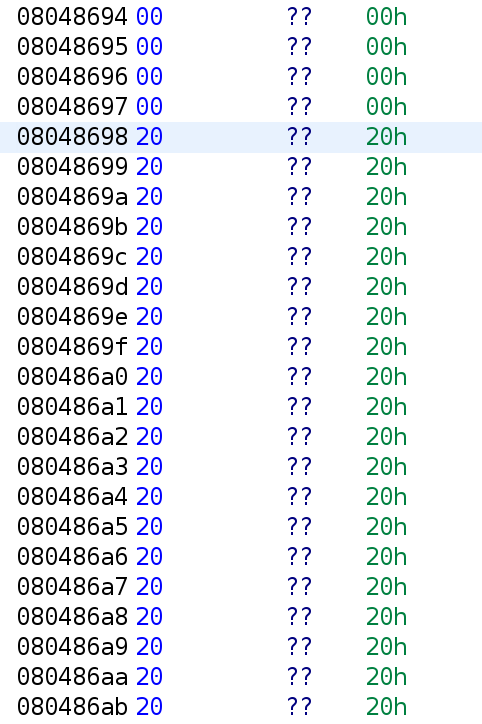
It appears it's the exact same thing. But look at what's above it. There are four null bytes. Could it be? It seems like each array index is a string with a specific 0x20 values stored in each array. Interestingly, 0x20 is the space character in ASCII. This would explain all of the spaces we saw earlier. There's a bunch of spaces here as you can see. Ok but what does this have to do with the strlen stuff from earlier? Let me explain. The variable xflag holds x amount of spaces in each index. Let's say we have 3 indices and xflag[0] has 74 spaces, xflag[1] has 97 spaces, and xflag[2] has 121 spaces. That means, strlen(xflag[0]) will give us 74. In ASCII, this gives us the letter "J". Similarly, strlen(xflag[1]) and strlen(xflag[2]) will give us 97 and 121, respectively. The ASCII values for 97 and 121 are "a" and "y". So, we can use the length of various xflag indices to get letters in the alphabet. Let's look at the disassembly we are interested in once more.
![Comparing strlen(xflag[i]) to user_input[i]](https://jaybailey216.com/content/images/2021/01/Comparing-xflag-to-userinput.png)
Ok now it should be a little more clear. We grab user_input[random_num] and compare it to strlen(xflag[i]). Let me write out the entire main function in C to really drive the point home.
if(argc != 4)
{
	printf("not enough arguments\n");
    return 0;
}
user_input = argv[3];
if(strlen(user_input) != 0x16)
{
	printf("nooooo\n");
    return 0;
}
i = 0;
j = 0;
while(j <= 0x219a6d)
{
	random_num = random();
    if(visited[random_num] == 0)
    {
    	visited[random_num] = 1;
        if(user_input[random_num] != strlen(xflag[i]))
        	break;
        i = i + 1;
    }
    j++

}
Alright that looks good! Now what about this random function? We still don't know what it's going to return. Let's go ahead and analyze the random function.
Analyzing the Random Function
Alright thankfully this function is small! This function starts off by adding 1 to the seed value. Recall that the seed variable was initialized to 0x30433E9. So, when this function is called, seed gets incremented to 0x30433EA. Then we get to the section where I need Ghidra's decompiling prowess! The section that's highlighted is the part that I cannot decompile myself. We talked about this in a previous challenge. This is the compiler trying to avoid performing a division operation because it is a slow operation. Let's go ahead and take a look at the decompiled output to see what this craziness comes out to be.
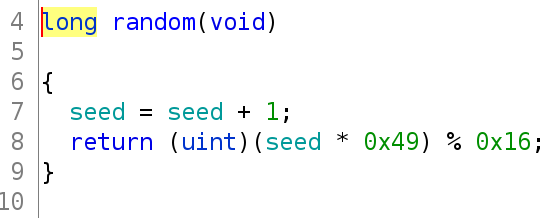
So, the random function, simply increments the seed variable, multiples it by 0x49 and mods it by 0x16. It makes sense why it performs a mod by 0x16 since that is the length of our user_input and that is the number of indices the visited and xflag variables.
Alright Jaybailey how are we going to solve this?
I'm glad you asked! We need to solve one more problem. We need to know the length of each xflag index and we need to provide our input so it is compared with the correct xflag index. Remember it is going to use this number to compare against xflag[i]. To solve the first problem we must turn to GDB. This is likely not the most efficient way to solve this problem but its the only way I could figure out at the time of writing. Recall that the first index of xflag starts at 0x0804a040. Let's open the binary in gdb. Once you have it open, we are going to examine 22 bytes starting at 0x0804a040. So that's x/22wx 0x0804a040. The wx means I want to examine in word increments so 4 bytes and display the contents in hexadecimal format.

Now comes the tedious part. We have to examine each of these addresses as strings. When we do this, we will get the length of each index in the xflag array. We can do that with x/s 0x08048630. Repeat this for every index in this array.
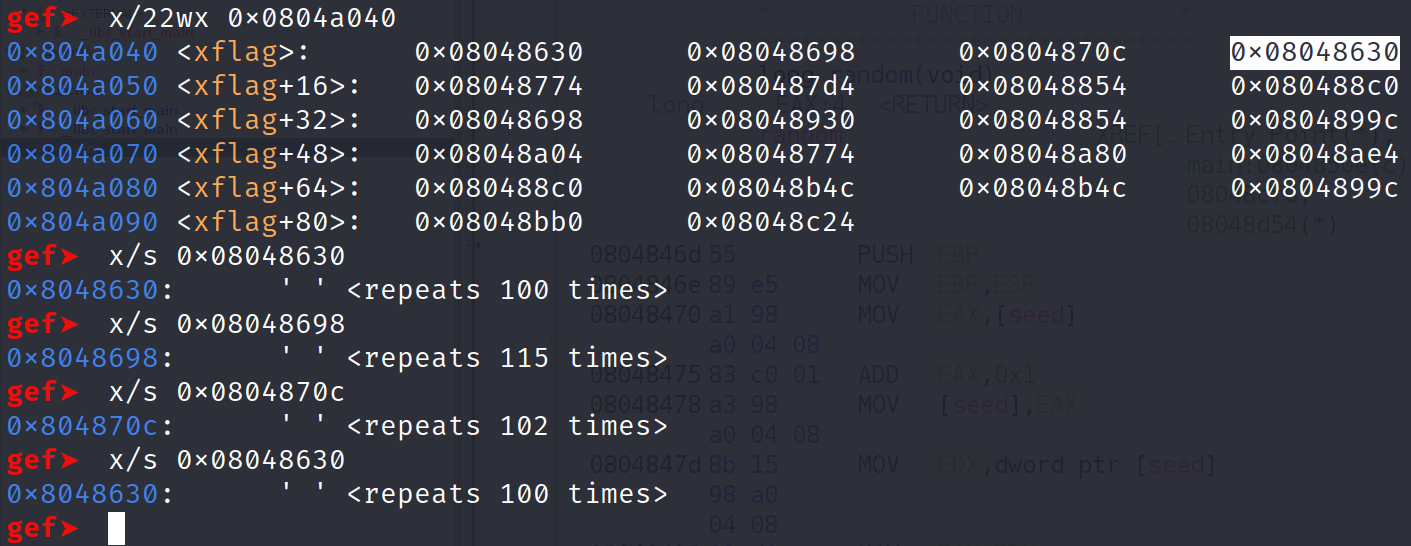
As you can see, gdb tells us the length of each string. So, xflag[0] is 100 bytes long, xflag[1] is 115 bytes long and so on. We can use this information to build a mapping of index to letters. I've done that for you below.
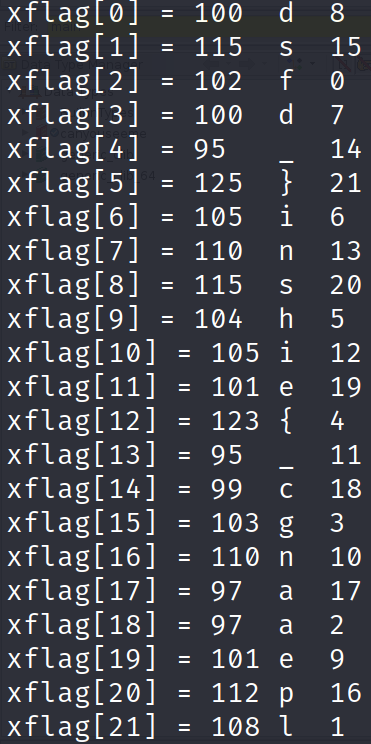
You might be wondering what the numbers are next to each letter. They look random. Well, they aren't random. Remember the random function outputs a number whenever it is called. To get the numbers in the image above, I wrote a Python script that will print out 22 numbers using the same logic in the random number function.
seed = 0x030433E9

for x in range(0, 22):
        seed = seed + 1
        print((seed * 0x49) % 0x16)
Running this script will give the numbers you see in the image above.
These numbers are the indices of user_input that will get compared against strlen(xflag[i]).
Can you explain that? I'm a little confused 😕
Sure, let's take the first 2 iterations. The random number will first produce the number 8. So, user_input[8] gets compared to xflag[0]. On the next iteration, user_input[15] gets compared against xflag[1]. Does that make sense?
Ohhh so thexflagvariable is indexed incrementally, but theuser_inputis indexed using the output of the random function?
Precisely!
Ok got it!
So can we just pass that weird string as input to the program?
Unfortunately, no.

We have to unscramble this string first. Fortunately, it's pretty simple. I'll show you the solution below.
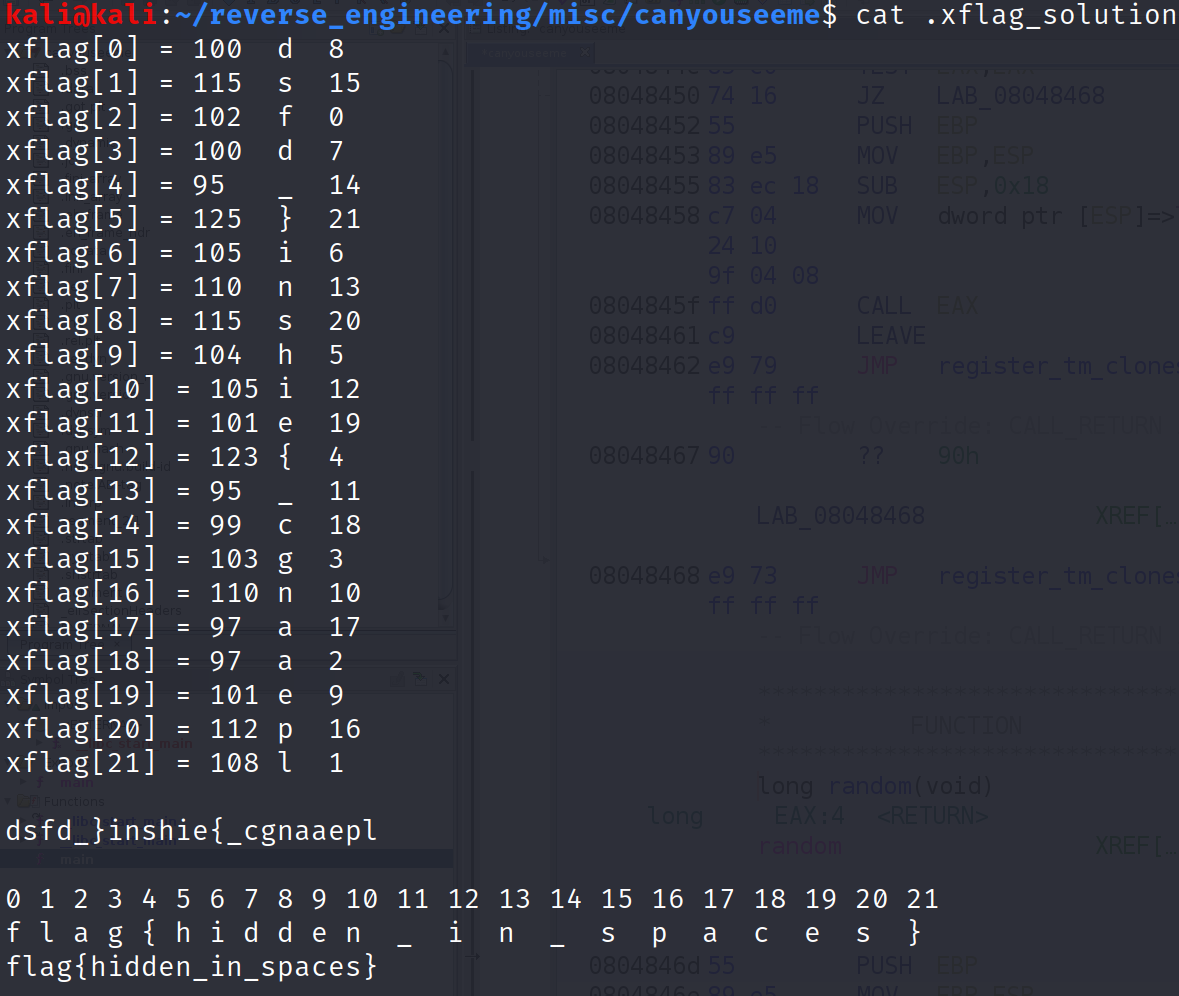
All I did was place the characters in order. The flag is a very clever "flag{hidden_in_spaces}". Now, run the binary with this as input and we get:

Woohoo we did it! That was an ordeal wasn't it!? Something to note, the first two arguments do not matter at all. You can literally put anything there, but you have to put something there otherwise the binary yells at you.
Conclusion
Alright and we are finally done! I hope you enjoyed reading this and I hope you learned something new. If you have any questions or comments feel free to reach out to me Twitter, Instagram, or Discord: jaybailey216#6540. If there's a challenge you want me to try feel free to let me know and I'll give it a shot. I'll see you all next time!
Peace out! ✌🏾