

Introduction
Hello yet again! We are back to solve another challenge! This is going to be a fun challenge. As the name implies our goal is to find the secret flag. The description for this challenge says, "Find the secret flag and get the name of the creators of this challenge!" We are provided with the name of the author already: decoder. Additionally, the name of the person who solved this challenge first is stefano118. Both of these will be important later in this challenge. If you want, you can view the video walkthrough on YouTube.
Optional Materials to Follow Along
If you want to follow along feel free to download the VM I provide. You can find instructions on importing the VM here. If you don't want to use my VM that's fine, my feelings won't be shattered. But you will at least need the binary. You can download the binary here. The binary comes in a password protected zip file. The password is hackthebox.
Note: You will need a valid HackTheBox account to download the binary.
You'll also need a disassembler. I recommend IDA or Ghidra. With all of that out of the way, let's get reversing!
Initial Triage
Let's start by running file on the binary.

We are dealing with a 64-bit binary. We also see that the binary has been stripped of its symbols. We can look at the dynamic symbols which will still provide some useful output. Let's run nm with the -D flag for dynamic.

We see this binary uses fread and fopen. We will likely need to provide some file for this challenge. We also see the ptrace function. This function is usually used to prevent users from debugging the program. Lastly, we see the use of a random function provided by the C standard library. Let's go ahead and run strings to complete our initial triage.
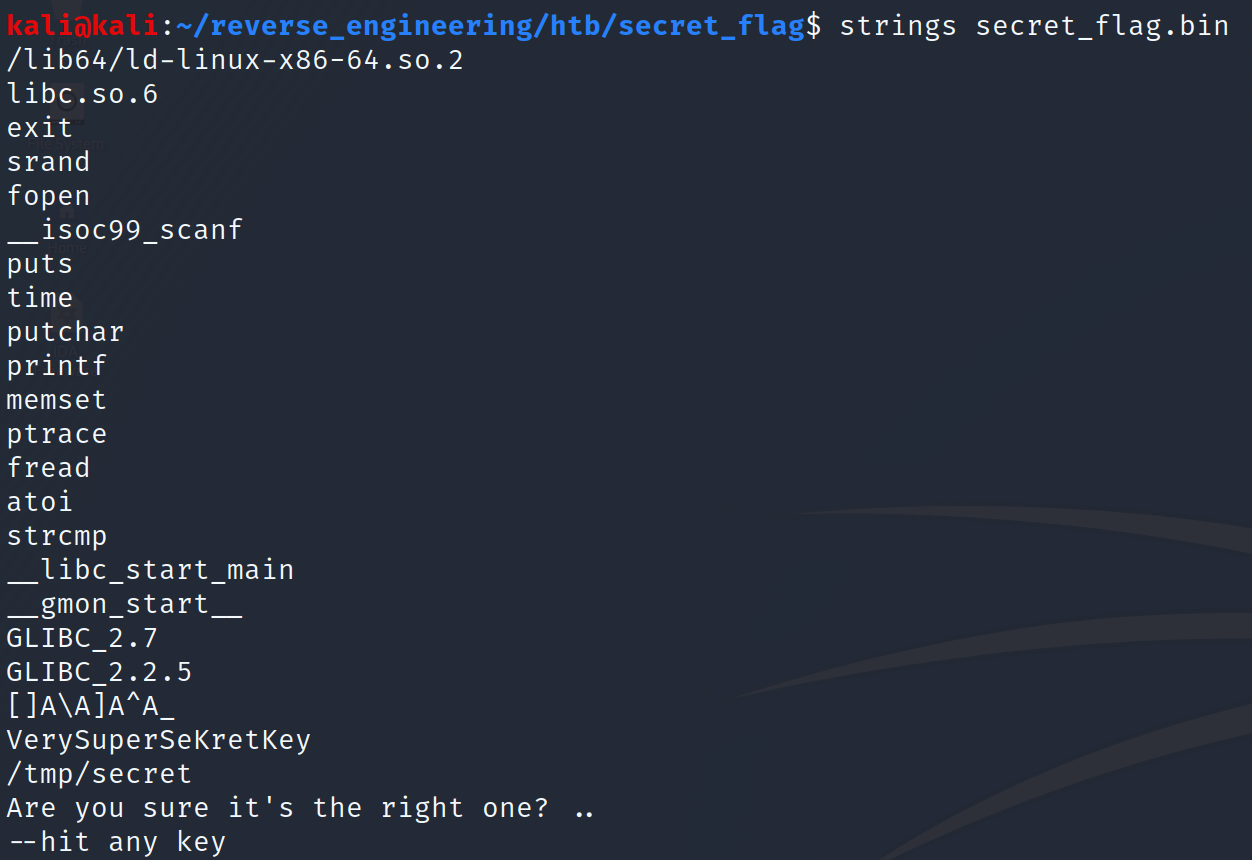
We see a possible flag: "VerySuperSeKretKey" and we see the file this binary will most likely look for when it runs: "/tmp/secret." So, let's create a file called secret, store it in the /tmp directory, and place "VerySuperSeKretKey" in the file. You can do this with the following command: echo VerySuperSeKretKey > /tmp/secret. After creating the file, let's run the program.

This is not what we expected at all! Let's go ahead and open this binary in IDA.
Static Analysis in IDA
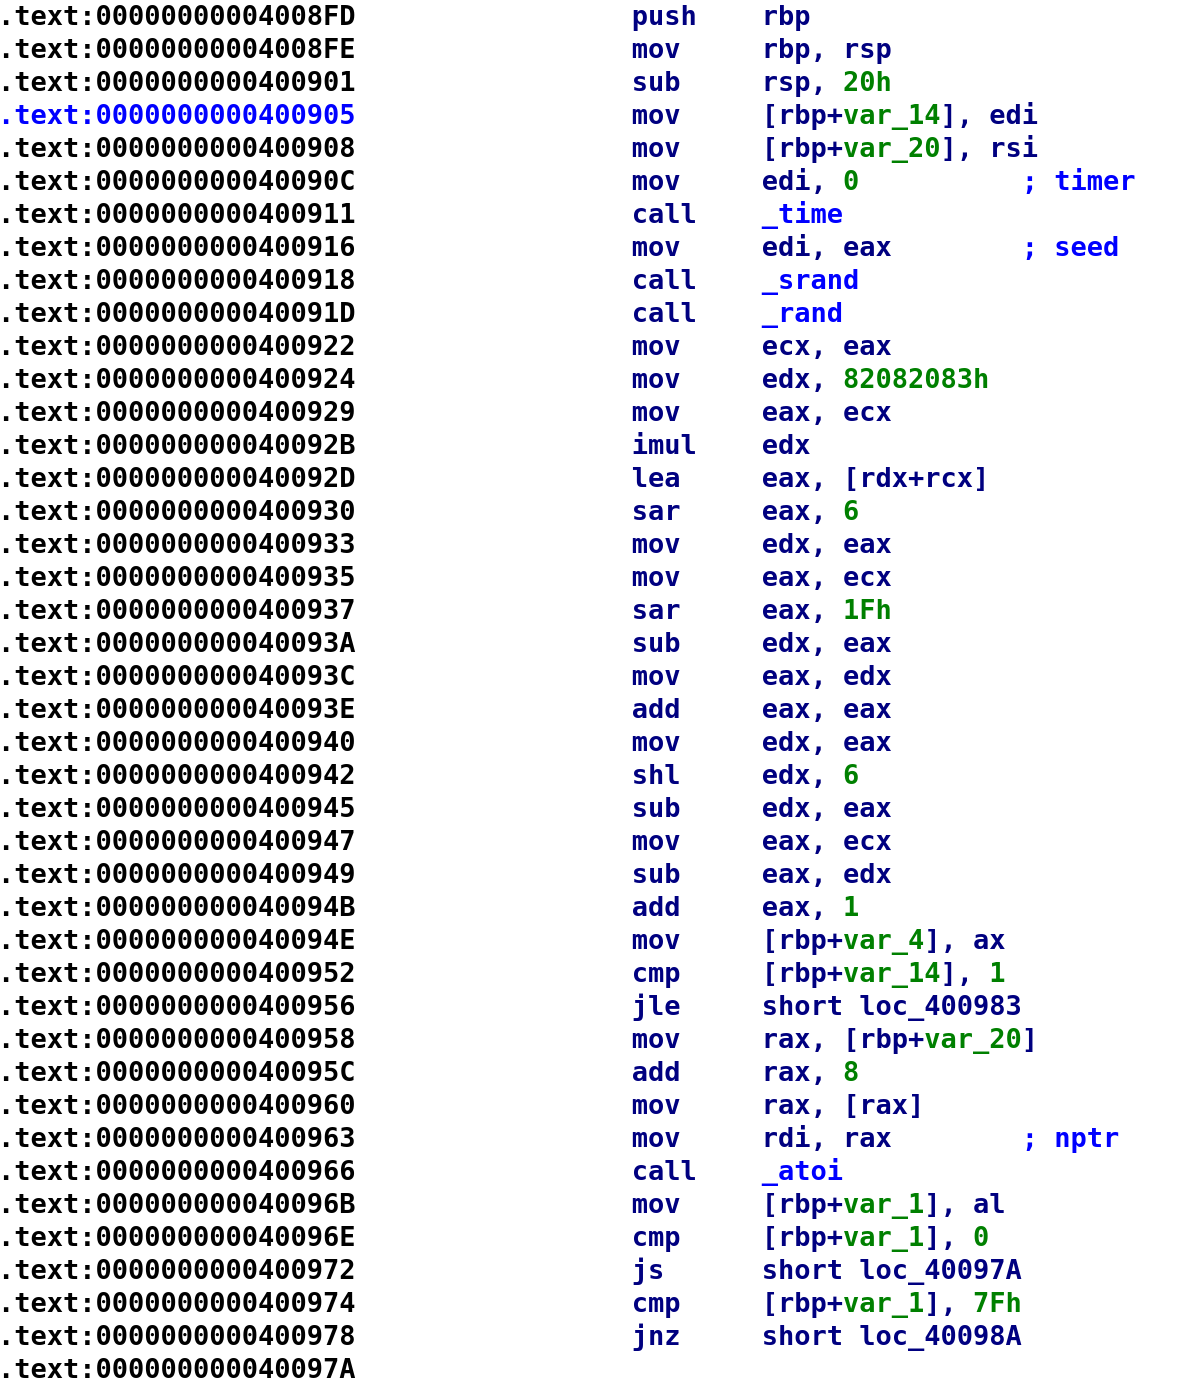
Alright so we know that var_14 and var_20 will be our argc and argv variables respectively. Next, we see 0 stored in the EDI register and the time function is called. The output of the time function is then used as an argument for the srand function and finally, we call the rand function and the output is stored in EAX which is then MOV'd to the ECX register. We can represent the previous lines as:
t = time(0);
srand(t);
random_num = rand();
I'm kind of jumping the gun a bit here by creating this random_num variable but I think it is clearer than putting a register there. The next 17 instructions starting from address 0x400924 up to address 0x40094E is another example of the compiler trying to avoid performing a division operation. We talked about this in a previous blog post. If you want to read more about it check out this stack overflow answer that describes what is going on here. I used Ghidra to decompile this block of code. The sequence comes out to random_num = random_num + (random_num / 0x2e) * -0x7e + 1; In the instruction MOV [rbp+var_4], ax, var_4 is going to be our random_num and AX holds the result from the calculations. After we calculate this random number, we compare argc to 1. So, it appears this program will behave differently depending on whether we supply input or not. Let's go ahead and rename these variables and take a look further down the disassembly.
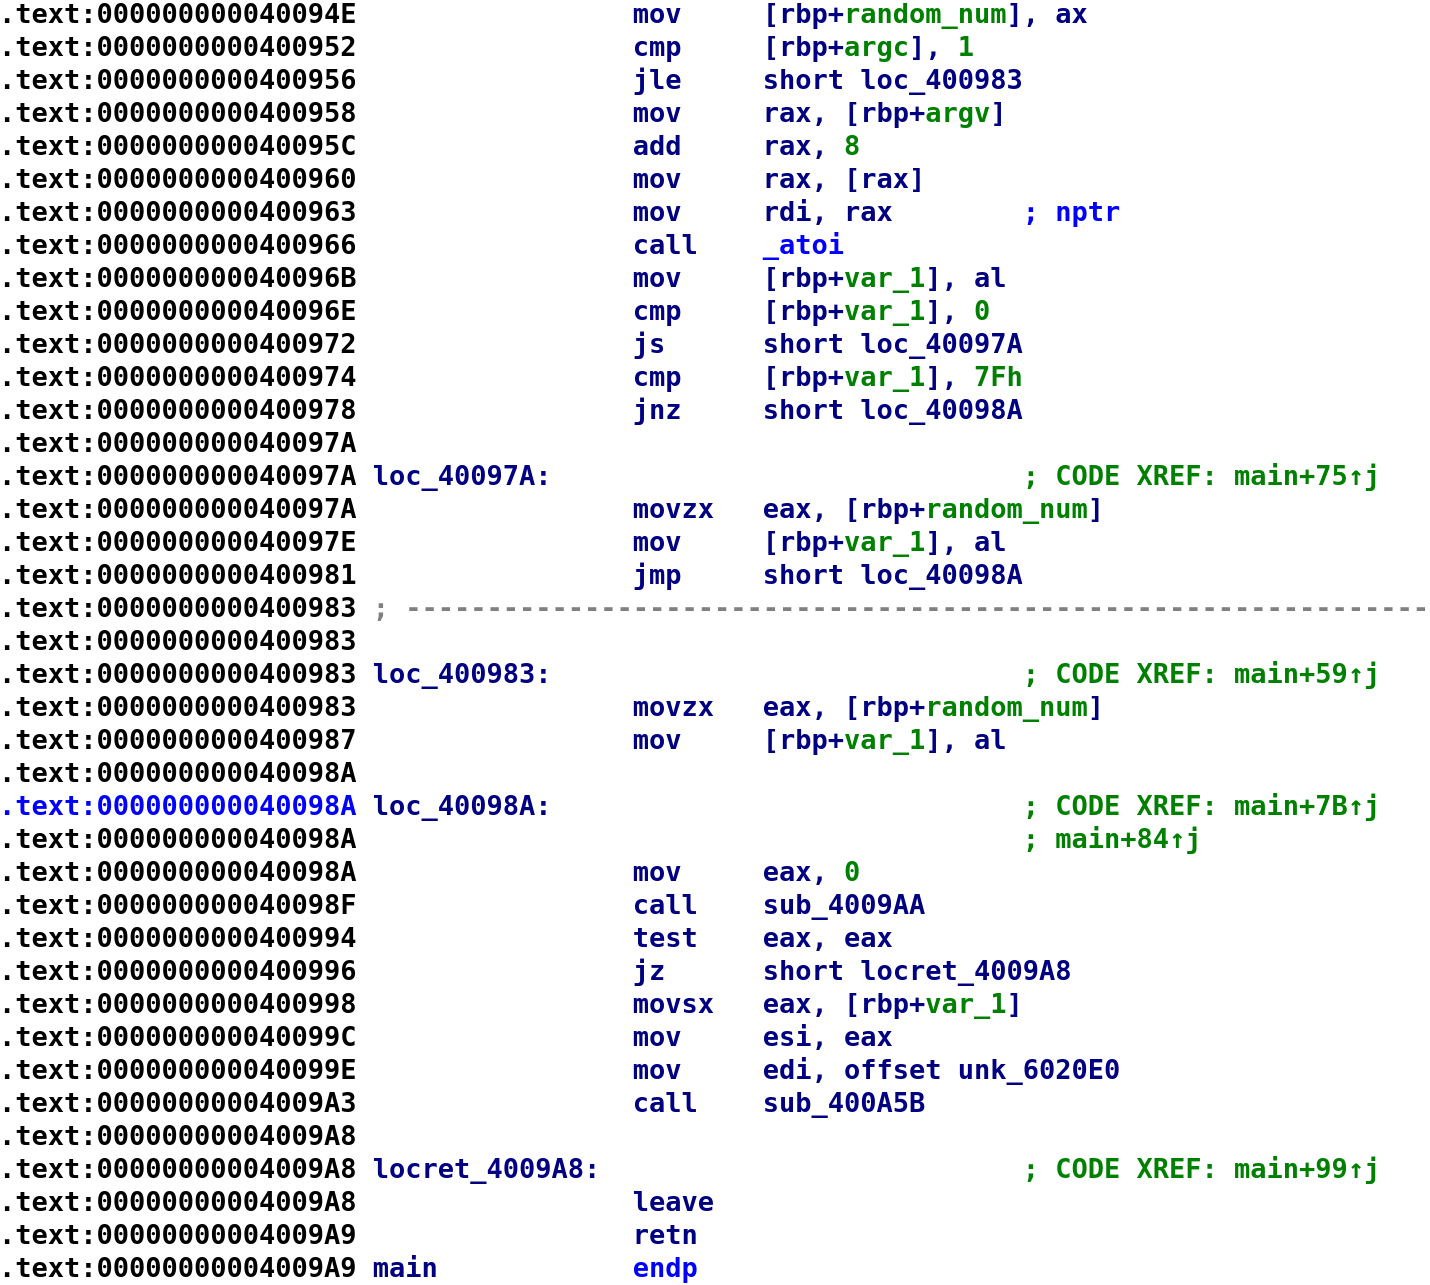
This is the rest of the main function. However, we do have two more functions to analyze but we will talk about those later. If we do not provide input to the program, we will jump to loc_400983. Which does not appear to immediately exit the program. What happens here is it sets our random number to var_1 and then proceed to call sub_4009AA. What happens when we provide the program with input? Well, we see that it grabs argv[1] and call atoi on it. This is depicted in the instructions from address 0x400958 to 0x400966. Then it stores atoi(argv[1] in the var_1 variable. Next, it compares var_1 to 0. The js instruction will jump if the sign flag is set. This is pretty much checking if we entered a negative number. If so, we jump to loc_40097A which again sets random_num to var_1 jumps over loc_400983. If we entered a number greater than 0, it then checks if that number is equal to 0x7F (127 in decimal). If it is not greater equal to 0x7F, then we jump to loc_40098A. We want this to happen. In the previous cases, a random number would be placed in var_1. Obviously, we don't want a random number because we can't predict what the output would be unlike in the previous challenge. So, we want to insert a number that is greater than 0 and less than 0x7F. Let's rename var_1 to user_input because ideally that's what it would hold. Assuming we provide a number greater than 0 and less than 0x7F, we will continue with our user input. Let's write what we learned in C for the time being.
t = time(0);
srand(t);
random_num = rand();
random_num = random_num + (random_num / 0x2e) * -0x7e + 0x1;
if(argc <= 1)
	user_input = random_num;
else
{
	user_input = atoi(argv[1]);
    if((user_input < 0) || (user_input == 0x7F))
    	user_input = random_num;
    else
    	goto here;
}
here:
	sub_4009AA();
I formatted this a little differently than I did in the video but I think this is more accurate based on what we see in the disassembly. Alright now let's analyze the sub_4009AA function.
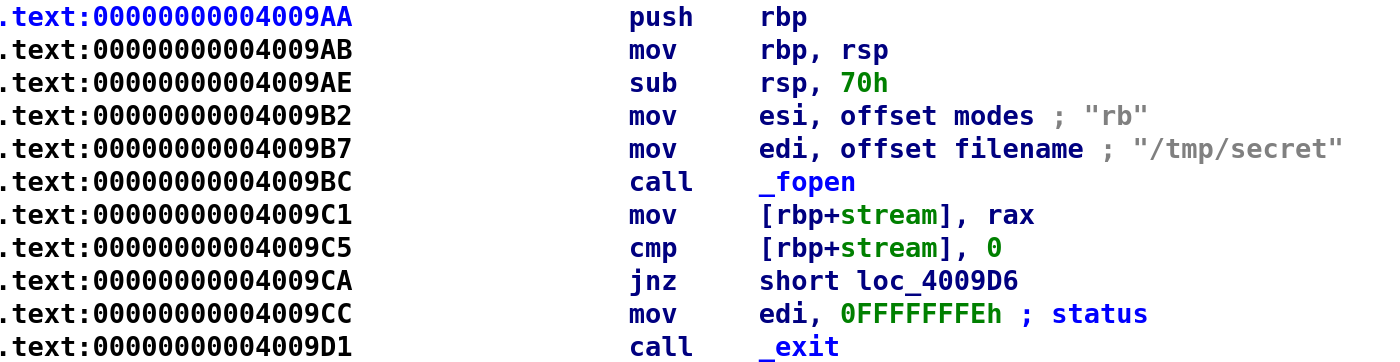
It looks like this is the function that's going to read our "/tmp/secret" file. Note that the file is being opened in binary mode. The section above actually does not do anything too interesting. It simply opens the file and checks if it is empty.
sub_4009AA()
{
	fp* = fopen("/tmp/secret", "rb");
    if (fp == 0)
    	exit(0);
}
Note: I changedstreamtofp. Probably not necessary but I likefpbetter.
Well we did create this file in the location it is looking for so why do we still get no input? Let's continue and see what happens.
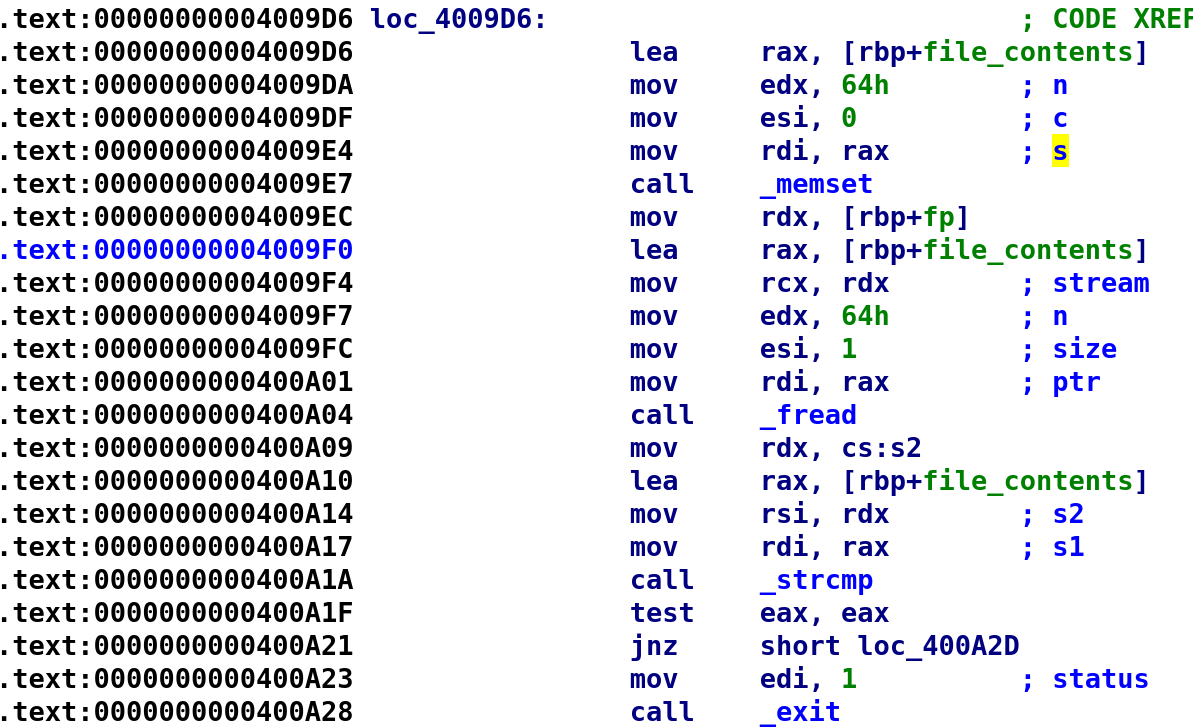
I took the liberty of renaming a variable already to file_contents but let's take a look at what it is doing with our file. Before interacting with our file, it calls memset on our file_contents variable. This would look like: memset(file_contents, 0, 100). This is going to initialize file_contents to 100 zeroes. Next, it reads in the file and stores it in file_contents like so: fread(file_contents, 100, fp); After the file has been copied to file_contents we then load a string cs:s2 into the RDX register. We can view the contents of this string by double clicking on cs:s2.

Would you look at that! This is the string we found earlier when we ran strings. We placed this in the file so if we compare the contents of the file to this string, we should be good to go right? Well, maybe not. We do compare file_contents with this string, however, if the two are equal we actually exit the program! This is apparent from the comparison at address 0x400A1A and you see if test eax,eax results in 0, meaning the two are equal, we call the exit function at address 0x400A28. That's right! The author bamboozled us! That explains why we get no output when we run the program. It was working as intended by completing trolling us! If we look ahead we will see what the program wants in our secret file.

It is important to note that var_6F, var_6E, and var_6D are all part of the file_contents variable. I'm not sure how to get IDA to treat these as a single variable but these are indeed the same variable. What you're seeing above is essentially, file_contents[0], file_contents[1], file_contents[2], and file_contents[3]. You might be able to see what it's doing already. It is comparing our file with the hex value 0xDEADBEEF. This is done over 4 checks as you can see above. So, instead of VerySuperSeKretKey, we should place the hex bytes 0xDEADBEEF. We can do this witht he following command:
echo -n -e "\xde\xad\xbe\xef" > /tmp/secretThe -n flag excludes newlines and the -e allows us to escape with the backslash character. When you cat the file, you'll notice some unprintable characters are displayed.

Now, let's run the binary again. If you run the binary with no input, we will get non-deterministic (random) output, however when we provide input, we get output that is deterministic.
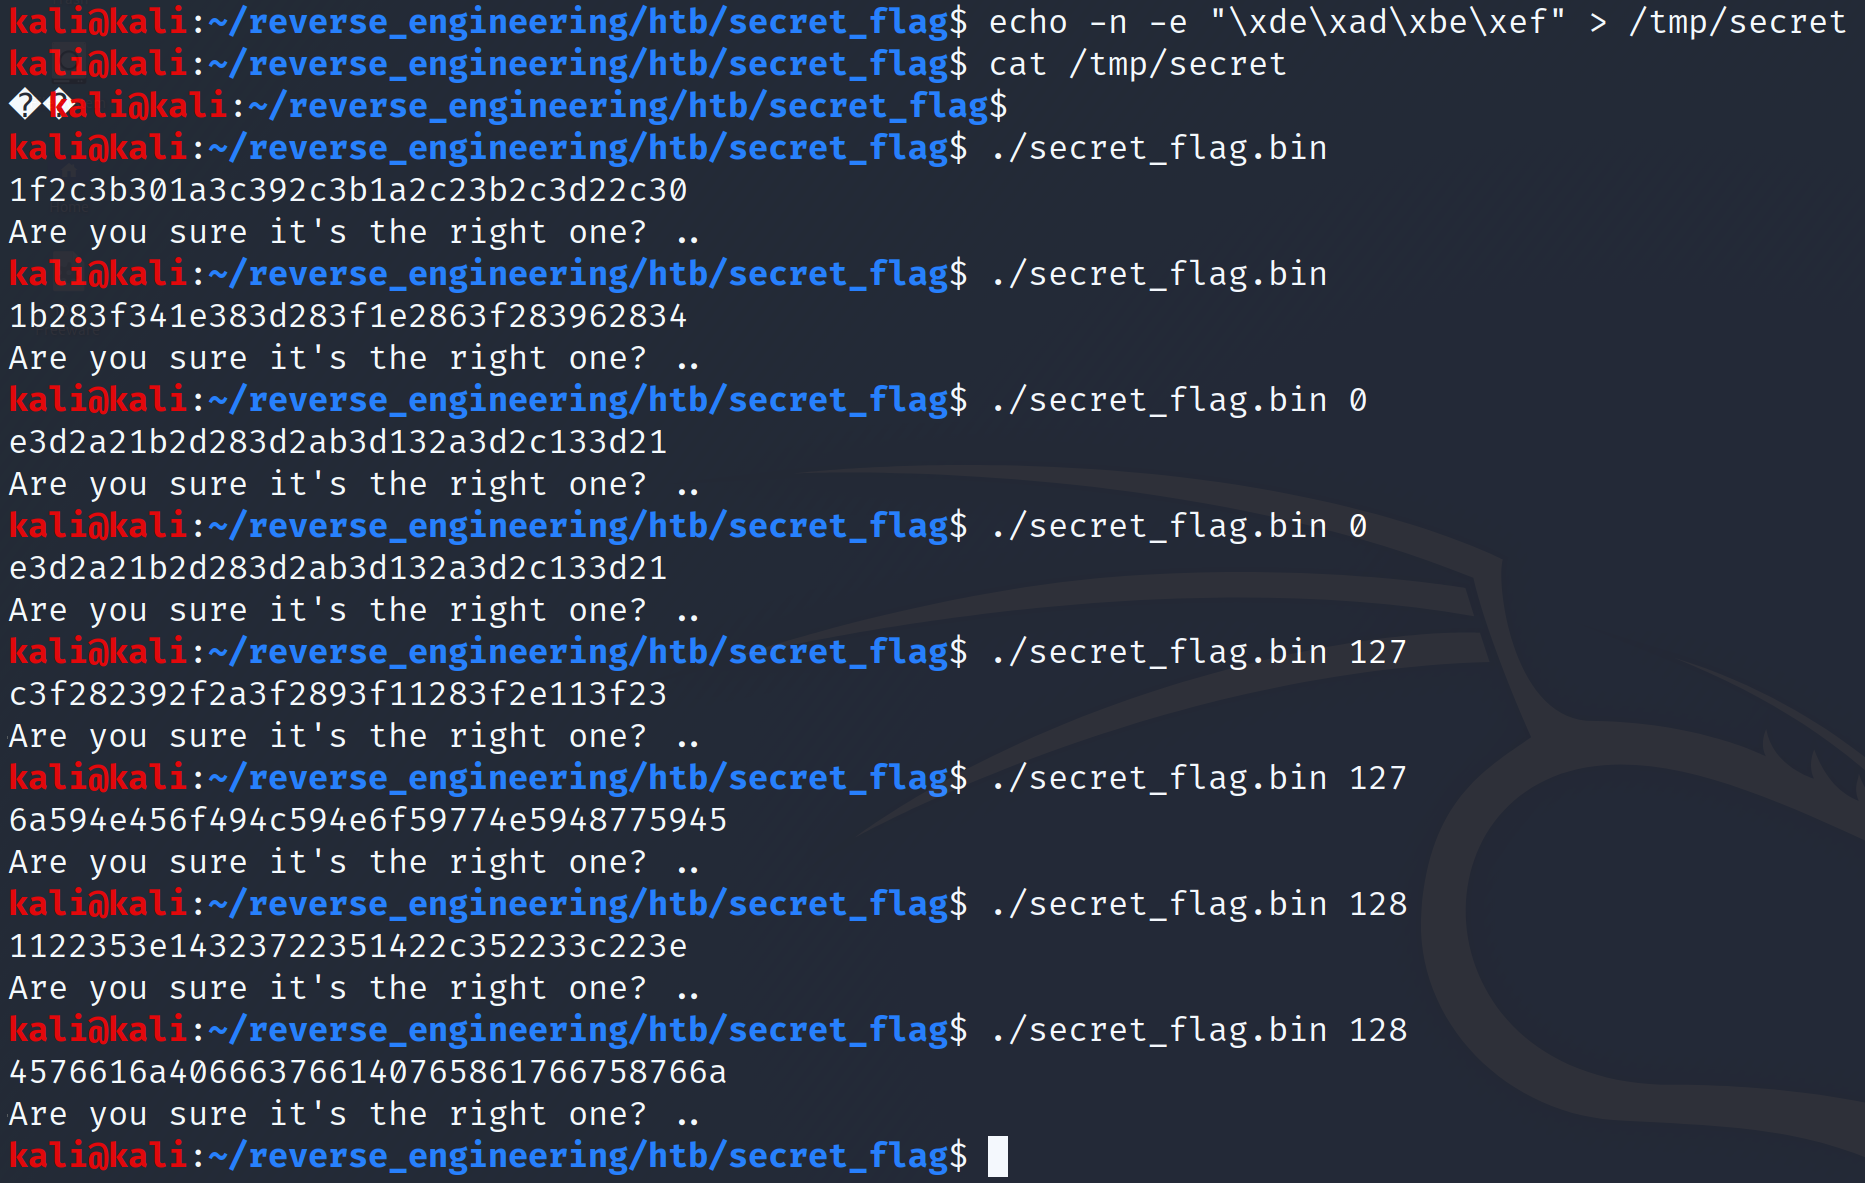
As you can see, when we run the binary with no output we get different characters, but when we run it with 0 we get the same characters. Also as expected when we provide 127, we also get different characters. But what about 128? Why are we getting random characters? When I made the video I didn't realize this would be the case. If you would come join me on a little detour as I explain what's going on here. Now, if you already know feel free to skip ahead.
A Slight Detour
Recall this disassembly here:
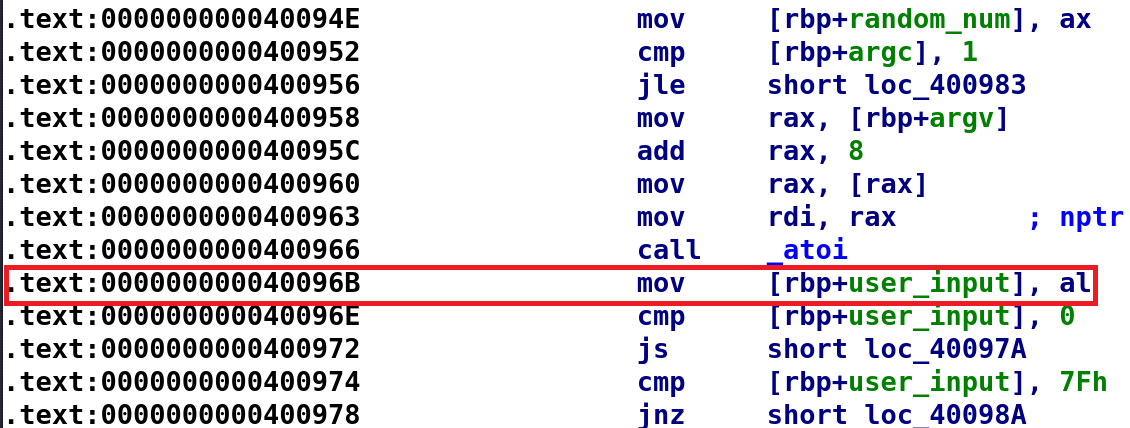
I highlighted the instruction that I originally didn't think twice about. Why did I highlight it? Before this instruction atoi is called on argv[1] as I discussed earlier. Now, if we were to store this value we would see a MOV instruction like so: MOV [rbp+user_input], eax. You might be thinking this doesn't really matter because AL holds the lower 8 bits of EAX. To that I say, yes you are correct, BUT, 8 bits can only have a maximum value of 255 if it is unsigned and 127 if it is signed. So, if we insert a number that is greater than 127, it will actually get wrapped around to -128. What C data type can only hold 8 bits? That's char! In this case, user_input is a signed char. I wrote a simple program that illustrates this. You can also check this code out in my Github.
#include <stdio.h>
#include <string.h>
#include <stdlib.h>

int main(int argc, char* argv[])
{
	signed char user_input
	if (argc <= 1)
    {
    	printf("Usage: %s <some_number>\n", argv[0]);
        exit(-1);
    }
    user_input = atoi(argv[1]);
    printf("What you actually typed: %d\n", atoi(argv[1]);
    printf("Number converted to signed char: %d\n", user_input);
}
And the output looks like this:
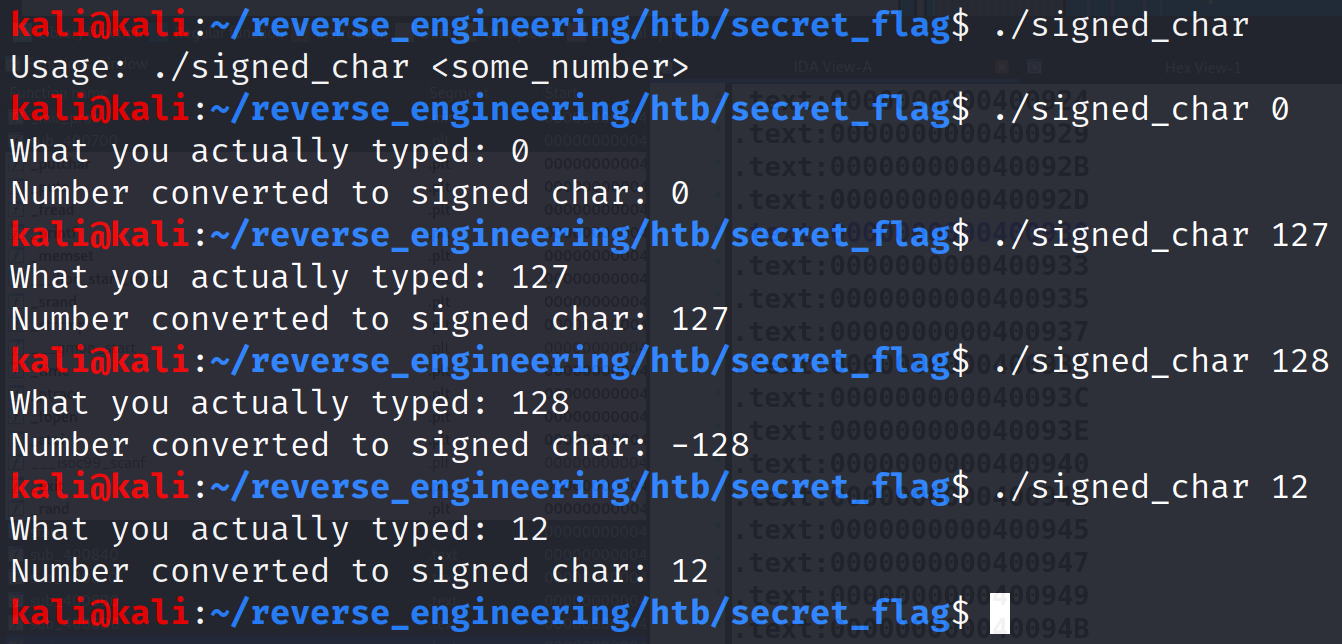
As you can see from the output above, when we enter a number larger than 127, it overflows to -128. Therefore, the program we are analyzing is essentially checking whether we enter a character within the range of 0 and 126. If we enter 127 or anything greater, it will store a random number in the user_input variable. Ok I hope that all makes sense. This detour came from me testing 128 as input and noticed it gave me a random number. I did a little debugging and noticed my input, 128, was being changed to -128. I did some digging and that's when I made this discovery. It's interesting what revisiting an already solved challenge with fresh eyes will do! Alright enough of this detour let's continue with the actual challenge.
Getting back on track!
At this point, we know that we have to pass this binary a number between 0 and 126. Additionally, we know that we need a secret file with the bytes 0xDEADBEEF. We also know that when we run the program we get some characters followed by "Are you sure it's the right one?" There is one more function we need to analyze. This function will likely give us better insight into solving this challenge. Before we take a look at this function let's look at the disassembly leading up to this mysterious function.
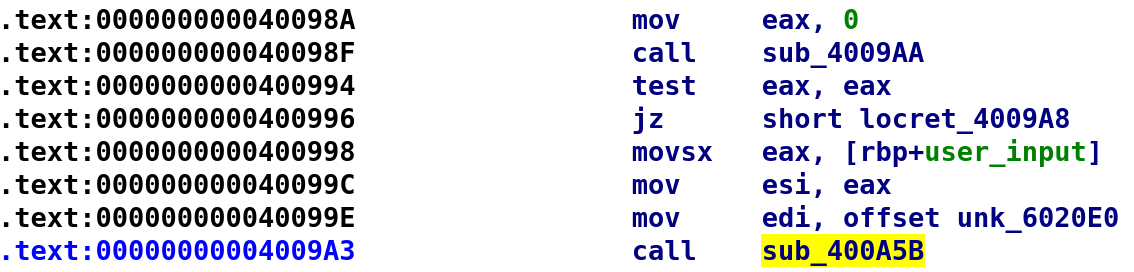
So, we know sub_4009AA will return 0 if we have the correct bytes in our secret file. Once we pass this check, we move our user_input into the EAX register. Then it gets placed into the ESI register. Finally, we see this unk_6020E0 thing get loaded into the EDI register. What the heck is unk_6020E0!? IDA will use unk_some_address, if, for some reason, it could decipher the type. We can simply double click on this value to inspect what is stored there.
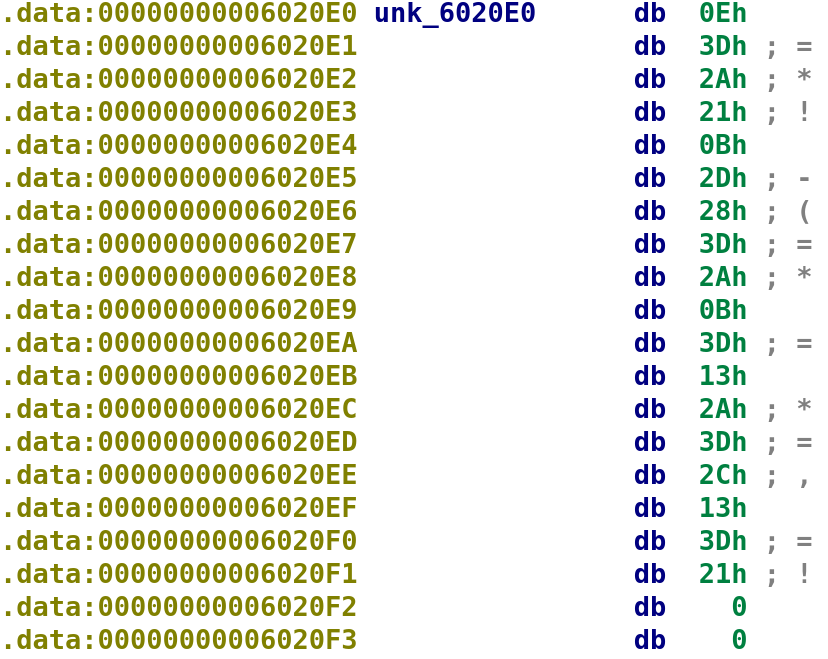
As you can see, a series of random looking bytes are stored here. This value is passed to the sub_400A5B function along with our user_input. So, the function call looks something like this: sub(unk_6020E0, user_input). Alright, now let's finally take a look at this mysterious function!
Analyzing the second function
Here is the disassembly for the sub_400A5B.
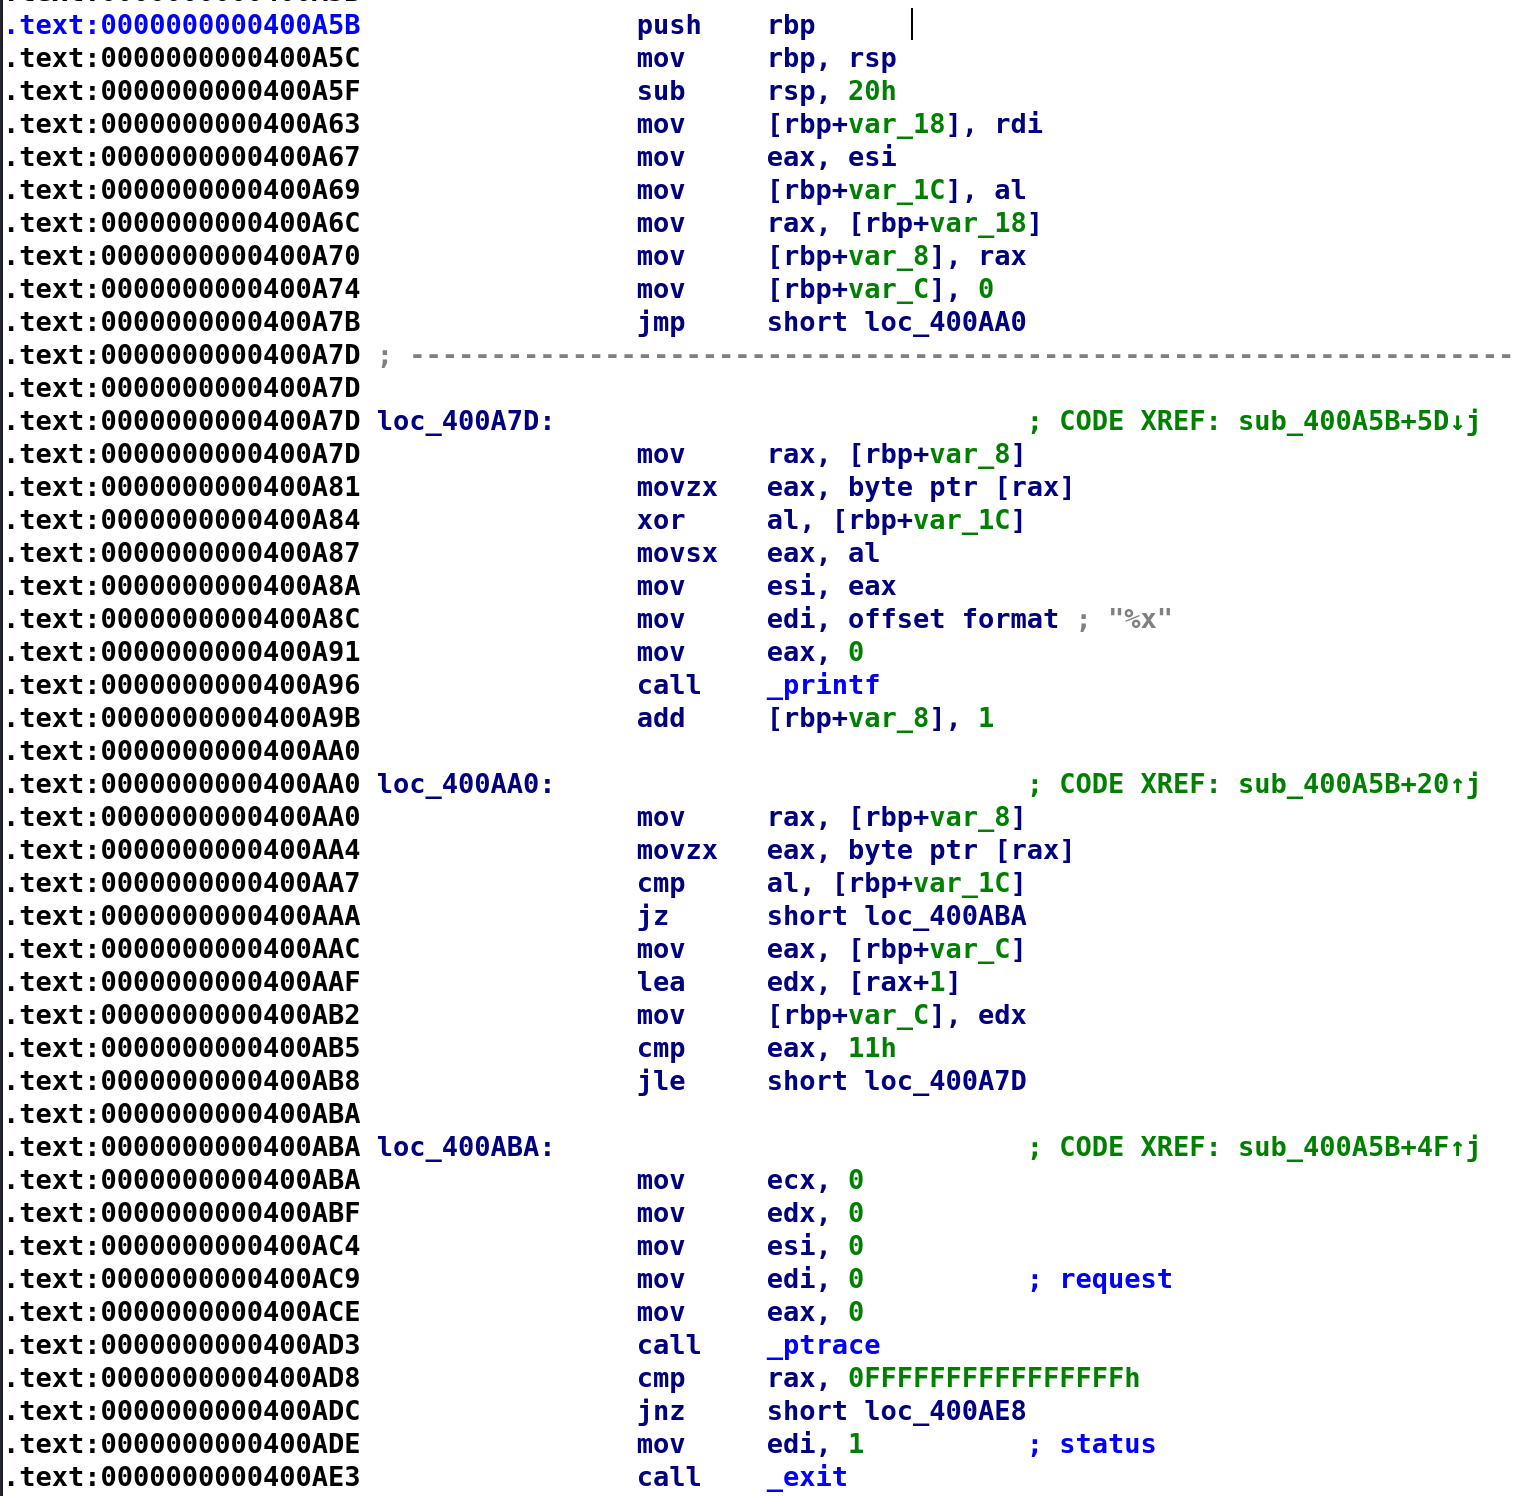
Fortunately, this function is pretty small. There is a little portion of code below this but we will worry about that later. Even more fortunate that this function does not call any other function. So after we analyze this function we should have all the information we need to solve this challenge. Fingers crossed! 🤞
It starts out by setting var_18 and var_1C to the unk_6020E0 variable and our user_input respectively. Let's go ahead an rename them now. It then stores var_18 into var_8. Not entirely sure why at the moment but let's rename var_8 to unk_6020E0_copy. Next, we see it sets var_C to 0 before performing an unconditional jump instruction. You know the deal! var_C is going to be renamed to i. I'll show you the disassembled code with the renamed variables below. I was trying to work through the logic and was confusing myself lol.
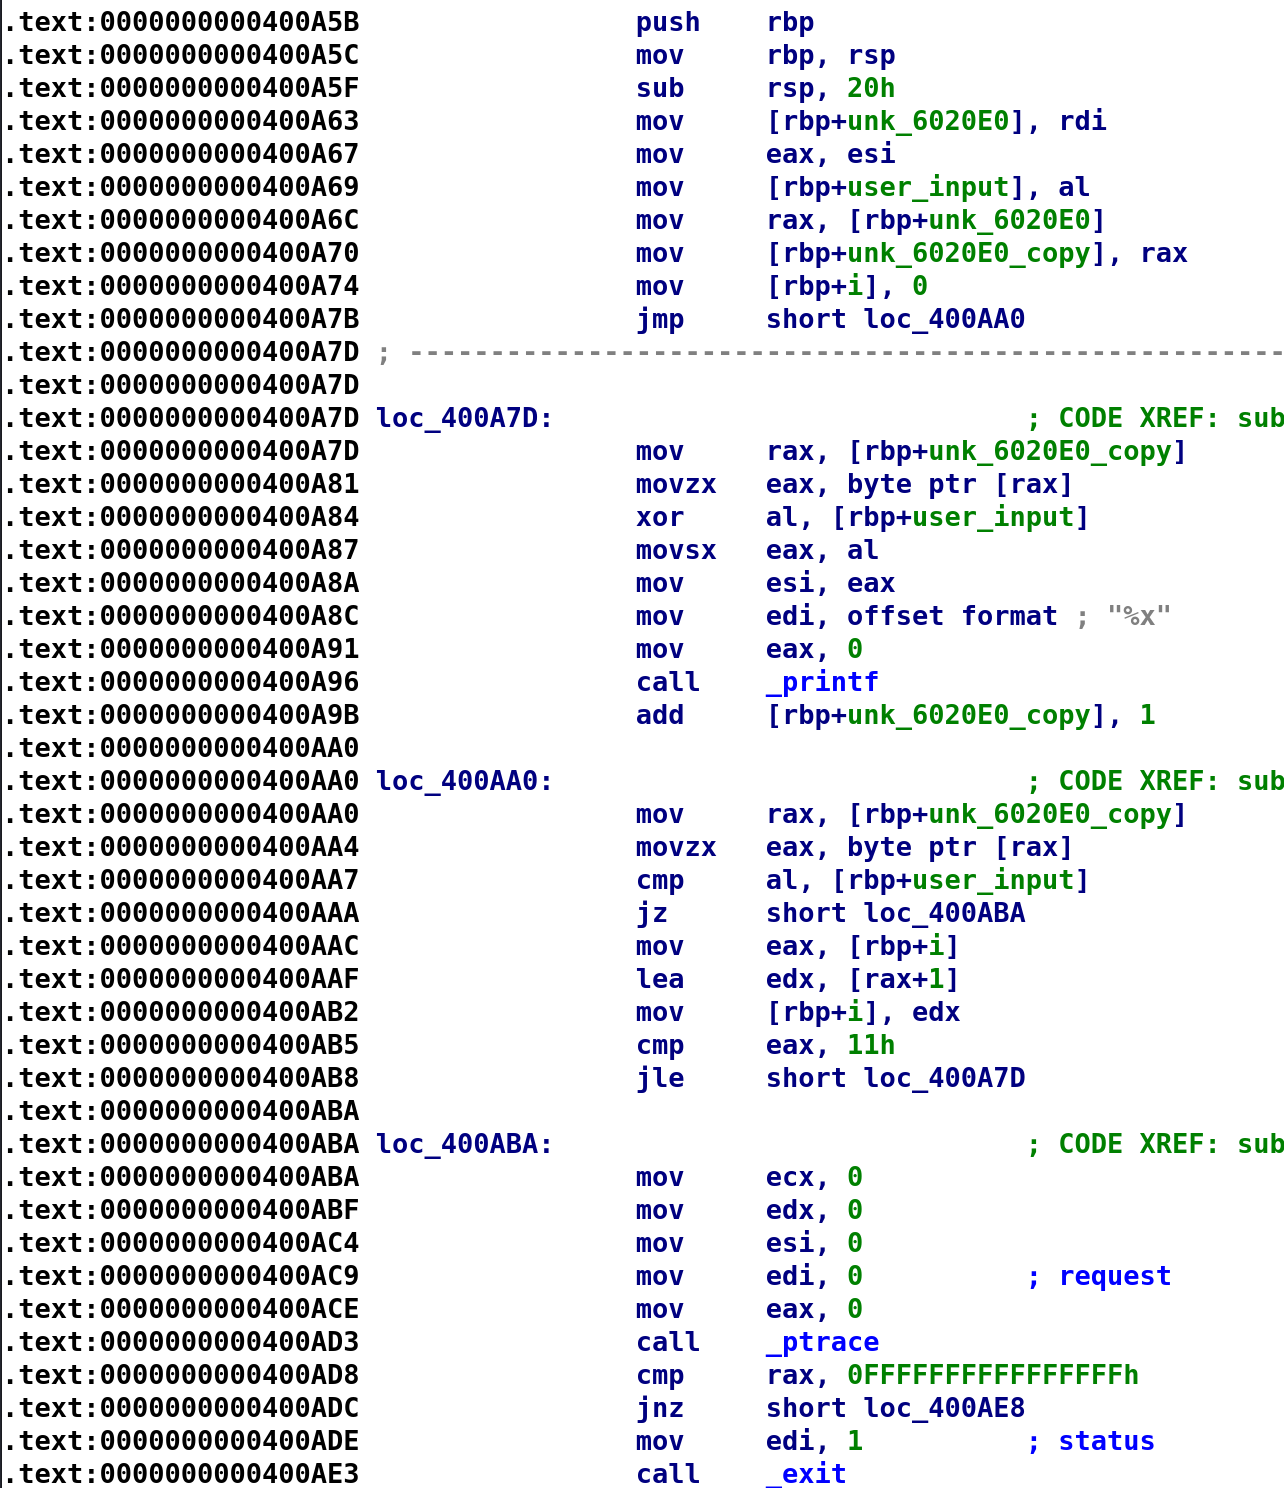
Alright this is much easier to follow. After i is set to 0, it jumps to loc_400AA0. Then, there is a comparison between unk_6020E0_copy and user_input. Now, it isn’t abundantly clear that unk_6020E0_copy is being indexed so I’ll do my best at explaining what’s going on. unk_6020E0_copy is a character array. So, when the instruction movzx eax [rax] executes it grabs a single character from the character array. This happens when you dereference a pointer. I didn’t fully realize this when I originally tackled this challenge. So, *unk_6020E0 will grab a single byte from the array. So, the cmp al, rbp+user_input is essentially comparing a single character from the array to user_input. If they are equal, then we break out of this loop and set some registers to 0 then call ptrace, a debuggers worst friend. In this case, it is actually easy to bypass this debugging trick. Then, i gets compared to 0x11 and if it's great than 0x11 we also break out of the loop. In terms of C code what we have so far is this:
unk_6020E0_copy = unk_6020E0
user_input = user_input
i = 0
while(user_input != unk_6020E0_copy)
{
	if(i > 0x11)
    	break;
    i++
}
There are probably a few ways I could have interpreted the disassembly but I think this is pretty accurate based on what we are seeing. Now, let's take a closer look at the contents of the loop.

The beginning of the loop shows that the binary copies unk_6020E0_copy into the RAX register then copies the value stored there and places it in the EAX register. Then, our user_input is XORed with unk_6020E0_copy[i]. Now, it isn't really unk_6020E0[i] I'm just using this notation to denote that a single character from this array is being XORed with user_input. Next, printf is called with the result of unk_6020E0_copy[i] ^ user_input with the format specifier of %x. Finally, we see 1 is added to unk_6020E0_copy which is essentially indexing unk_6020E0_copy. So we can complete the above C code. I’ve modified it from what I had in the YouTube video as I think this is more accurate.
unk_6020E0_copy = unk_6020E0
user_input = user_input
i = 0
while(user_input != *unk_6020E0_copy[i])
{
	if(i > 0x11)
    	break;
    printf("%x", *unk_6020E0_copy ^ user_input);
    i++
}
So, the characters we saw earlier when we ran the program are hex characters. So, we can take the output of this binary and convert the characters from hex to ascii. Since we don't know what the user input should be, we can brute force it by trying every possible input from 0 - 126 and convert the hex values to ASCII. The following Bash script will do the trick:
#!/bin/bash


FILE=/tmp/secret
if [ ! -f "$FILE" ]; then
        echo "$FILE does not exist. Creating $FILE with deadbeef"
        echo -n -e "\xDE\xAD\xBE\xEF" > /tmp/secret
fi

for i in {1..126}
do
        echo "i " $i
        FLAG_OUT=$(./secret_flag.bin $i | head -1)
        echo $FLAG_OUT
        echo $FLAG_OUT | xxd -r -p
        printf "\n"
done
Run this script and you'll get a lot of output. Obviously! But the most interesting are the following:
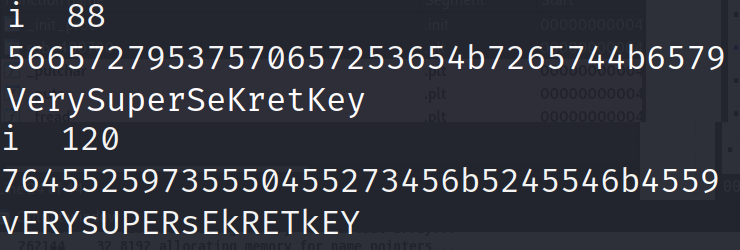
All of the other outputs appear to be just random characters. Unfortunately, we do not have the name of the author in either of these outputs or any other output for that matter. So what gives!? It appears we missed something in our analysis. Let's take another look. Specifically, let's go back to the data section.
Discovering The Secret Function
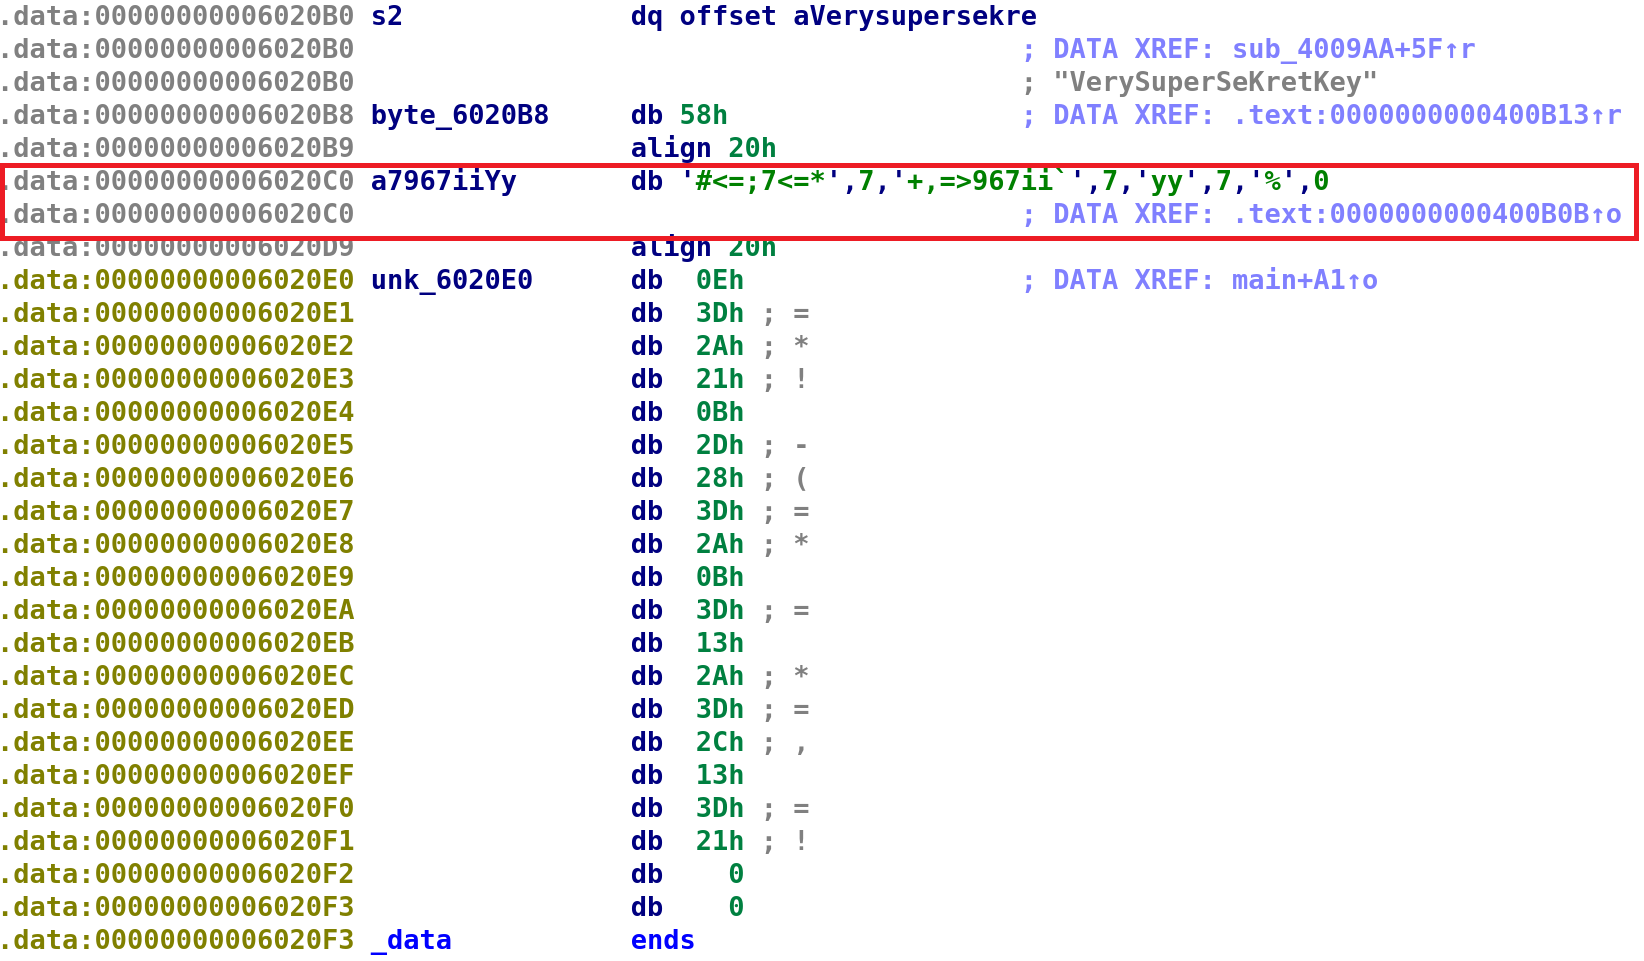
We see some familiar strings, but what's up the string that's highlighted? Specifically, the XREF just points to the .text section. We would expect a cross reference to some function we analyzed but it is pointing to a function that wasn't even called: 0x400B0B. Let's take a look at this secret function. Simply double-click on the address and that'll take you to the function.
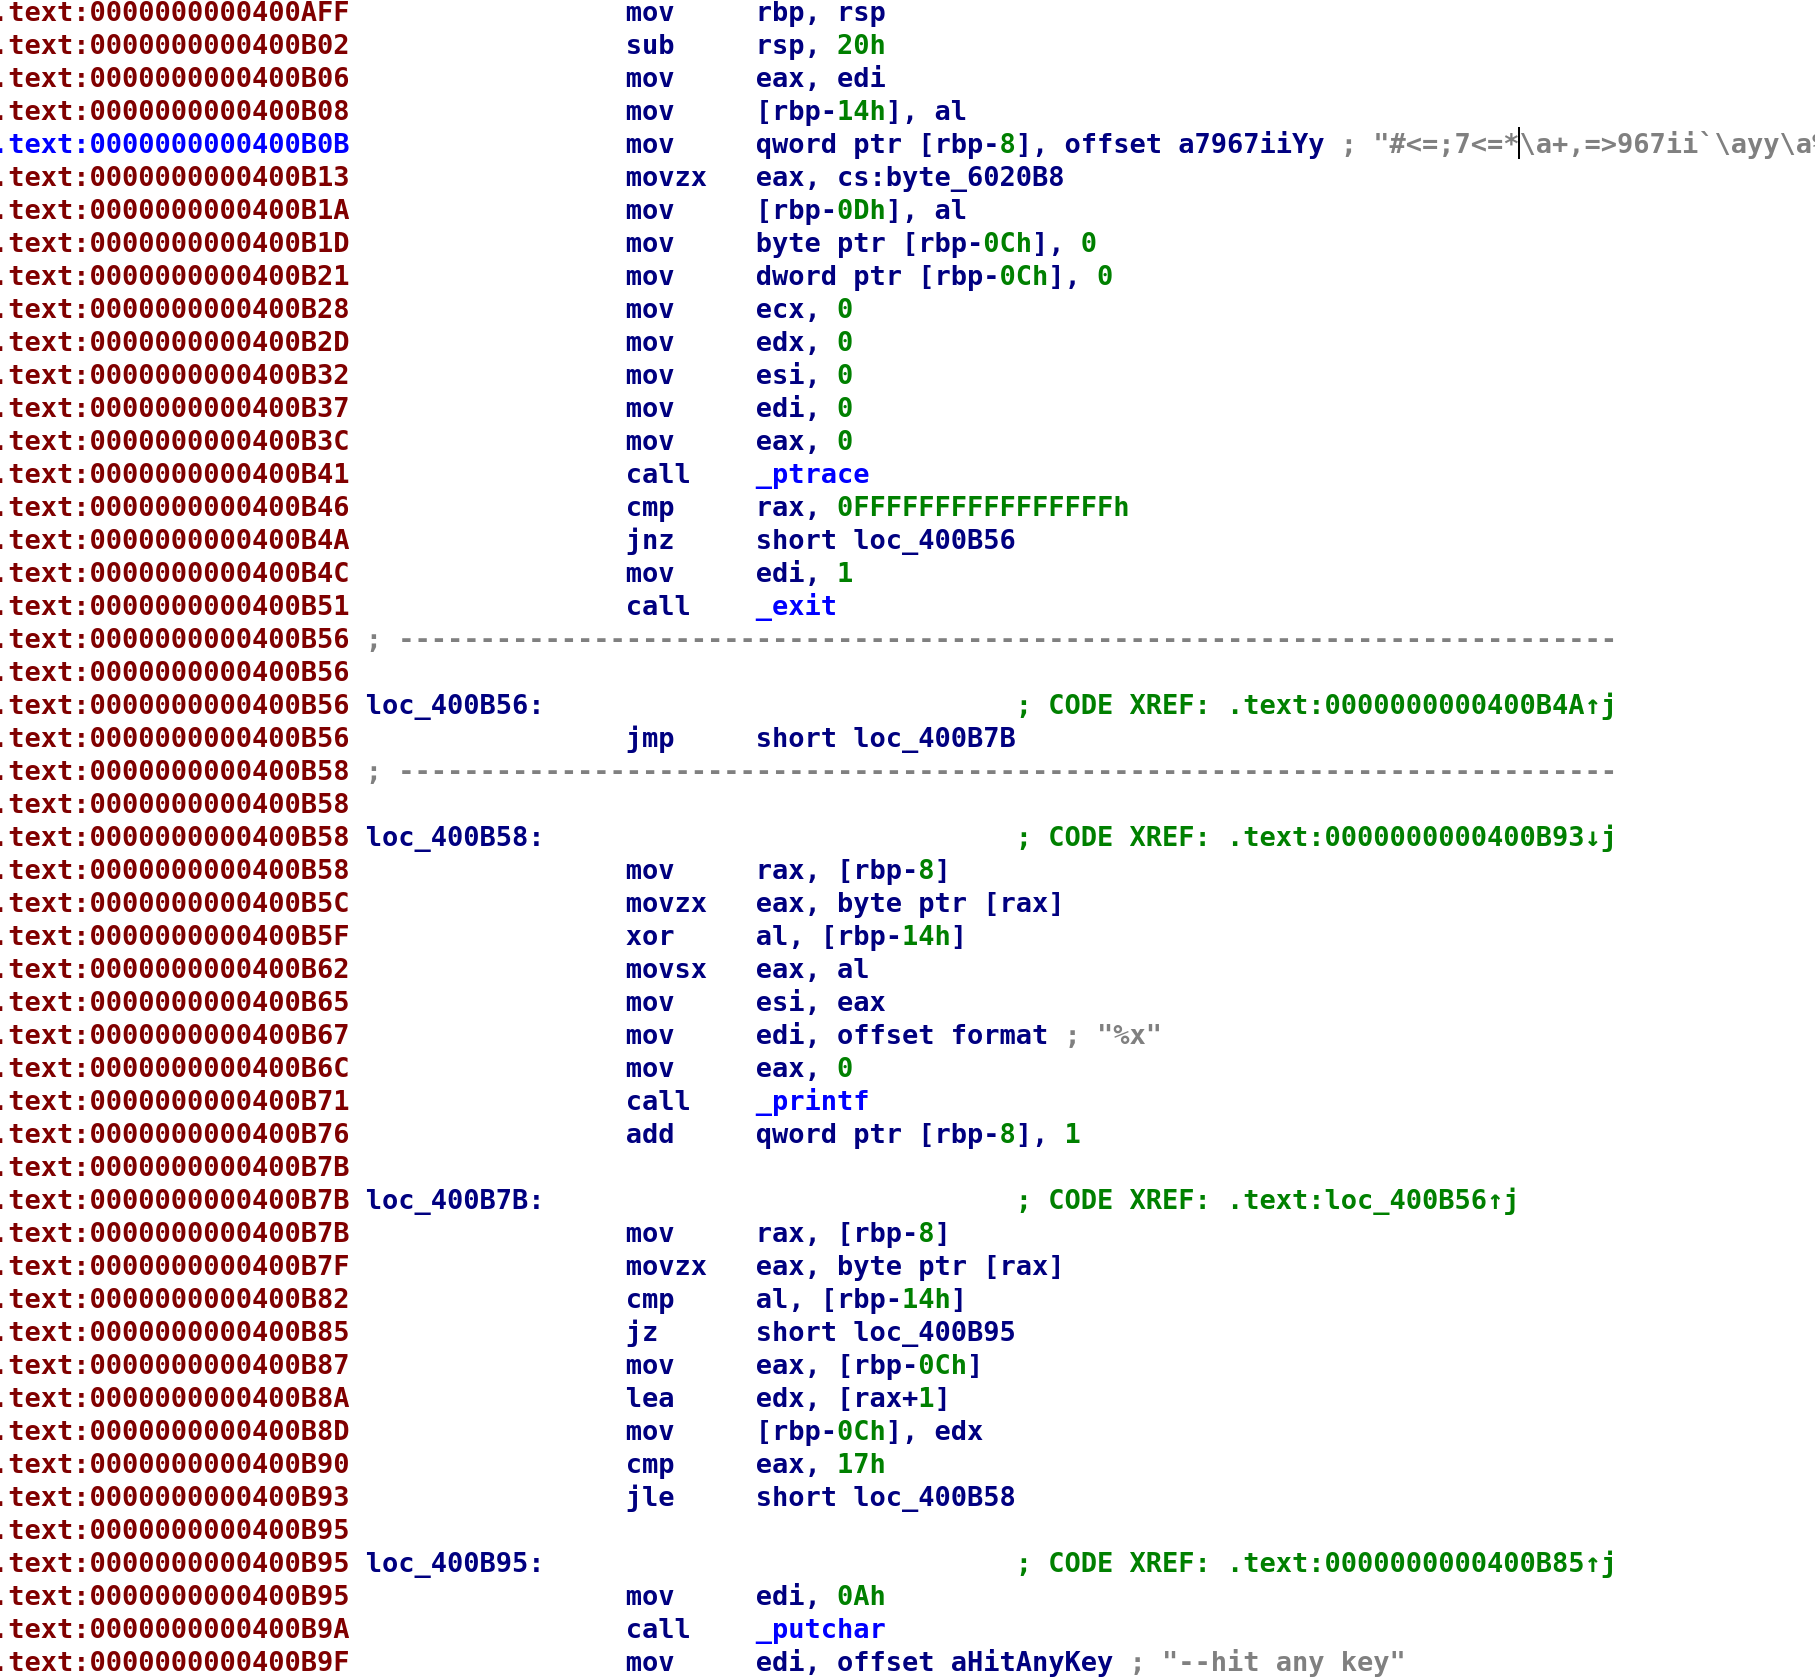
Wait a second, we've seen this before haven't we? Yes, sub_400A5B is almost identical to this function.
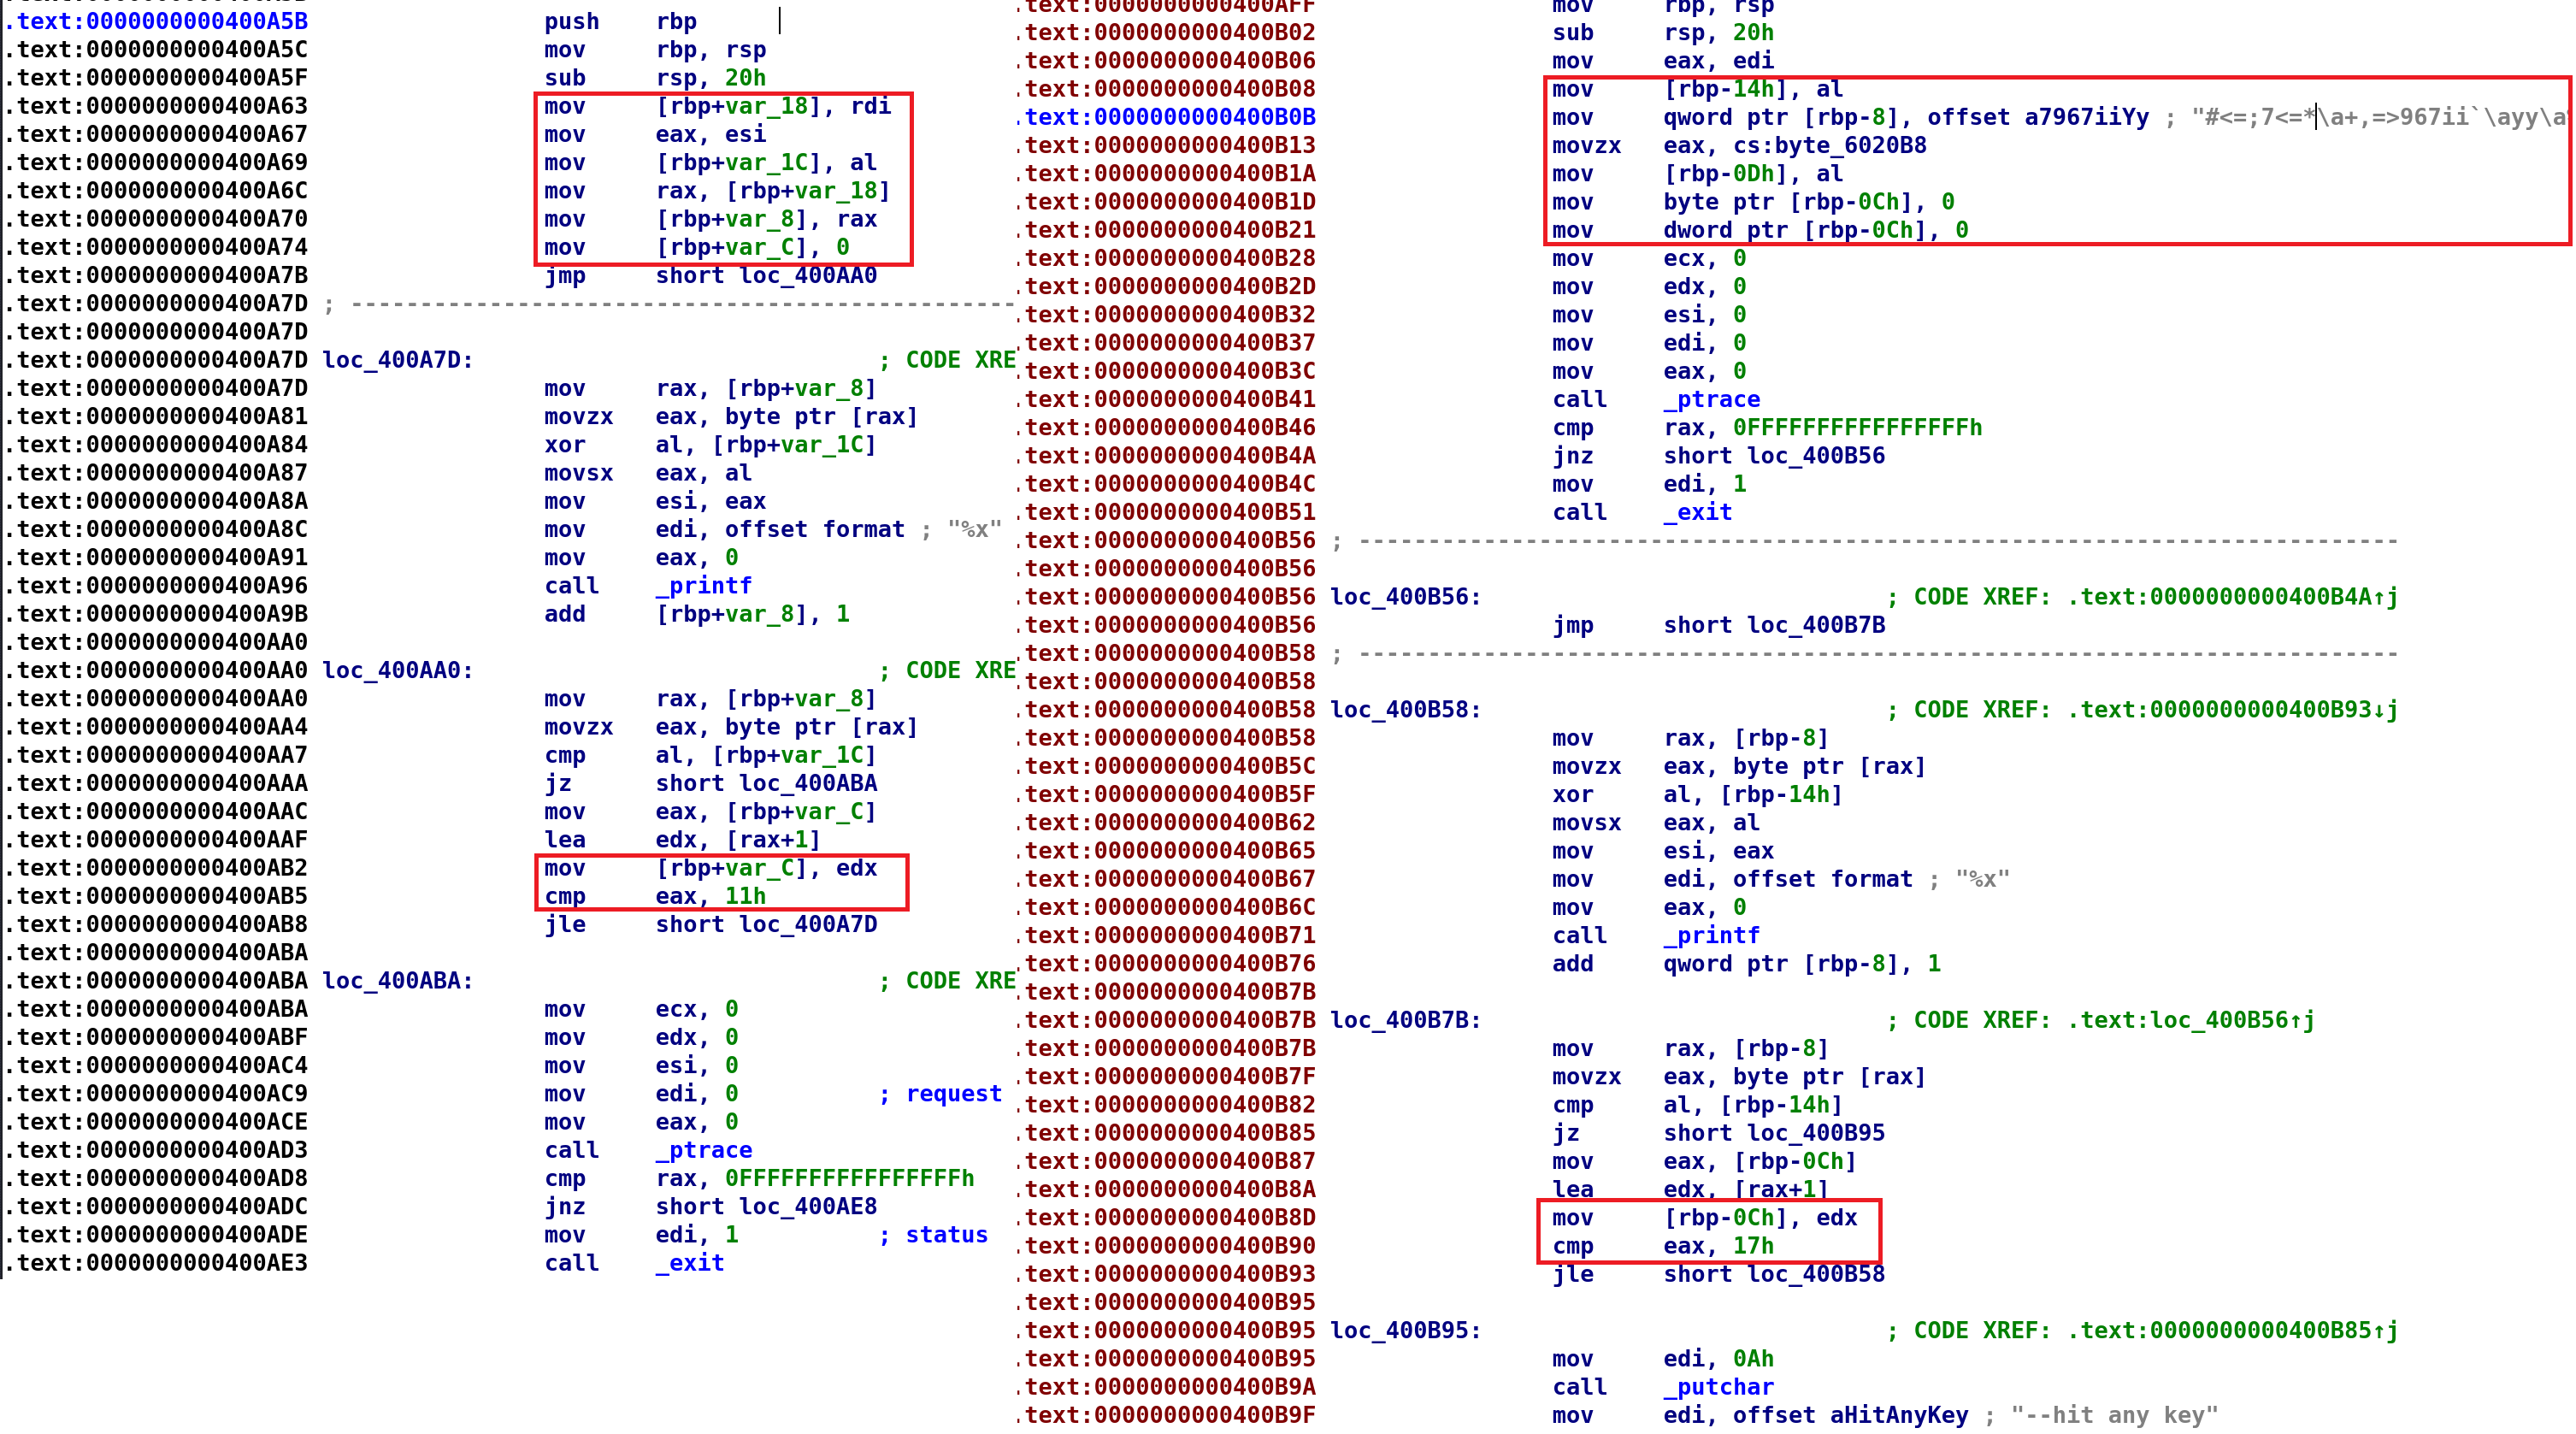
There are a few key differences that I've highlighted in the image above. On the left is sub_400A5B and on the right is the new secret function. For starters, the secret function only takes one parameter. That's evident since only EDI is used at the beginning where parameters are usually retrieved. We can assume this our user_input since the string is loaded locally in this secret function. So, our user_input will be [rbp-0x14]. Furthermore, the mysterious string is stored in [rbp-8]. Unfortunately, IDA will not allow us to rename this variable so we have to remember these values. It then stores a byte in the variable [rbp-0xD]. It turns out this byte is 0x58. We don't need to worry about it since it is never used in the code again. However, 0x58 is 88 in decimal. Recall when we ran the program with our bash script, 88 was one of the inputs that yielded something of interest. Finally, we set [rbp-0xC] to 0. However, it doesn't immediately perform an unconditional jump. Instead, it calls ptrace to detect whether we are debugging the binary! If we aren't debugging, then, we perform the unconditional jump. So, [rbp-0xC] is i. now take a loop at the loop. It's exactly the same as our previous loop with one difference. The variable i is compared to 0x17 instead of 0x11. The binary runs through this loop and eventually it prints the string "--hit any key" and exits. This must be the key to solving this challenge! We have one problem, this function is never called. We have a few options. First, we can call this function manually in a debugger. We will run into an issue with ptrace but as we've talked about before, we can bypass this fairly easily. Alternatively, we can patch the binary so it calls sub_400A5B with this secret string we just discovered. That is, instead of calling the function like this: sub_400A5B(unk_6020E0, user_input), it is called like so: sub_400A5B(offset_6020C0, user_input). Additionally, we also need to modify the comparison so it evaluates the entire secret string. That is change, i <= 0x11 to i <= 0x17. We're going with option B for better or worse! Let's patch this baby!
Patching the Binary with Hexeditor
An important note about patching binaries. In general, you cannot add or remove bytes because this will cause the binary to be malformed. Now, I know there are far easier ways to patch a binary than what I'm going to show you but this manual technique works just fine. First, we need to locate the bytes we want to patch. Remember, we are going to modify the sub_400A5B function call so the secret string is used as a parameter instead. Additionally, we need to update the function so i is compared to 0x17 instead of 0x11. Fortunately, this is simple. Take a look at the MOV instruction we need to modify.

Now, this is the nice and pretty way that IDA presents us. We can view the actual bytes by taking a look at the Hex View.

The highlighted bytes BF E0 20 60 00 are the corresponding bytes to the MOV instruction above. All we need to do, is modify this to BF C0 20 60 00. Making that change will successfully load up the secret string. Luckily, modifying the loop is just as easy. Below I highlighted the instruction we want to modify:
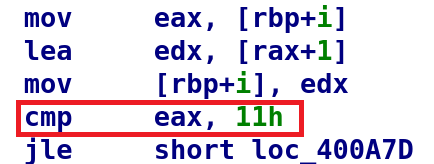
Just like the last time, let's look at the bytes view.

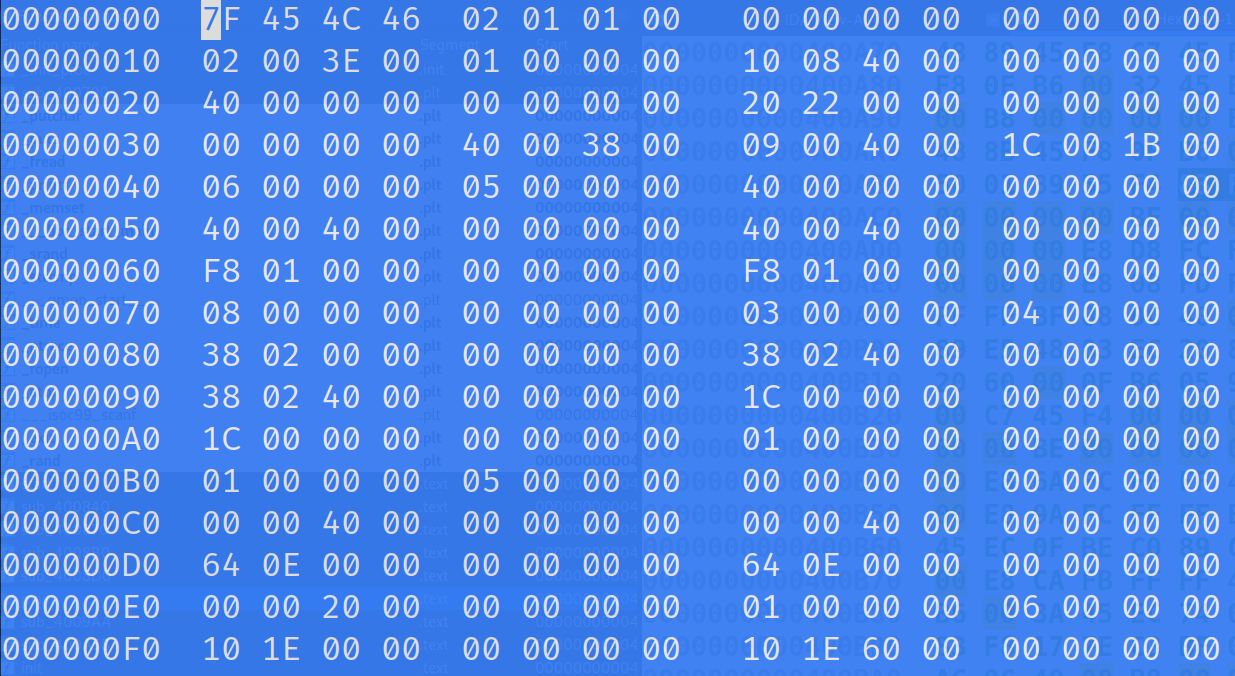
The bytes we want to modify are: 83 F8 11. Just like the MOV instruction this will be a 1-bit change. We want to modify these bytes to 83 F8 17. This will perform a comparison against the entire secret string which appears to be longer than the unknown string we were using before. Now, that we know which bytes we want to modify, let's go ahead and change them! Open the binary in any hex editor. I'm using hexeditor which should be installed on most linux distributions. When you open it you'll notice the address on the left hand side do not map nicely to the address in IDA.
So, we have to search for the bytes we want to modify. In order to really pinpoint the bytes in question let's copy a search for a few bytes before and after the bytes we actually want to modify. If you're using hexeditor you can search with Ctrl+W. There are two different search options to choose from: "Search for text string" and "Search for Hex bytes." We want to choose "Search for Hex bytes."
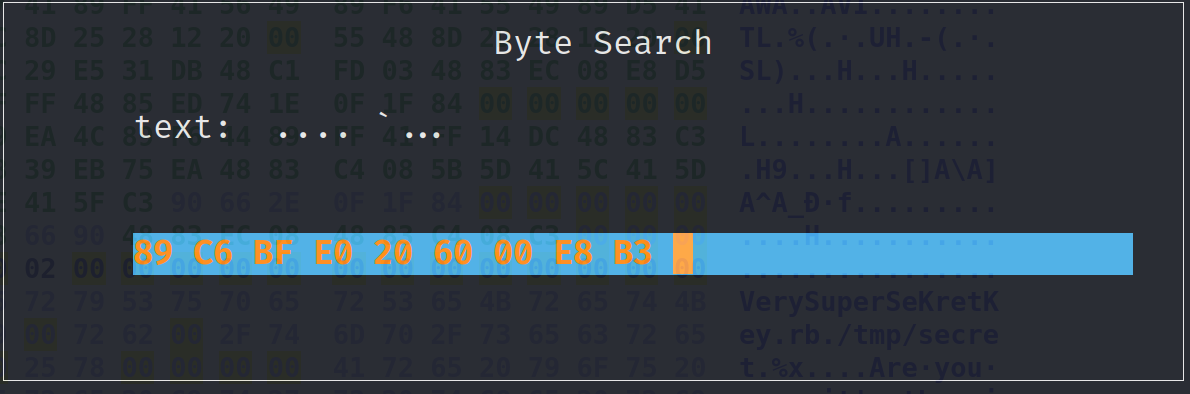
The hex editor is attempting to interpret the bytes as a string in the text section of this search menu. If successful you should see the bytes that we want to modify.

To change the byte, simply scroll over to the E0 bytes and type a C. You'll see the color change from white to a light blue. It should look like this.

Now, do the same for the compare bytes. First search for the bytes:
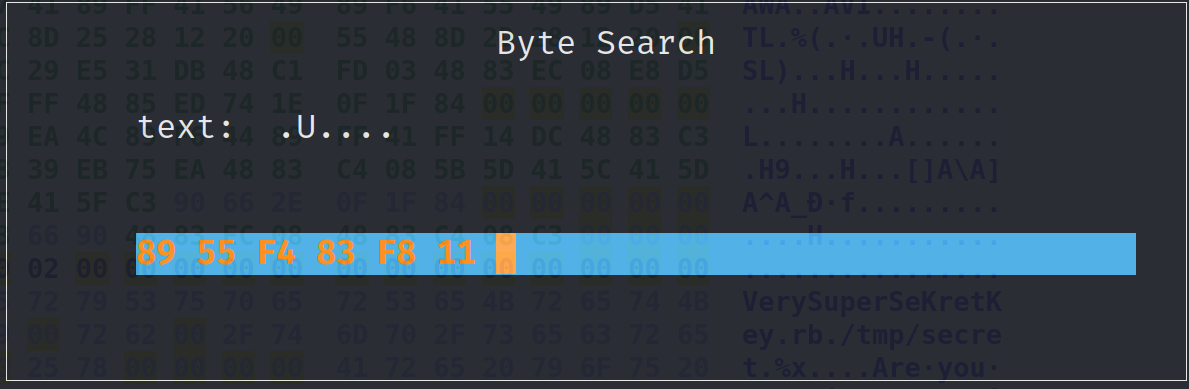
Then modify 11 to 17.

Alright, those are all the changes we need to make. Go ahead and save with Ctrl+X. It's going to ask you to give it a name. I like to ensure that the original binary is still available so let's name this secret_flag.bin.mod. Now, let's make it executable with chmod +x secret_flag.bin.mod. Now, we can try every possible character again but we already know that there are two inputs that give us something other than unintelligible text: 88 and 121. So, let's try our modified binary with these values first!

Oh. My. Goodness!!! We did it!!! If you're still here give yourself a pat on the back this was a LONG journey and I thank you for coming along for the ride!
Conclusion
Alright we wrapped up yet another challenge. I hope you enjoyed reading and learned something new! If you have any questions please do not hesitate to hit me on Twitter, Instagram, or Discord: jaybailey216#6540. If you have a challenge you want me to try next, let me know and I'd be happy to give it a shot. I'll see you all next time!
Peace out! ✌🏾